

IB1C71 - 08/11
7
NOTE
: to step back, use the key. If pressed for >2 sec, programming
will be exited, saving those operations confirmed up to that moment.
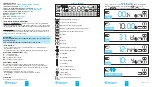
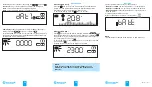
Press key to enter programming menu.
Selecting the day(s) to be programmed
Starting with day 1 (Monday) blinking, move down each day in turn by
using the key.
During this process select using the key those day(s) required to
have the same time/temperature profile. (Day(s) so selected will now
appear on a black background).
With the days selected, successively press the key until the time/
temperature profile starts to blink. Then press to advance to the
profile programming stage.
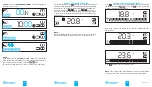
Programming the 24 hour time/temperature profile
With the zero hour segment of the profile blinking, select the desired
temperature level using the keys.
Pressing the key confirms the setting and at the same time
programming advances to the next hour. This procedure is repeated
for setting the desired temperature level for each of the 24 hourly
segments.
0 1 2 3 4 5 6 7 8 9 10 11 12 13 14 15 16 17 18 19 20 21 22 23
OK
0 1 2 3 4 5 6 7 8 9 10 11 12 13 14 15 16 17 18 19 20 21 22 23
1
2
3
4
5
6
7
OK
3
5
0 1 2 3 4 5 6 7 8 9 10 11 12 13 14 15 16 17 18 19 20 21 22 23
1
2
4
6
7
OK
OK
PROGRAMMING
PRG
OK
OK
1
2
3
4
5
6
7
9
8
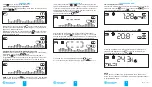
Following confirmation, a digital countdown plus a circular motion
graphic will be displayed. Touch to view the set temperature.
To exit from the program, press the key .
NOTE
A time period of < 100hours is programmed in hours and minutes.
A time period of 100hrs to a maximum of 9999 hours (9999=416days)
is programmed in hours.
Continue by setting the temperature and confirm with .
Time -Temperature function
This function will maintain a single specific temperature over a specific
time period. Press the key for 2 sec, then use the keys to
select the required time period and to confirm.
1:28
OK
20:8
OK
°C
24 3h
VACATION PROGRAM
T
OK
OK
To exit and cancel Party programming hold the key down.
To cancel the Party function while running, press the key once.
After setting the temperature level for the final hour that requires
modification, do not press . Simply touch no key for > 3 seconds
and the Party profile will be accepted and will run – as shown by the
display of a rectangle with clockwise movement of the segments.
(From main screen) Press or to enter into the party function.
This allows the temperature level assigned to each hour to be modified
for just the following 24hour period. These levels will not be saved or
apply beyond the 24 hour period. Starting from the current hour, set
the temperature level using the key.
Pass to the next hour by the key.
0 1 2 3 4 5 6 7 8 9 10 11 12 13 14 15 16 17 18 19 20 21 22 23
OK
-- --
0 1 2 3 4 5 6 7 8 9 10 11 12 13 14 15 16 17 18 19 20 21 22 23
OK
OK
PARTY FUNCTION
T
OK


