Final Sound F1000i Скачать руководство пользователя страница 14

Contents Copyright 2006 Final Sound Solutions.

14

9. CONNECTING THE FINAL SOUND HOME THEATRE SYSTEM

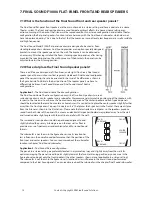
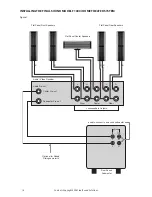
For the wiring scheme of the complete Final Sound Model F1000i Home Theatre System please have a look at figure 
1 at page 16. The wiring scheme of the Final Sound Model F1000i Stereo system is represented in figure 2 at page 17. 

There are 4 different types of connections shown in this figure to get the best performance and functionality from 
your Home Theater System.

Interlinks: these audio signal cables have RCA-type pin leads on both sides, which fit on the pre-output plugs on 
your amplifier and the subwoofer line-input plugs. These cables are not included in the Final Sound Model F1000i 
Home Theatre System package. These cables are commercially available at your dealer in variable lengths and
qualities.

Loudspeaker cable (marked B in figure 1): these cables fit on the loudspeaker outputs of your amplifier. You can 
connect them with the high power-input on the Final Sound subwoofer. Normally these wires are equipped with
so-called spades. These cables are commercially available at your dealer in variable lengths and qualities. 

Please read your manual or contact your dealer if you are not sure to get the optimal sound from your system. 

Loudspeaker cable (marked C in figure 2): these cables fit on the loudspeaker outputs of your Audio/Video
receiver or amplifier. These cables, which can be equal to cable B (see above), are used to connect the Model F1000i 
flat-panel speakers to the Audio/Video receiver or amplifier. Please be absolutely sure you connect the red (+)
terminal of the flat-panel speaker to the corresponding red (+) terminal of the Audio/Video receiver and the black (-) 
terminal of the flat-panel speaker to the corresponding black (-) terminal of the Audio/Video receiver! These speaker 
cables are available at your dealer in variable lengths and quality. 

12 VDC power supply cords: these are necessary to connect the Model F1000i flat-panel speakers to the mains.
All the flat-panel speakers can only function well if they are connected to the mains. The 12 VDC power supply cords 
are not shown in figure 1 and 2. 

Before connecting the flat-panel speakers, all sound system equipment should be disconnected from the power 
supply until you have gone through all steps below. This will avoid the risk of damage to your system while
connections are made or broken.

Step 1

Make sure before starting that all sound equipment is disconnected from the mains. After doing so, please continue 
with the install procedure. 


First make the connections from the center channel loudspeaker output of your Audio/Video receiver or multi
channel amplifier to the Final Sound Model F1000i flat-panel center speaker. Make sure that the red (+) terminal of 
the speaker is connected to the red terminal (+) of the Audio/Video receiver and the black (-) terminal of the speaker 
is connected to the black terminal  (-) of the Audio/Video receiver (see figure 1).

Make the connection from the Front channel loudspeaker output of your Audio/Video receiver or multi channel 
amplifier to the Final Sound Model F1000i flat-panel front speakers. Make sure that the + and - are properly
connected (see figure 1). 

Make the connection from the Rear channel loudspeaker output of your Audio/Video receiver or multi channel am-
plifier to the Final Sound Model F1000i flat-panel rear speakers. Make sure that the + and - are properly connected 
(see figure 1). 

Step 2

Check all connections of the Final Sound loudspeakers properly before connecting the flat-panel speakers to the 
mains. Each flat-panel speaker (e.g. the center, front and rear speakers) has to be connected to the mains. The
electronics in the flat-panel speakers are designed to stay powered permanently. Figure 1 on page 16 shows the 
connection scheme of a complete Final Sound Home Theatre configuration. 

Содержание F1000i

Страница 1: ...Model F1000i Stereo and Home Theatre Systems User manual 01 05 2006 Contents Copyright 2006 Final Sound Solutions...

Страница 2: ...he cart stand tripod bracket or table specified by the manufacturer or sold with the apparatus When a cart is used use caution when moving the cart apparatus combination to avoid injury from tip over...

Страница 3: ...is a left and a right speaker channel In a Home Theatre configuration however there are 2 front channels 2 rear channels 1 center channel and a subwoofer low frequency channel The Model F1000i flat pa...

Страница 4: ...What is the function of the Final Sound front and rear speaker panels 7 2 Where do I place the Final Sound speaker panels 7 3 How do I install the Final Sound speaker panels safely 7 4 How to clean a...

Страница 5: ...cts and to change the prices or specifications of any product without notice or obligation to any person Exclusions Any implied warranties relating to the above product shall be limited to the duratio...

Страница 6: ...nniversary of the date of purchase During the first ninety 90 days following the date of purchase by the original purchaser the Final Sound Limited Ninety Day Warranty supersedes this Warranty Exclusi...

Страница 7: ...provide specially designed brackets to mount the speaker panels on the wall The brackets can be obtained as an accessory The Model F1000i Home Theatre flat panel speaker packaging contains 1 Model F4...

Страница 8: ...led with the F400i WMCP code The flat panel center speaker has to be mounted on the wall by means of the special mount included in the package or placed on an optional Final Sound stand The bracket co...

Страница 9: ...hunderstorms The center speaker is equipped with speaker terminals which are suited for spades or common loudspeaker wires The red speaker terminal has to be connected to the red terminal on the Audio...

Страница 10: ...Sound Home Theatre configuration consists of two front speakers two rear surround speakers a center speaker and a subwoofer We recommend a symmetric positioning of the speakers with respect to the scr...

Страница 11: ...to the mains otherwise they won t function The flat panel speakers are designed to stay on the mains permanently however it is better to disconnect them during thunderstorms The front and rear flat p...

Страница 12: ...tify your authorized Final Sound dealer immediately For further details please look at the manual supplied with the subwoofer 8 3 How do I perform a safe installation IMPORTANT Before connecting the s...

Страница 13: ...s The exceptions are the connection between pre out front and line input of the subwoofer This connection will make sure you can use the crossover on the Final Sound subwoofer up to 250 Hz Please read...

Страница 14: ...are available at your dealer in variable lengths and quality 12 VDC power supply cords these are necessary to connect the Model F1000i flat panel speakers to the mains All the flat panel speakers can...

Страница 15: ...timal channel settings differs with the brands of the Audio Video receivers and therefore we recommend reading the Audio Video receiver manual or contact your dealer how to get the best settings in or...

Страница 16: ...Audio Pre out Center Pre out Subwoofer Pre out Front Center Rear L R L R Loudspeakers Outputs used to connect to a second subwoofer Line In Out L R L R Optional for Added Dialogue warmth Audio Video R...

Страница 17: ...006 Final Sound Solutions 17 INSTALLING THE FINAL SOUND MODEL F1000i HOME THEATER SYSTEM Figure 2 L R Loudspeaker out L R L R Center LFE High Level in Amplifier Stereo Final Sound Subwoofer C C Flat P...

Страница 18: ...plied This entirely symmetrical drive of the diaphragm is the basic principle of an extremely low distortion rate In order to maintain this symmetry we have chosen a level non curved construction Reso...

Страница 19: ...ound electrostatic loudspeaker is not covered because that would be detrimental to the sound Come to that a little dust is not a problem since the stators can easily be cleaned with a vacuum cleaner T...

Страница 20: ...during stormy weather What is to be done if puncturing knocking over or come in contact with fluids and fire damages the Final Sound speakers Unplug your Final Sound loudspeakers and contact your Fin...

Страница 21: ...nd replace components Not only does this restrict maintenance costs it also offers you the opportunity to modify your loudspeakers to keep them thoroughly up to date Your Final Sound dealer can carry...

Страница 22: ...rranty registration the serial numbers of all units you have bought Numbers appear on labels at the back of the product 1 Final Sound Center Speaker __________________________________ 1 set Final Soun...

Страница 23: ...Contents Copyright 2006 Final Sound Solutions 23...

Страница 24: ...Contents Copyright 2006 Final Sound Solutions Final Sound Solutions B V Eisenhowerweg 8D 5466AC Veghel The Netherlands www finalsound com...

Отзывы: