background image

Page 4 


DETAIL A 

Step 4 

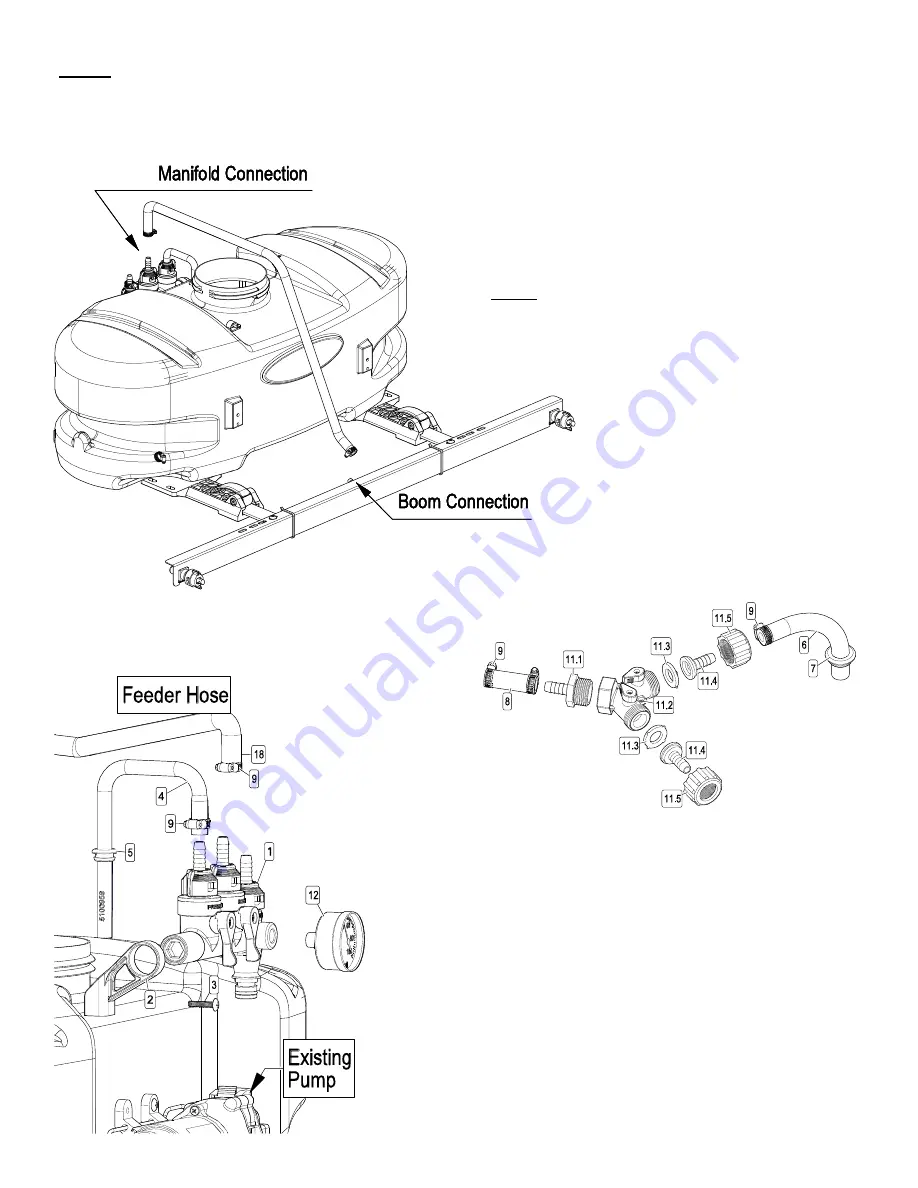
After your nozzle harness is attached to the boom, lo-

cate  the  43”  hose  and  the  (2)  hose  clamps  from  the 

parts bag. 


Place  the  hose  clamps  over  each  end  of  the  hose 

loosely. Slip the ends of the hose over the hose barbs 

on both the manifold and the poly tee fitting on the  

nozzle harness. Use a twisting motion, if necessary, to 

get  the  hose  fully  onto  each  barb.  Bring  the  hose 

clamps to the connection point and tighten securely. 


NOTE: 

Make sure this boom feeder hose does not end up on 

the  ‘outside’  of  your  spray  wand  hose,  otherwise  un-

wrapping  the  spray  wand  hose  from  around  the  tank 

may be difficult. 

An additional set of plumbing fittings may be included with your 

boom kit. These may or may not be used.  


DETAIL A: shows the configuration of these fittings as they will 

attach to your sprayer when hooking up to a 1.0 gpm pump. 


For the ‘old style’ tank, where the pump mounts on top, a hole 

must be drilled through the top of the tank for the bypass return 

hose. After threading the fittings together, locate the place on 

your tank for the place on your tank for the hole, so that the 

hose can be inserted without causing kinks.


If your sprayer has the manifold assembly off the outlet side of 

your pump (DETAIL B), you probably will not need to utilize 

these fittings.


Assembly Procedure (ATVBK-200-QR) 

DETAIL B 

Содержание ATVBK-200-QR

Страница 1: ...RETURNING THIS PRODUCT FOR ANY REASON PLEASE CALL 1 800 831 0027 MONDAY FRIDAY 8 00 AM TO 5 00 PM CST If you should have a question or experience a problem with your Fimco Industries Product Visit our website www fimcoindustries com or call the Toll free number above Our technical support representatives will be happy to help you In most cases a customer service rep can resolve the problem over th...

Страница 2: ...Page 2 Contents of your sprayer s carton ATVBK 200 QR 2 Nozzle Boom QJ 5278237 Contents of Bracket Kit 5278140 Manifold Detail 5281538 See Page 6 for Parts List Contents of Parts Bag 5278223 ...

Страница 3: ... with the pump assembly at the operator s back and the spray wand will be at the rear of the unit Right Hand RH and Left Hand LH sides of the sprayer are determined as if you are standing behind the sprayer looking at it facing forward Start the assembly procedure by turning the tank up side down on a stable flat surface A phillips head screwdriver is required for this step Mount tank brackets to ...

Страница 4: ...ng the spray wand hose from around the tank may be difficult An additional set of plumbing fittings may be included with your boom kit These may or may not be used DETAIL A shows the configuration of these fittings as they will attach to your sprayer when hooking up to a 1 0 gpm pump For the old style tank where the pump mounts on top a hole must be drilled through the top of the tank for the bypa...

Страница 5: ... pressure switch that is pre set at the factory to shut the pump off when all discharges are closed The pump will turn back on when one of the following actions occurs Boom valve is opened to broadcast spray with the boom Bypass valve is opened to re circulate solution back into the tank When spraying with either the boom pressure may be reduced by slowly opening the bypass valve until desired pre...

Страница 6: ...Sprayer When sprayer is not in use release Cam Lock Handles This is to prevent deforming of Cam Lock Mechanism Do not use QR bracket Cams to hold and store boom in vertical position Winter Storage Prepare the sprayer for end of season storage by running RV antifreeze through the system This will keep internal parts lubricated protect against corrosion and keep the unit from freezing Note RV antifr...

Страница 7: ...he minimum overlap required to obtain uniform distribution with 120 tips and 40 spacing Suggested Minimum Spray Height 18 20 above what is being sprayed to plant not ground Optimum Spray Height 39 Wide angle spray nozzle height is influenced by nozzle orien tation The critical factor is to achieve a minimum 30 over lap Nozzle Detail ...

Страница 8: ...mited Warranty you must 1 provide written notice to Fimco Ind of the defect during the Warranty Period and within thirty 30 days after the defect becomes apparent or the repair becomes necessary at the following address Fimco Ind 1000 Fimco Lane North Sioux City SD 57049 and 2 make the Equipment available to Fimco Ind or an authorized dealer within a reasonable period of time For more information ...

Отзывы: