


-
Do not attach to surfaces that are damp freshly painted or otherwise electrically
conductive
e g metallic surfaces
,
( . .
) .
-
IMPORTANT
Always switch off the electricity supply at the mains during installation
and maintenance We recommend that the fuse is withdrawn or circuit breaker switched
off at the distribution board whilst work is in progress turning off the light switch is not
sufficient
.
.
(
).
Electrical installation
-
This product must be installed by a competent preson If in doubt consult a qualified
electrician
.
,
.
-
The mains cables
Live
Neutral
of the shower cabin must be connected to the
junction box
("
"&"
")
.
-
Do not spary water directly to the fan
.
-
Live supply to the terminal marked L brown wire
Neutral supply to the terminal marked
N blue wire
Ensure connections are tight
(
) ;
(
) .
."
-
WARNING
:
Only allow children to use appliance without supervision when adequate instructions
Have been given so that the child is able to use the appliance in a safe way and
understands the hazards of improoper use
.
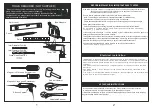
TOOLS REQUIRED
(
NOT SUPPLIED
)
3
mm Diameter Drill Bit
Power Drill
Tape Measure
Pencil
Adjustable Spanner
Rubber Hammer
Spirit Level
-
W hen you
'
re ready to start
,
make sure that you have the following tools to hand
,
plenty of space and a clean dry area for assembly
Two people are needed
.
Please note
:
although these instructions are
comprehensive
,
we always recommend that a technically competent installer
should undertake installation
.
Ruler
Scissors
Cross
-
Head Driver Bit
Silicone Sealant
Magnetic Cross
-
head Screwdriver
8
mm Diameter Drill Bit
-
Ensure that the enclosure is fitted to a level floor and vertical wall surface
.
Note
:
The wall fixings included with this product are suitable for solid walls only
.
-
If the supply cord is damaged
,
it must be replaced by the manufacturer or its service agent or a
similarly qualified person in order to avoid a hazard
.
-
This appliance is not intend for use by persons
(
including children
)
with reduced physical
,
sensory o
r
mental capabilities
,
or lack of experience and knowledge
,
unless they have been given supervision or
instruction concerning use of the appliance by a person responsible for their safety
.
Children should be supervised to ensure that they do not play with the appliance
.
-
Soap and water will be adequate to clean the glass
,
Glass cleaner can be used if required
.
-
In hard water districts
,
insoluble lime salts may be deposited on the glass
.
If this deposit is allowed to build up
,
it becomes increasingly difficult to remove and looks unsightly
.
Regular cleaning will minimise this effect
.
-
Plasterboard or stud walls may require specialist fixings
(
not supplied
).
-
Please handle all glasses with care
,
avoid knocks and shock loading to all sides and edges
.
Safety glass cannot be reworked
.
-
Care should be taken when drilling into walls to avoid hidden pipes or electrical cables
.
AFTERCARE INSTRUCTIONS
BEFORE INSTALLATION
&
IMPORTANT SAFETY NOTES
Magnetic Slot head Screwdriver
1
2
Содержание K-1607A
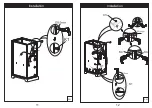
Страница 4: ...5 6 C1 B3 C2 C2 K2 Installation Installation...
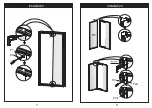
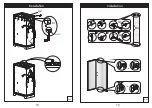
Страница 5: ...7 8 5 5 F1 K3 B5 K3 F2a F2b Installation Installation...
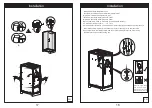
Страница 6: ...9 10 LH LH K1 H3 Installation Installation RH...
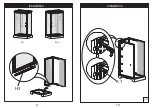
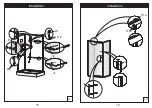
Страница 7: ...11 12 K1 K1 K1 K4 K4 C3 Installation Installation LH LH...
Страница 8: ...13 14 K1 A2 G1 G2 B4 Installation Installation LH LH...
Страница 9: ...15 16 E D2 D2 D1 J2 J1 H1a H1b H2 I Installation Installation LH LH...
Страница 11: ...19 20 8mm L1 L2a L2b L2c Installation Installation LH LH...