background image

www.fieldpiece.com  www.fieldpiece.com  www.fieldpiece.com  www.fieldpiece.com  www.fieldpiece.com  www.fieldpiece.com  www.fieldpiece.com  www.fieldpiece.com  www.fieldpiece.com  www.fieldpiece.com  www.fieldpiece.com  

6 0

6 1

Setup Switch Position

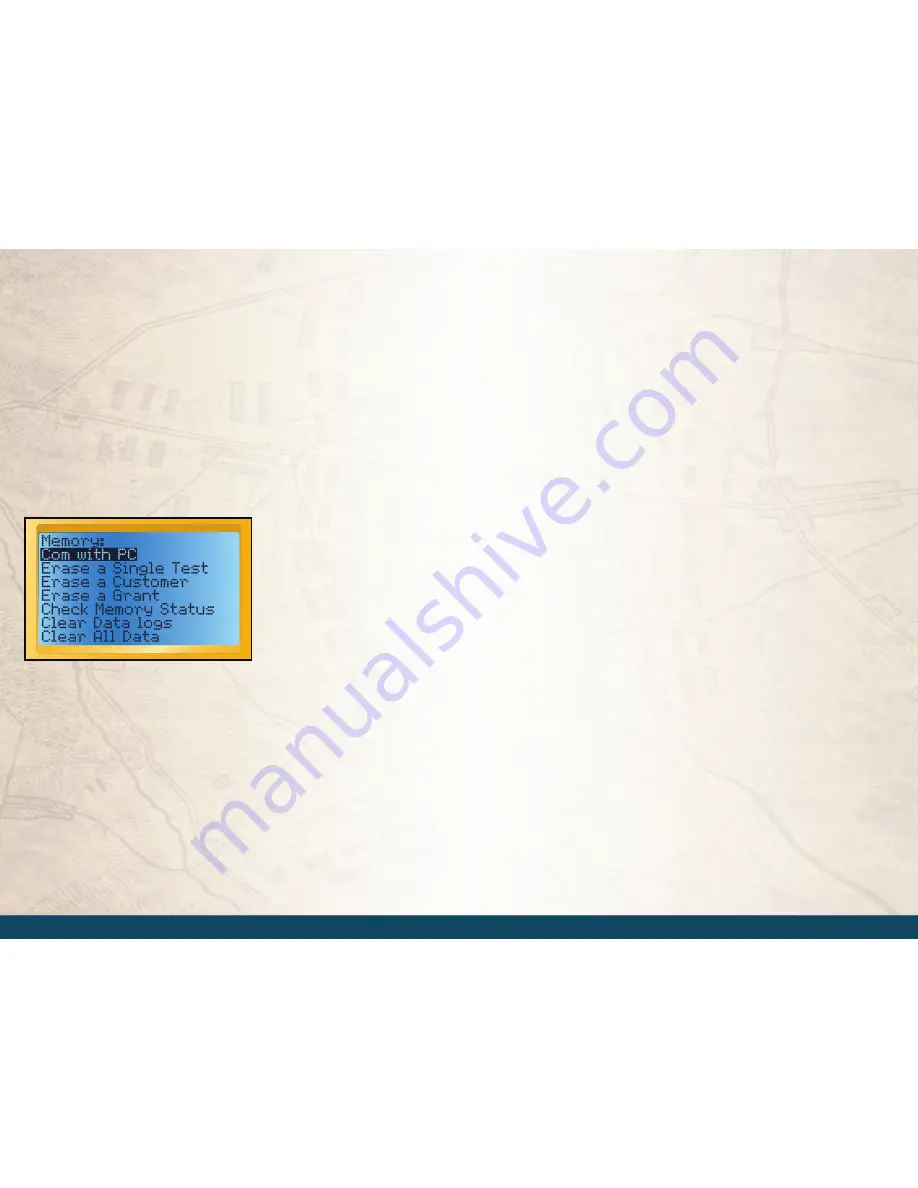
Com with PC

Highlight Com with PC and press enter to upload and download tests to 

and from a PC.  See HVAC Guide Software Manual for detailed information.

Memory Management

From the Setup Switch Position you can delete a single test, entire cus-

tomer file, Grant info, data logs or all data. You can also check how much 

memory is left using the Check Memory Status.  

Setup switch position display.

Power Savings

Sleep Mode 

 Set the HG3 to go into sleep mode after a desired amount of 

time. Sleep mode turns off the display while leaving all other functions 

running to save battery life. Press any button to come out of Sleep mode.  

Default for sleep mode is 15 Minutes.

Auto Power Off  

Turn on Auto Power Off to save battery life.  This is 

useful if the HG3 gets accidently left on. Auto power off is automatically 

disabled during data logging tests. You can set the time for Auto Power 

Off.  Default for Auto Power off is 30 minutes.  

Version (about)

You can check the version of your Firmware by highlighting 

Version(about) and pressing Enter.  Keep your Firmware up to date by down-

loading the latest version from www.fieldpiece.com/downloads.  

Time/ Time Setup

The internal clock is used to time stamp each saved test. The time can-

not be altered once data is taken. The time is shown at the bottom of most 

INPUT FORMs.

•  

Rotate the dial to the SETUP.

•  

Scroll to Time Setup and Press ENTER.

•  

Press Enter to Change the time.

•  

LEFT  and  RIGHT  arrows  cycle  through  month,  day,  year, 


military clock, and minutes.

•  

UP and DOWN arrows adjusts.

•  

Press ENTER to set time.

•  

Press INPUT to get you back to the main SETUP screen.

Содержание HG3

Страница 1: ...www fieldpiece com www fieldpiece com www fieldpiece com www fieldpiece com www fieldpiece com www fieldpiece com 1 Model HG3 Field Manual ...

Страница 2: ...mers The HVAC Guide System Analyzer also has a data logging switch posi tion to record up to 13 measurements at one time With the Display switch position view one parameter by connecting any Fieldpiece Accessory Head directly or wirelessly Do it right the first time do it faster easier more completely and avoid call backs in the process Disclaimer Neither this book nor the HVAC Guide makes you an ...

Страница 3: ... Output Sync Recall Enter Save MAX 30VDC 24VAC CONNECT ONLY TO ACCESSORY HEADS HVAC Guide Fieldpiece HG3 SETUP Target Evaporator Logger Exit Temp CFM Display Superheat Subcooling Combustion CheckMe Data In L D Jacket Charging Jacket Charging Me Co Er Er Er Ch Cle Cle Me Co Er Er Er Ch Cle Cle HVAC Guide Controls Clear Input Output Sync Recall Enter Save MAX 30VDC 24VAC CONNECT ONLY TO ACCESSORY HE...

Страница 4: ...ng the actual superheat to the calculated target superheat 5 Subcooling Charge a TXV EXV A C system using the manufactur er s target subcooling 6 Combustion Setup and tune furnaces or other combustion equip ment 7 Charging Jacket Follow a step by step procedure showing how use model S365 to charge TXV systems in cold weather 8 Data Logger Record up to 13 parameters using Fieldpiece Accessory Heads...

Страница 5: ... Recommended actions are displayed to fix problems or confirm system is running properly Step 4 Save Download and PrintTest After the HVAC Guide software is installed connect to a computer to download the tests and print All data and information from INPUT FORM and OUTPUT FORM is printed The HG3 dial Superheat OUTPUT FORM Superheat INPUT FORM Step 2 Inputs can be entered using Fieldpiece products ...

Страница 6: ...et to the list highlight the input line you want to change with the UP DOWN ar rows and press ENTER or the RIGHT arrow Use the UP DOWN arrows to highlight the appropriate input and press ENTER to select it Manual Entry Enter system data Customer IDs or test data measured with another instrument Highlight the input line using the UP DOWN arrows and press the RIGHT arrow Then use the UP DOWN arrows ...

Страница 7: ...get Evaporator Logger Exit Temp CFM Display Superheat Subcooling Combustion CheckMe Data Clear Input Output Sync Recall Enter Save MAX 30VDC 24VAC CONNECT ONLY TO ACCESSORY HEADS HVAC Guide Fieldpiece HG3 SETUP Target Evaporator Logger Light Exit Temp CFM Display Superheat Subcooling Combustion CheckMe Data Service Clear Input Output Sync Recall Enter Save MAX 30VDC 24VAC CONNECT ONLY TO ACCESSORY...

Страница 8: ...R UNIT Meter Device TXV TEV Return DB 71 7 F Return WB 60 8 F INPUT FORM Sys Type AC Grant and Sys Info None INDOOR UNIT Meter Device TXV TEV Return DB 71 7 F Return WB 60 8 F Memory Com with PC Erase a Single Test Erase a Customer Erase a Grant Check Memory Status Clear Data logs Clear All Data Memory Com with PC Erase a Single Test Erase a Customer Erase a Grant Check Memory Status Clear Data lo...

Страница 9: ...ll Enter Sav e MAX 30VDC 24VAC CONNECT ONLY TO ACCESSORY HEADS HVAC Guide Fieldpiece HG3 SETUP Target Evaporator Logger Exit Temp CFM Display Superheat Subcooling Combustion CheckMe Data Clear Input Output Sync Recall Enter Sav e MAX 30VDC 24VAC CONNECT ONLY TO ACCESSORY HEADS HVAC Guide Fieldpiece HG3 SETUP Target Evaporator Logger Exit Temp CFM Display Superheat Subcooling Combustion CheckMe Dat...

Страница 10: ...aporator Punch or drill a small hole in the supply plenum and measure in the center of the plenum Suggested Accessories ATH4 ATB1 Return Plenum Press Return Plenum Pressure Optional Static pres sure in the return plenum before the evaporator Suggested Accessories ADMN2 ASP2 Supply Plenum Press Supply Plenum Pressure Optional Static pres sure in the supply plenum after the evaporator Suggested Acce...

Страница 11: ...emperature leaving the evaporator This is the same as Out of Evap Supply Dry Bulb See page 18 Fan Press Fan Pressure The pressure difference between the supply ple num pressure and the return plenum pressure Suggested Actions Suggested actions are displayed to correct the prob lem Use the down arrow to scroll down the OUTPUT FORM See Sec See Section The section numbers at the end of the OUTPUT FOR...

Страница 12: ...C O T E M P ON GA S OI L Lo Ba tt C F AU TO OF F ST AB LE Fu el Ty pe 2 2 T C CA L A R H 4 S li n g P s y c h ro m e te r H e a d ON AU TO OF F 1 RH m VD C 1 F m VD C 1 C m VD C LO BA TT D E W P O IN T R H W E T B U L B T E M P F C O N O FF A T H 4 T 1 T 2 T 2 T 1 Fu nc tio n T1 CA L T2 CA L AU TO O FF C F T 1 T 2 Se t m et er to m VD C ra ng e to di sp la y te m pe ra tu re di re ct ly LO BA TT O...

Страница 13: ... suction line taken at the suction line service port Suggested Accessories ASX14 SL Temp Suction Line Temperature Take the suction line temperature be tween the evaporator and compressor Make sure to be at least 6 inches away from the compressor Suggested Accessories ATC1 Customer ID Used in the file name to save recall and download tests Use arrow buttons to type in each character Press RIGHT arr...

Страница 14: ...gerant in the evaporator coil Calculated from SL Pressure Suggested Actions Suggested actions are displayed to correct the problem Use the down arrow to scroll down OUTPUT FORM Be cause everything within the system is interdependent one adjust ment can affect the whole system Tests should be used together such as Superheat to correct refrigerant charge and Target Evap Exit Temp to correct airflow ...

Страница 15: ... Output Sync Recall Enter Sa ve MAX 30VDC 24VAC CONNECT ONLY TO ACCESSORY HEADS HVAC Guide Fieldpiece HG3 SETUP Target Evaporator Logger Exit Temp CFM Display Superheat Subcooling Combustion CheckMe Data Clea r Input Output Sync Recall Enter Sa ve MAX 30VDC 24VAC CONNECT ONLY TO ACCESSORY HEADS HVAC Guide Fieldpiece HG3 SETUP Target Evaporator Logger Exit Temp CFM Display Superheat Subcooling Comb...

Страница 16: ...Pressure Taken at the liquid line service port LL Temp Liquid Line Temperature Taken after the condenser near the liquid line service port Customer ID Used in the file name to save recall and download tests Use arrow buttons to key in each character Press RIGHT arrow to get to the first character Once complete press ENTER to lock it in Units Select English or Metric units Subcooling INPUT FORM ask...

Страница 17: ...which subcooling is cal culated Suggested Actions Suggested actions are displayed to correct the problem Use the down arrow to scroll down the OUTPUT FORM Because everything within the system is interdependent one adjust ment can affect the whole system Tests should be used together such as Subcooling to correct refrigerant charge and Target Evap Exit Temp to correct airflow across the evaporator ...

Страница 18: ... hydronic piping air duct leakage or insulation levels Properly tuned gas combustion equipment will produce little or no car bon monoxide no soot and will consume less fuel Combustion gases should be sampled close to the exit from the heat ex changer within an area where all gases would be well mixed and before dilu tion air enters the venting systems i e draft hoods barometric dampers etc Testing...

Страница 19: ...re probe to the AOX2 Set the AOX2 on TEMP and measure the temperature of the combustion products in the flue stack 18 inches from the start of the flue CO Carbon Monoxide Connect a flue gas CO detector and take a sample of the combustion products in the flue stack in the same location as the O2 measurement within 18 inches from the start of the flue Enter your measured CO value into the HG3 for ca...

Страница 20: ...ip ment calculated by analyzing the losses up the exhaust Siegert Eff Efficiency The European standard for combustion efficiency See Sec See Section The section numbers on the OUTPUT FORM refer to the sections in this manual with more detailed information about each test Atmospheric Fan Assisted Natural Gas or LPG Oxygen O2 6 9 StackTemperature 325 500 F Condensing Natural Gas or LG Oxygen O2 6 9 ...

Страница 21: ...urate and comprehensive the diagnoses CheckMe determines the current state of the equipment It is recommended that you pretest before repairs and test after repairs to confirm the improvement 5 2 CheckMe INPUT FORM Below is a picture of the extended CheckMe INPUT FORM The fol lowing sections cover each part of the INPUT FORM in more detail Refer to the page numbers in the blue boxes Clear Input Ou...

Страница 22: ...ssure static Evap Fan Amp evaporator fan amperage Test ini tial or after repair Outdoor Model No number Outdoor Year year manufactured of the outdoor unit Outdoor Serial No serial number of the outdoor unit OD Volts voltage of the outdoor unit Advanced Tolerances These are some of the basic error tolerances which the CheckMe program uses to determine if a system is perform ing properly Some grants...

Страница 23: ...has better resolution than most gauge sets LL Temp Liquid Line Temperature Measure near the location that the LL Pressure was taken Use the ATC1 to get a good pipe temperature The clamp should be perpendicular to the pipe and should be securely seated with the sensor in contact with the liquid line OD Dry Bulb Outdoor Dry Bulb Temperature Clip a calibrated ATA1 to the inlet of the condenser typica...

Страница 24: ...CONNECT ONLY TO ACCESSORY HEADS HVAC Guide SETUP Target Evaporator Logger Light Exit Temp CFM Display Superheat Subcooling Combustion CheckMe Data Service Clear Input A HVA Fie Target Evaporato Logger Light Exit Temp CFM Combus Data Service INPUT FO Sys Type Grant an None INDOOR U Meter De Return D Return W Supply D OUTDOOR Refriger Rated Am Target S SL Press SL Temp LL Press LL Temp OD Dry B Cond...

Страница 25: ... Logger Exit Temp CFM Display Superheat Subcooling Combustion CheckMe Data Clear Input Output Sync Recall Enter Save MAX 30VDC 24VAC CONNECT ONLY TO ACCESSORY HEADS HVAC Guide Fieldpiece HG3 SETUP Target Evaporator Logger Exit Temp CFM Display Superheat Subcooling Combustion CheckMe Data Clear Input Output Sync Recall Enter Save MAX 30VDC 24VAC CONNECT ONLY TO ACCESSORY HEADS HVAC Guide Fieldpiece...

Страница 26: ...ow accessory head s such as the AAV3 This is for convenience and to ensure accurate measurements It allows for multiple measurements per grille Hold the vane perpendicular to the grille set the AAV3 to velocity and press Enter to start taking the measurement Avg Whilemeasuringvelocity pressRightArrowtotakeadditionalreadings to get a more accurate average You can take up to 99 readings per grille A...

Страница 27: ...at each grille Minimum The minimum air velocity of all the readings taken at each grille Maximum The maximum air velocity of all the readings taken at each grille Number of Readings The number of readings taken at each grille See Sec See Section The section numbers on the OUTPUT FORM refer to the sections in this manual with more detailed information about each test Outputs For EachTest Total Supp...

Страница 28: ... Display Superheat Subcooling on CheckMe Clear Input Output Sync Recall Enter Save MAX 30VDC 24VAC CONNECT ONLY TO ACCESSORY HEADS HVAC Guide Fieldpiece HG3 SETUP Target Evaporator Logger Exit Temp CFM Display Superheat Subcooling Combustion CheckMe Data Clear Input Output Sync Recall Enter Save MAX 30VDC 24VAC CONNECT ONLY TO ACCESSORY HEADS HVAC Guide Fieldpiece HG3 SETUP Target Evaporator Logge...

Страница 29: ...SE ND RE CE IVE ON AC DC Wireles s Tran sm itter Sync ET 2W MA X 30VDC 24VAC CO NN ECT ON LY TO AC CESSOR Y HEAD LO BA TT SE ND RE CE IVE ON AC DC Wireles s Tran sm itter Sync ET 2W MA X 30VDC 24VAC CO NN ECT ON LY TO AC CESSOR Y HEAD LO BA TT SE ND RE CE IVE ON AC DC Wireles s Tran sm itter AR H4 Slin g Psych rometer Hea d ON AU TO OF F 1 RH mVD C 1 F mVD C 1 C mVD C LO BA TT DE W PO INT RH WET B...

Страница 30: ...lect Volts AC or volts DC See Accessory Head in struction manual to determine Volts AC or Volts DC 5 CustomerID Used in the file name to save recall and download tests Use arrow buttons to type in each character Press RIGHT arrow to get to the first character Data logger OUTPUT FORM Data Logger INPUT FORM continued from above Average measurement of IndoorTemp with duration Span shown below Minimum...

Страница 31: ...tery life Press any button to come out of Sleep mode Default for sleep mode is 15 Minutes Auto Power Off Turn on Auto Power Off to save battery life This is useful if the HG3 gets accidently left on Auto power off is automatically disabled during data logging tests You can set the time for Auto Power Off Default for Auto Power off is 30 minutes Version about You can check the version of your Firmw...

Страница 32: ... again The INPUT FORM for that switch position will then be popu lated with the previous test s data No Outputs are saved on the HVAC Guide they are simply recalculated from the saved inputs Contrast Adjustment To adjust the contrast level of the display hold the BACKLIGHT button until the Contrast Adjustment Screen shows Press UP and DOWN arrows to adjust and ENTER to set Clearing a Single Input ...

Страница 33: ...defective unit at its option subject to verification of the defect This warranty does not apply to defects resulting from abuse neglect accident unauthorized repair alteration or unreasonable use of the instru ment Any implied warranties arising from the sale of a Fieldpiece product including but not limited to implied warranties of merchantability and fitness for a particular purpose are limited ...

Страница 34: ... is low This usually means that the capacity of the system has been reduced due to incorrect refrigerant charge Higher than expected airflow is rare but does occur occasionally Measuring the airflow directly would identify if high airflow is the cause of the low temperature split 5 407 High airflow possibly reduce airflow The indoor coil airflow was directly measured using the TrueFlow grid and is...

Страница 35: ... of the target superheat The closer the superheat is to the target the bet ter 5 511 Overcharged recover refrigerant until actual subcool ing reaches target subcooling Actual subcooling is _ F and target subcooling is _ F There is too much refrigerant in this TXV EXV system Remove refrigerant until the actual subcooling is within 3 F Grant None of the target subcooling The closer the actual subcoo...

Страница 36: ...enser check con denser fan There is insufficient airflow going across the condenser for the needed heat transfer Check that the condenser coils and fins are clean aligned and free of nearby obstructions Check the fan motor bearings to ensure that the fan is rotating freely 5 8 Outdoor Unit Amp Draw Diagnosis 5 801 Outdoor amp draw OK The outdoor unit is running at the proper amperage for the curre...

Страница 37: ...s V AC and DC Switch positions Data logger and display Type KThermocouples ATA1 Dry bulb air temperature with a clip ATB1 Dry bulb air temperature ATBF1 Dry bulb air temperature up to 900 F ATC1 Pipe Clamp thermocouple 3 8 to 1 3 8 ATC1R Pipe clamp thermocouples 1 8 to 3 4 ATR1 Dry bulb air temperature with 4 5 piercing probe ATWB1 Wet bulb air temperature with clip Refrigerants R11 R113 R114 R12 ...

Страница 38: ...www fieldpiece com www fieldpiece com www fieldpiece com www fieldpiece com www fieldpiece com www fieldpiece com 74 v 01 ...

Отзывы: