12
FZN 2000-E
EN
Machine assembly | Starting the tool | Hedge trimming
8. MACHINE ASSEMBLY
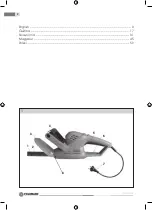
(Fig. 1)
Protective guard and blade assembly
Slide the attached protective guard (3) onto the grooves in the hedge trimmer body and
fasten it on both sides using the attached fixing bolts (8).
Connection to the electric mains
The hedge trimmer should only be connected to a single-phase power supply powered by
alternating current.
Check whether the parameters of the power network match the values specified in the
tool’stype label.
Plug the power cord to an appropriate extension cable.
Create a loop and slide it through an opening in the rear handle and hitch it onto the cord
holder (6).
9. STARTING THE TOOL
(Fig. 1)
ATTENTION!
Warning!
Use the tool solely for purposes specified in the chapter Scope of Application.
Switching on the tool
Press the rear handle switch (5) and the front handle switch (4) simultaneously with
both hands.
Switching off the tool
Release the switch (5) or (4).
Note:
The cutting blade brake stops the movement of the blades within 0.5 s, i.e. almost instantly.
Small flash in the area of upper vent holes is normal and poses no risk either for you or the
tool.
10. HEDGE TRIMMING
Before hedge trimming, locate branches with diameter greater than 20 mm and cut them off
using the pruning shears.
Trapezoidal cut corresponds to natural growth of plants and contributes to optimal hedge
growth.
First trim the hedge sides from bottom-up. Now trim the upper part to form the desired shape;
you may select straight cut, roof-shaped cut or round cut.
Содержание FZN 2000-E
Страница 1: ...FZN 2000 E ...
Страница 2: ...2 FZN 2000 E English 3 Čeština 17 Slovenčina 31 Magyarul 45 Polski 59 1 1 2 3 4 5 6 7 8 ...
Страница 73: ...73 ...
Страница 76: ......


