Field Controls VentCool 1.8 Скачать руководство пользователя страница 12

page 12 of 16

To turn the fan on, press the Power On/Start Fan button. The fan will start and the damper fl aps will open.  Be-
cause the VentCool is a single speed fan, pressing this button repeatedly will have no effect on the fan’s speed. 

To set the fan’s timer, press the INCREASE TIMER button. The timer will be set to 1 hour, after which the fan will
automatically turn off. To increase the timer’s setting, press this button again. Each time you press this button, 
the timer’s setting will increase by 1 hour, up to 12 hours total. The timer resets each time the fan is turned off.

To turn the fan off, press the POWER OFF/FAN OFF button. The fan will turn off and the damper fl aps will fall 

closed. 

When starting this fan for the fi rst time, make sure to observe it turning on, running, and turning off from 

both the attic (to see the fan itself) and the living space (to see the backdraft damper). 

•  If the fan does not turn on, check the power to the unit, the control connections, and the circuit breaker 

feeding the fan mounted electrical control box.

•  If the damper fl aps do not open or close, visually inspect the damper for any debris obstructing their move-

ment.

•  If the steps above do not work, contact Field Controls Tech Support at 800.742.8368 or by email at                                 

fi eldtec@fi eldcontrols.com for further assistance.

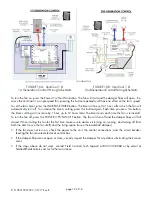
FIGURE 16A:  VentCool 1.8

1st Generation Control Wiring Schematic

FIGURE 16B:  VentCool 1.8

2nd Generation Control Wiring Schematic

P/N: 78030007018

P/N 78010007000  05/17 Rev B

Содержание VentCool 1.8

Страница 1: ...1 8 WHOLE HOUSE FAN ITEMS INCLUDED GENERATION 1 2 Fan assembly with electrical control box Chain 25 ft Duct tape 30 ft 7 ft of acoustic flex duct 16 diameter Backdraft Damper Backdraft Damper Transit...

Страница 2: ...ared to install the Whole House Fan system In particular Thehomeowner residentshouldreadtheWHERETOLOCATEsectionsothatthefanwillbecorrectlylocatedto maximize its effectiveness and efficiency The VENTIL...

Страница 3: ...ity supply We strongly recommend providing a dedicated circuit for this fan providing a dedicated circuit for this fan This unit is provided with a single speed controller and a minimum 10 ft power co...

Страница 4: ...in their products specification documents Ifthisinformationisunavailable aratioof50 netfreeareatototalareaisusuallyagoodruleofthumb A notable exception to this rule of thumb are ridge vents The indust...

Страница 5: ...w space or over hard flooring as sound reflecting off of hard surfaces can amplify its percieved noise Even though this fan is extremely quiet we specifically recommend against installing it in a bedr...

Страница 6: ...hrough the opening created in the previous step and into the attic opening created in the previous step and into the attic These items have been designed to fit through this These items have been desi...

Страница 7: ...e installed with the Y axis at a slight angle However this angle must NOT exceed 45 as shown in Figure 6C The X axis must NEVER be installed at any angle as The X axis must NEVER be installed at any a...

Страница 8: ...adhere to the following guid lines Do not hang the fan using fewer than 4 lengths of chains or eye bolts all four attachment points are necessary to sup port the fan s weight and to eliminate any swa...

Страница 9: ...secure use pliers to close all of the S hooks to ensure stability and tape down all unused D rings to avoid excess rattling Lastly use the provided foil tape to seal the joints between the fan assembl...

Страница 10: ...menclature Note Thiscableislow voltagebutunshielded Building Codes require unshielded low voltage wiring to be run through shielded conduit Do not run cable in Building Codes require unshielded low vo...

Страница 11: ...able breaker on the electrical control box on fan assembly has not tripped POWER CONNECTION FIGURE 14 Wall Mounting Bracket Using the provided wall mounting bracket Figure 14 as a template trace an ou...

Страница 12: ...e fan will turn off and the damper flaps will fall closed When starting this fan for the first time make sure to observe it turning on running and turning off from both the attic to see the fan itself...

Страница 13: ...indows to your fan s opening Generally the longer the path the more cooling IMPORTANT OPERATING TIPS A wireless remote is an available accessory for this fan It is not included as part of the VentCool...

Страница 14: ...embly and backdraft damper are kept clean of any possible build up of debris Blocking this fan s exhaust can cause it to fail prematurely Keep the area in front of the fan as unobstructed as possible...

Страница 15: ...page 15 of 16 Figure 18 Spare Parts P N 78010007000 05 17 Rev B...

Страница 16: ...y information about this or any Field Controls product visit For warranty information about this or any Field Controls product visit www fieldcontrols com ventCool www fieldcontrols com ventCool Field...

Отзывы: