FIC A440 series Скачать руководство пользователя страница 16


Outline of the A440 Series


1-16


 FIC A440 Series Service Manual


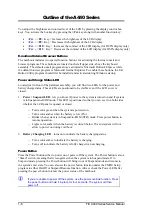
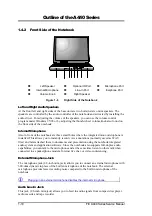
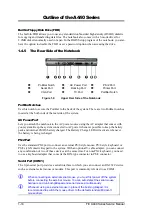
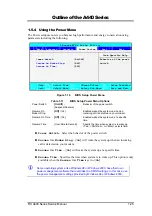
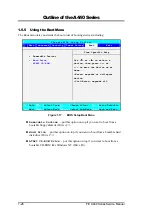
1.4.6  The Under Side of the Notebook 


/  

Tilt Foot 

/  

Internal Module Compartment 

/  

Battery Compartment / Latch 


Memory Compartment 


Figure 1-10 

The Under Side of the Notebook 


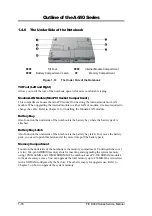
Tilt Foot (Left and Right)


Allow you to tilt the rear of the notebook upward for more comfortable typing.  
 

Modem/LAN Module (Mini-PCI Socket Compartment)


This compartment houses the mini-PCI socket for inserting the internal modem or LAN 
module. When upgrading the internal module to either LAN or modem, it is also required to 
change the cable. Refer to Chapter 2 for installing the Modem/LAN module.  
 

Battery Bay 

Also found on the underside of the notebook is the battery bay where the battery pack is 
attached. 
 

Battery Bay Latch 

Also found on the underside of the notebook is the battery bay latch. To remove the battery 
pack, you need to push this latch and at the same time pull the battery pack. 


Memory Compartment 

Found on the underside of the notebook is the memory compartment. Underneath the cover 
are two 144-pin SODIMM memory slots for inserting and upgrading the system memory 
using 32MB, 64MB, and 128MB SODIMM. The notebook uses PC-100 SDRAM modules 
for faster memory access. You can upgrade the total memory up to 256MB. One is inserted 
with a SDRAM configured by the factory. The other is empty for upgrade use. Refer to 
Chapter 2 on how to upgrade the system memory. 


Содержание A440 series

Страница 1: ...cludes a variety of innovative features Table 1 1 Feature Highlights Features Description CPU Pentium III Mobile Processors using Socket 370 FCPGA packaging at 650 700 750 800 850 MHz Celeron Mobile p...

Страница 2: ...ace PCMCIA Slot Double deck PCMCIA 2 1 card slots that support two Type II or one Type III PC cards 32 bit CardBus PCI local bus technology Supports mixed voltage PC cards 5V and 3 3V Integrated ZV Zo...

Страница 3: ...ours Power Management Off Charging Time 2 5 3 hours quick charge computer off Power Management Windows APM 1 2 Compliant ACPI and DMI 2 0 BIOS Ready Suspend to RAM and Suspend to Disk feature Auto Sus...

Страница 4: ...Device Serial Interface RS 232C Parallel Interface Memory Slot 0 32 64 128 MB SDRAM Built in HDD PCMCIA Card Slot x 2 PS 2 Keyboard Keyboard PS 2 Mouse RS 232C Peripheral Printer 3 5 FDD 16 Bit Audio...

Страница 5: ...rowser Buttons Status LED Panel Glidepad Power Button Air Cooling Vent Keyboard Power Charge LEDs Figure 1 2 Inside the Notebook Color LCD Display Panel The notebook comes with several LCD option size...

Страница 6: ...sed 1 Power Suspend LED lets you know if power to the system is turned on and if system is in Suspend to RAM mode This LED is positioned so that you can see it on both sides whether the LCD panel is o...

Страница 7: ...ystem is accessing the floppy disk drive FDD Caps Lock This LED will turn on when the Caps Lock key is activated When activated all alphabet keys type in will be in upper case or in capital letters Sc...

Страница 8: ...ow resolution modes on high resolution LCD panel Fn F6 Turn the system speaker to on or off Fn F8 Increases the LCD s brightness Fn F9 Reduces the LCD s brightness 2 Control keys Ctrl Alt Fn and Shift...

Страница 9: ...the notebook for more information Internal Hard Disk Drive Found just underneath the left side of the palm rest panel is the internal hard disk drive HDD The internal HDD is an approved industry stan...

Страница 10: ...egrated mono microphone is installed This allows you to instantly record voice annotations normally saved as WAV files and later attached them to documents and presentation using the notebook integrat...

Страница 11: ...in speakers or the external earphone headphone set The volume knob does not work for the Line Out jack You need to adjust the volume from the external speakers itself or from Windows program IR Port...

Страница 12: ...same time or one Type III card The notebook uses a CardBus PCMCIA controller that supports 5V and 3V 32 bit CardBus and 16 bit PC cards including cards with Zoomed Video ZV function like MPEG PC card...

Страница 13: ...rear side of the notebook 1 4 4 The Left Side of the Notebook USB Ports CD ROM or DVD ROM Drive FDD Drive Figure 1 8 Left Side of the Notebook USB Universal Serial Bus Ports The USB Universal Serial...

Страница 14: ...ep the system connected to AC power whenever possible to keep the battery pack and internal CMOS battery charged The Battery Charge LED will activate whenever the battery is being recharged PS 2 Port...

Страница 15: ...ram to change the configuration of the parallel port to Bi directional or ECP Extended Capabilities Port mode Some older parallel devices may not function with the ECP default setting You need to run...

Страница 16: ...ing the Modem LAN module Battery Bay Also found on the underside of the notebook is the battery bay where the battery pack is attached Battery Bay Latch Also found on the underside of the notebook is...

Страница 17: ...to another you use the up and down arrow keys On the BIOS Setup program you will find the following parts on the screen Menu Bar found on the top line of the screen Each of the six items has a separat...

Страница 18: ...t 4 4 4 4Sub Menu F10 Save and Exit Figure 1 11 BIOS Setup Main Menu Table 1 5 BIOS Setup Parameters Default and Alternate Settings System Time 12 00 00 Tab Shift Tab or Enter selects field System Dat...

Страница 19: ...l DVD CD ROM This field displays various parameters for the internal CD ROM or a DVD ROM Drive Boot Display Device This field allows you to set the output boot display to the LCD CRT or Both System Me...

Страница 20: ...71MB BIOS auto detect for information only Multi Sector Transfers Disabled 2 Sectors 4 Sectors 8 Sectors 16 Sectors Determine the number of sectors per block for multiple sector transfers LBA Mode Con...

Страница 21: ...ff Selects Power on state for NumLock PS 2 Mouse Disabled Both Auto Disabled prevents any installed PS 2 mouse from functioning but frees up IRQ12 Both allows both internal and external PS 2 mouse to...

Страница 22: ...of the LCD Silent Boot Select boot screen during POST Aperture Size Allows you to set the aperture size of the VGA Frame Buffer Size You can set to either 4MB or 8MB Uses Shared Memory Architecture SM...

Страница 23: ...Enabled User configuration Auto BIOS or OS configuration Mode Uni directional ECP Bi directional Set the mode for the parallel port using options Base I O address 378 278 3BC Select the base I O addre...

Страница 24: ...Set User Password Press Enter User Password controls access to the system Password on boot Disabled Enabled Enabled password entry on boot Fixed disk boot sector Normal Write protect Write protects b...

Страница 25: ...the power switch Resume On Modem Ring Off On Enabled wakes the system up when an incoming call is detected on your modem Resume On Time Off On Enabled wakes the system up at a specific time Resume Ti...

Страница 26: ...the device up or down Enter expands or collapses device Ctrl Enter expands all F1 Help K K K K Select Item Change Values F9 Setup Defaults Esc Exit s s s st t t t Select Menu Enter Select Sub Menu F10...

Страница 27: ...ery Refresh F1 Help K K K K Select Item Change Values F9 Setup Defaults Esc Exit s s s st t t t Select Menu Enter Select Sub Menu F10 Save and Exit Figure 1 18 BIOS Setup Exit Menu Exit Saving Changes...

Страница 28: ...he AC adapter is cut off It is also very important to have the battery pack always charged to prevent battery cell degradation If the AC adapter is not connected or not available and the notebook is n...

Отзывы: