Fiamo Loft Twin Bed Complete Скачать руководство пользователя страница 5

5

Furniture Care Instructions

Room Climate Control


Wood, when first cut contains more than 50 percent water. When it is prepared for furniture

construction it is placed in a Kiln and the moisture content is brought down to 8 to 10 percent. Wood

is porous and responds to its environment. If the room has high humidity it will absorb it and expand

and if the humidity is low it will lose moisture and shrink.

      It is important that the humidity levels in the room be controlled from extremes of too much

humidity or too little. Furniture should not be placed close to air-conditioning outlets, fireplaces, 

radiators, space heaters, humidifiers or dehumidifiers. Exposure to extreme variations of

temperature and humidity can damage any fine wood product.

The Ideal Environment for Fine Furniture


Fine wood furniture will have fewer problems when its environment is controlled at a temperature

between 65 and 75 degrees and a relative humidity between 35 and 40 percent. Wood placed in an

environment outside of those limits can and will shrink or expand and may develop some small

cracks which are not material or structural defects.

Sticking Doors and Drawers


With minor changes in temperature and humidity, doors and drawers may swell and be

difficult to open or close. Tolerances have been built into the units but extreme conditions may still

cause sticking. This will adjust back to normal over time but until it does, consider using a 

dehumidifier or rub candle wax or paraffin on the sides that stick.

Avoid Direct Sunlight  


Keep the furniture out of direct sunlight. Ultraviolet rays will fade colors and in some cases

darken them. It can also cause crazing or hair line cracks in the finish. White finishes will yellow

naturally over time and exposure to direct sunlight will hasten this natural process along with some

woods darkening naturally over time; this is not considered to be a quality defect.

Proper Storage


 If you need to put your furniture in storage for any period of time, do not place furniture


in a damp

basement or hot dry attic. Allow air movement around the furniture and do not stack anything on it.

In General


Protect furniture surface from hot or extremely cold items.

Use coasters under hot or cold beverages. 

Do not use synthetic fabric under accessories or lamps.

Protect tops from pens, markers and crayons.

Oils from potpourri and other scented items can damage the furniture finish.

Do not drag items across the surface of the furniture.

Allow the surface to breath by rotating your accessories and lamps.

Do not over polish the furniture, do it  only two or three times a year. Over polishing can

distort the natural finish of the product.

Do not wax the furniture as wax build up can destroy the natural finish of the product.

When moving furniture always lift the unit. Do not push or drag it to avoid damage to the legs.

Keep the furniture level so doors and drawers open and close freely.

Clean with a damp, not wet, cloth. Use only a mild soap. Do not use abrasive cleaners. 

Содержание Loft Twin Bed Complete

Страница 1: ...RTANT Please keep these instructions for future reference Please read these instructions before assembly and use of this product Adult assembly is required Allen wrench included required for assembly Product features and decorations may vary from illustrations Do not use power drills or drivers Phillips Head Screwdriver Not included required for assembly ...

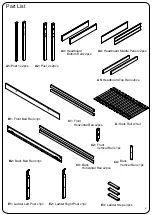
Страница 2: ...cs B1 Front Bed Rail x1pc A5 Headboard Top Rail x2pcs C1 Front Horizontal Rail x2pcs C3 Back Horizontal Rail x2pcs B2 Back Bed Rail x1pc C4 Back Vertical Rail x1pc E1 Ladder Left Post x1pc E2 Ladder Right Post x1pc E3 Ladder Step x3pcs D Slats Roll x1Set Part List C2 Front Vertical Rail x1pc 2 ...

Страница 3: ...ddle Panel x2pcs A5 Headboard Top Rail x2pcs B1 Front Bed Rail x1pc B2 Back Bed Rail x1pc C1 Front Horizontal Rail x2pcs C2 Front Vertical Rail x1pc C3 Back Horizontal Rail x2pcs C4 Back Vertical Rail x1pc D Slats Roll x1Set E1 Ladder Left Post x1pc E2 Ladder Right Post x1pc E1 C3 E2 E3 E3 E3 E3 Ladder Step x3pcs Part List 3 ...

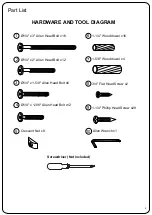
Страница 4: ...4 x 1 3 8 Allen Head Bolt x12 3 Crescent Nut x8 5 7 3 4 Flat Head Screw x2 8 1 1 4 Phillip Head Screw x29 9 Allen Wrench x1 10 1 1 4 Wood dowel x16 6 1 5 8 Wood dowel x4 Part List HARDWARE AND TOOL DIAGRAM Ø1 4 x 1 5 8 Allen Head Bolt x6 4 4 Screwdriver Not included ...

Страница 5: ...ime but until it does consider using a dehumidifier or rub candle wax or paraffin on the sides that stick Avoid Direct Sunlight Keep the furniture out of direct sunlight Ultraviolet rays will fade colors and in some cases darken them It can also cause crazing or hair line cracks in the finish White finishes will yellow naturally over time and exposure to direct sunlight will hasten this natural proces...

Страница 6: ...6 STOP IF YOU EXPERIENCE ANY ISSUES WITH THIS PRODUCT BEFORE YOU RETURN THIS TO THE RETAILER PLEASE FOLLOW PROCEDURES ON THE BACK PAGE ...

Страница 7: ... BUNK 9 DO NOT USE SUBSTITUTE PARTS CONTACT THE MANUFACTURER OR DEALER FOR REPLACEMENT PARTS 10 USE OF A NIGHT LIGHT MAY PROVIDE ADDED SAFETY PRECAUTION FOR A CHILD USING THE UPPER BUNK 11 ALWAYS USE GUARDRAILS ON BOTH LONG SIDES OF THE UPPER BUNK IF THE BUNK BED WILL BE PACED NEXT TO THE WALL THE GUARDRAIL THAT RUNS THE FULL LENGTH OF THE BED SHOULD BE PLACED AGAINST THE WALL TO PREVENT ENTRAPMEN...

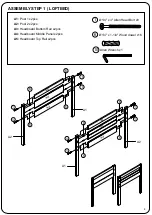
Страница 8: ... Head Bolt x8 1 1 6 6 1 1 1 A2 A2 A1 A1 A3 A4 A5 A3 A4 A5 A1 Post 1 x2pcs A2 Post 2 x2pcs A3 Headboard Bottom Rail x2pcs A4 Headboard Middle Panel x2pcs A5 Headboard Top Rail x2pcs Allen Wrench x1 10 6 6 6 6 6 6 1 1 1 8 1 ASSEMBLY STEP 1 LOFTBED ...

Страница 9: ... Back Bed Rail x1pc C3 Back Horizontal Rail x2pcs Ø1 4 x 3 Allen Head Bolt x8 1 Ø1 4 x 2 Allen Head Bolt x8 2 Allen Wrench x1 10 1 1 1 1 2 2 B1 B2 C3 7 7 7 7 Crescent Nut x8 5 5 5 5 7 1 5 8 Wood dowel x4 ASSEMBLY STEP 2 LOFT BED ...

Страница 10: ...or attaching Ladder on the RIGHT side of the Loft Bed For attaching Ladder on the LEFT side of the Loft Bed Note before attaching Front Vertical Guardrail C2 decide which side of the bunk bed you would like the ladder on Follow the diagrams on the left side for attaching the ladder on the left Follow the diagrams on the right side for attaching the ladder on the right Allen Wrench x1 10 Ø1 4 x 2 A...

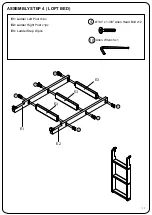
Страница 11: ...11 Ø1 4 x 1 3 8 Allen Head Bolt x12 4 E1 Ladder Left Post x1pc E2 Ladder Right Post x1pc E3 Ladder Step x3pcs E2 E1 4 4 4 4 4 4 E3 E3 E3 Allen Wrench x1 10 ASSEMBLY STEP 4 LOFT BED ...

Страница 12: ...12 Ladder on the right side of the Loft Bed Ladder on the left side the Loft Bed 8 3 4 Flat Head Screw x2 8 ASSEMBLY STEP 5 LOFT BED ...

Страница 13: ...13 1 1 4 Phillip Head Screw x29 9 C4 Back Vertical Rail x1pc D Slats Roll x1Set C4 9 9 D 9 Loftbed Complete with Ladder on the left Loftbed Complete with Ladder on the right 9 9 ASSEMBLY STEP 6 LOFT BED ...

Страница 14: ...14 LOFT BED COMBINE WITH SLIDING DESK HUTCH 3 DRAWER CHEST SLIDING DESK 3 DRAWER CHEST LOFT BED HUTCH LADDER ON THE LEFT LADDER ON THE RIGHT MAX WEIGHT ON BED 300LBS 300 lbs ...

Страница 15: ...do not have internet access you can fax your information to us If you do not have internet or fax access please call us at our toll free number Be sure to have all of the above information ready to give to your Customer Service Specialist Product Assistance Procedures Procedures to follow should you have any questions You have purchased a quality piece of furniture Our International team has spent...

Отзывы: