background image

AUTORAKE

®

 OPERATION (Continued)


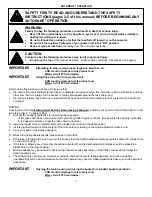
SAFETY FIRST!!  READ AND UNDERSTAND THE SAFETY 
INSTRUCTIONS (pages 2-5 of this manual) BEFORE BEGINNING ANY 
AUTORAKE

®

 OPERATION 

 
DUMPING 
 
1.  Shut off the auxiliary hydraulics. 
2.  Move to the dump site and park on firm, level ground. 
3.  Activate the auxiliary hydraulics in the direction opposite of what was used to operate the rake chain.  This will retract 

the hydraulic cylinder and open the main housing. 

4.  Raise this product about four feet above the ground. 
5.  Dump the bucket and reverse the process so that you are ready to resume raking. 


AUTORAKE

®

 MAINTENANCE


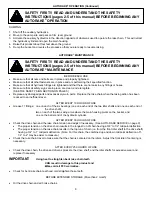
SAFETY FIRST!!  READ AND UNDERSTAND THE SAFETY 
INSTRUCTIONS (pages 2-5 of this manual) BEFORE BEGINNING ANY 
AUTORAKE

®

 MAINTENANCE


BEFORE EACH USE 


Make sure that all nuts and bolts are in place and properly tightened. 


Make sure that all other fasteners are in place and are performing their specified function. 


Make sure that all hydraulic fittings are tightened and that there are no leaks in any fittings or hoses. 


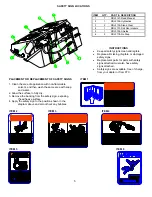
Make sure that all safety signs are in place, are clean, and are legible.  


(SEE THE SAFETY SIGN SECTION ON PAGE 5.) 


Replace any damaged parts and excessively worn parts.  Replace the rake chain when the raking action has been 
reduced to an inefficient level. 


AFTER EVERY 10 HOURS OF USE 


Grease 11 fittings:  one on each of the six bearings (one on each end of the two idler shafts and one on each end of  


the drive shaft),  


two on each of the two swing arms where the main housing pivots on the bucket, and  


one on the barrel end of the hydraulic cylinder. 


AFTER EVERY 30 HOURS OF USE 


Check the drive chain and the rake chain tension and adjust if necessary.  (See AUTO-RAKE SERVICE on page 9) 


The proper tension on the drive chain results in the longest run of chain having a 3/8” to 1/2” midpoint deflection. 


The proper tension on the rake chain results in the top run of chain (i.e. from the front idler shaft to the drive shaft) 
having a 3/4” to 1” midpoint deflection.  (Note: For this chain, the combined up and down midpoint deflection of 1-
1/2” to 2” may be easier to measure.) 


Check the rake chain travel to make sure that the chain is centered on the idlers.  Adjust the front idler if centering is 
necessary. 


AFTER EVERY 250 HOURS OF USE 


Check the drive chain, the drive and driven sprockets, the drive shaft, and the idler shafts for excessive wear and 
replace if necessary.


IMPORTANT


Using heat to straighten bent rake chain teeth 


CAN result in damage to this product and 


WILL void all FFC warranties. 


Check for bent rake chain teeth and cold straighten those teeth. 


BEFORE EXTENDED STORAGE (More than 2 month) 


Oil the drive chain and all 3 rake chains. 


Содержание AUTORAKE LAF6866

Страница 1: ...s Factory Company AUTORAKE OWNER S OPERATOR S MANUAL Models covered LAF6866 LAF6876 OWNER S OPERATOR S MANUAL FFC PART MR15595 FARMERS FACTORY COMPANY 100 EAST LEE ROAD LEE IL 60530 1 800 747 2132 06...

Страница 2: ...f which are covered on the parts list and specifications page s GENERAL INFORMATION The purpose of this manual is to assist in assembling mounting operating and maintaining your AutoRake Read this man...

Страница 3: ...ipment whether it is on the highway in a farm field or in an industrial plant can be any safer than is allowed by the person who is at the controls If accidents are to be prevented and accidents can b...

Страница 4: ...e in good condition for performing the desired function When using tools wear the protective equipment specified by the tool manufacturer i e hardhat safety glasses work gloves protective shoes etc WH...

Страница 5: ...e fluid remains clean that all devices function properly and that there are no fluid leaks WHEN MOUNTING THIS PRODUCT TO YOUR POWER UNIT Refer to the operator s manuals of your power unit your loader...

Страница 6: ...ith safety signs attached must also have safety signs attached Safety signs are available free of charge from your dealer or from FFC PLACEMENT OR REPLACEMENT OF SAFETY SIGNS 1 Clean the area of appli...

Страница 7: ...this product to your power unit s hydraulic system Refer to AUTORAKE MAINTENANCE on page 8 and follow the instructions AUTORAKE HYDRAULIC CONNECTION SAFETY FIRST READ AND UNDERSTAND THE SAFETY INSTRUC...

Страница 8: ...nother piece of equipment to a depth of 2 or deeper RAKING Keeping in mind that all raking must be done while moving backward position your power unit and this product on the area to be raked To begin...

Страница 9: ...reduced to an inefficient level AFTER EVERY 10 HOURS OF USE Grease 11 fittings one on each of the six bearings one on each end of the two idler shafts and one on each end of the drive shaft two on ea...

Страница 10: ...lection is not within the above specified range 10 Replace the drive chain shield and bolts Tighten the bolts to 20 ft lbs or 2 0 ft lbs RAKE CHAIN ADJUSTMENT 5 Loosen the four nuts that secure the be...

Страница 11: ...PARTS ILLUSTRATION 10...

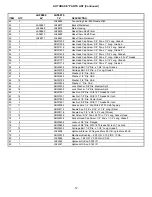
Страница 12: ...Adapter Male 6 O Ring Boss To Male 6 JIC 17 3 LAF4414 Hydraulic Adapter Male 10 O Ring Boss To Male 10 JIC 18 1 LAF4417 Hydraulic Elbow 90 Degree Female 10 JIC To Male 10 JIC 20 1 LAF4584 Hydraulic M...

Страница 13: ...262 Washer 3 8 Dia USS 61 2 RHW5462 Washer 1 2 Dia USS 62 16 RHW5732 Washer 3 4 Dia SAE 63 1 RHW5932 Washer 1 Dia SAE 64 6 RHW6202 Lock Washer 3 8 Dia Medium Split 65 18 RHW6402 Lock Washer 1 2 Dia Me...

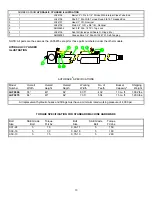
Страница 14: ...F6876 except for those parts numbered under the other models HYDRAULIC CYLINDER ILLUSTRATION AUTORAKE SPECIFICATIONS Model Overall Overall Overall Working No of Bucket Shipping Number Width Height Dep...

Отзывы: