9
Eccentric motion (fi ne sanding)
This position is selected for sanding with
low output for a scratch-free surface
(fi ne sanding).
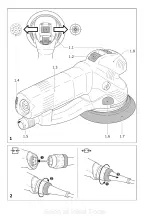
Press the switch (1.1) downwards and push it
into the left-hand position.
5.2 Sanding
pad
brake
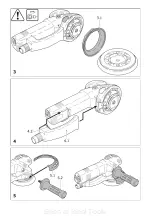
The rubber collar (3.1) prevents the sanding
pad from revving up to maximum speed in an
uncontrolled manner during eccentric motion
(fi ne sanding). Because the collar wears down
in the course of time, it has to be replaced by a
new one (order no. 465 472) as soon as there
is any reduction in the braking effect.
5.3
Choice and installation of the san-
ding disks
Choise of sanding disk
The appliance can be fi tted with three sanding
disks of different hardness depending on the
surface to be treated.
Hard:
coarse sanding on surfaces, sanding at
edges.
Soft:
universal for coarse and fi ne sanding for
fl at and curved surfaces.
Super-soft:
fi ne sanding on formed parts,
curves, radii. Do not use on edges!
Assembly
The FastFix system enables tool-free replace-
ment of the sanding pad:
- Set the switch (1.1) to the right, to the Rotex
rotary motion
- Press spindle stop (1.6), direction of move-
ment (3.2) fi rst to the side, then forwards
- Turn the fi tted sanding pad from the spindle
(right-handed thread)
- Keep the spindle stop pressed and screw
on the new sanding pad (in doing so, make
sure that the rubber collar (3.1) is correctly
fi tted!)
- let go of the spindle stop
Actuate the spindle stop only when the drive
spindle is stationary. Do not switch on the motor
when the spindle stop is pressed in.
5.4 Attaching
sanding
material
The appropriate Stickfi x sanding paper and
Stickfi x sanding felt can be fastened quickly and
easily onto the Stickfi x sanding base.
The self-adhesive sanding material is simply
pressed onto the sanding base (1.7) and held
safely in place by the Stickfi x sanding base vel-
cro surface. After use, the StickFix sandpaper
is simply pulled off.
5.5 Securing
polishing
attachments
To prevent damage, PoliStick polishing attach-
ments (sponges, felt, lambswool bonnets) may
only be used on the special polishing pad that
is fi tted on the machine instead of a sanding
pad. In the same way as the StickFix abrasives,
the PoliStick polishing attachments are simply
pressed onto the polishing pad and pulled off
after use.
5.6 Dust
extraction
Always connect the machine to a dust
extractor.
You can connect a Festool extractor with an ex-
tractor hose diameter of 27 mm to the extractor
connector (1.5). The extraction adapter (4.1)
can be removed if necessary. To do this, press
the locking button (4.2), draw the extraction
adapter backwards and pull off. To reattach the
extraction adapter, insert it as shown in Fig. 4
and slide it towards the sanding pad until the
locking button (4.2) latches into place.
5.7 Edge
protector
The edge protector (5.1) prevents the sanding
pad from touching the edge perpendicular to a
surface (e.g. when sanding along a wall), there-
by preventing the machine from rebounding.
Assembly
Slide the edge protector onto the machine until
it latches into place (see Fig. 5).
5.8 Auxiliary
handle
The auxiliary handle (Accessories, 5.2) can
be screwed onto either the right or left of the
gear head.
6
Working with the machine
Always secure the workpiece in such a
manner that it cannot move while being
sawed.
For safe guidance, hold the machine with both
hands on the motor housing (1.3) and on the
gear head (1.8) and/or the auxiliary handle
(Accessories, 5.2).
Never overload the tool by using too much
pressure! The best sanding results are achieved
when applying moderate pressure. The sanding
performance and quality depend mainly on the
choice of the right sanding material.
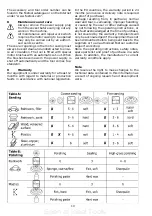
Tables A and B show the settings we recommend
for different sanding and polishing work.
6.1 Metalworking
The following precautions are to be ta-
ken when processing metals for safety
reasons:
- Pre-connect a residual current circuit-breaker
(FI, PRCD).
- Connect the machine to a suitable dust ex-
tractor.
- Clean tool regularly of dust accumulations in
the motor housing.
- Wear protective goggles.
7 Accessories,
tools
For your own safety, use only original
Festool accessories and spare parts.
Festool offers the appropriate accessories,
sanding and polishing attachments for every
application.
Seen at Ideal Tools.
Содержание ROTEX RO 150 FEQ
Страница 2: ...Seen at Ideal Tools ...
Страница 3: ...Seen at Ideal Tools ...

