


7
Conversion
Festo – MPAC-VI-EN – 2017-12a – English
51
1
2
3
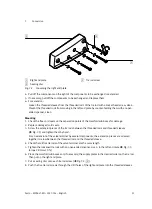
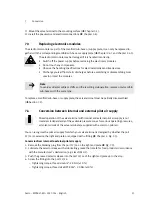
1
Right end plate
2
Sealing disc
3
Tie rod screw
Fig. 7.2
Loosening the right end plate
4. Pull off the components on the right of the components to be exchanged or extended.
5. If necessary, pull off the components to be exchanged and replace them.
6. For extension:
Loosen the threaded sleeves from the threaded rods of the tie rod with a socket head screw, size 4.
Prevent the threaded rods from moving in the left end plate by counter-holding them with an open-
ended spanner, size 5.
Mounting
1. Check the free cord seals on the separation points of the manifold sub-bases for damage.
2. Replace damaged cord seals.
3. Screw the extension pieces of the tie rods between the threaded rods and threaded sleeves
(
è
Fig. 7.1) and tighten them by hand.
For an extension of the valve terminal by several components, the extension pieces are screwed
together in a row between the threaded rod and the threaded sleeve.
4. Check that all five tie rods of the valve terminal are the same length.
5. Tighten the loosened tie rods with an open-ended spanner, size 5, in the left end plate (
è
torque 2.0 Nm ±10 %).
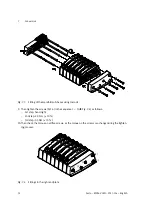
6. Place the manifold sub-bases and, if necessary, the supply plates in the desired order on the tie rod.
Then put on the right end plate.
7. Put a sealing disc onto each tie rod screw (
è
2
).
8. Push the five tie rod screws through the drill holes of the right end plate into the threaded sleeves.
Содержание MPAC-VI
Страница 1: ...Pneumatics description 8023740 2017 12a 8075694 Valve terminal MPAC VI ...
Страница 73: ......


