background image

Not for 

Reproduction

16

ferrismowers.com

and should not be changed for parking brake adjustment

procedures. The adjustment is achieved by changing the

compressed spring length of the upper parking brake springs.
1. Disengage the PTO, engage the parking brake, stop the

engine, and chock the tires.

2. Raise the seat plate.
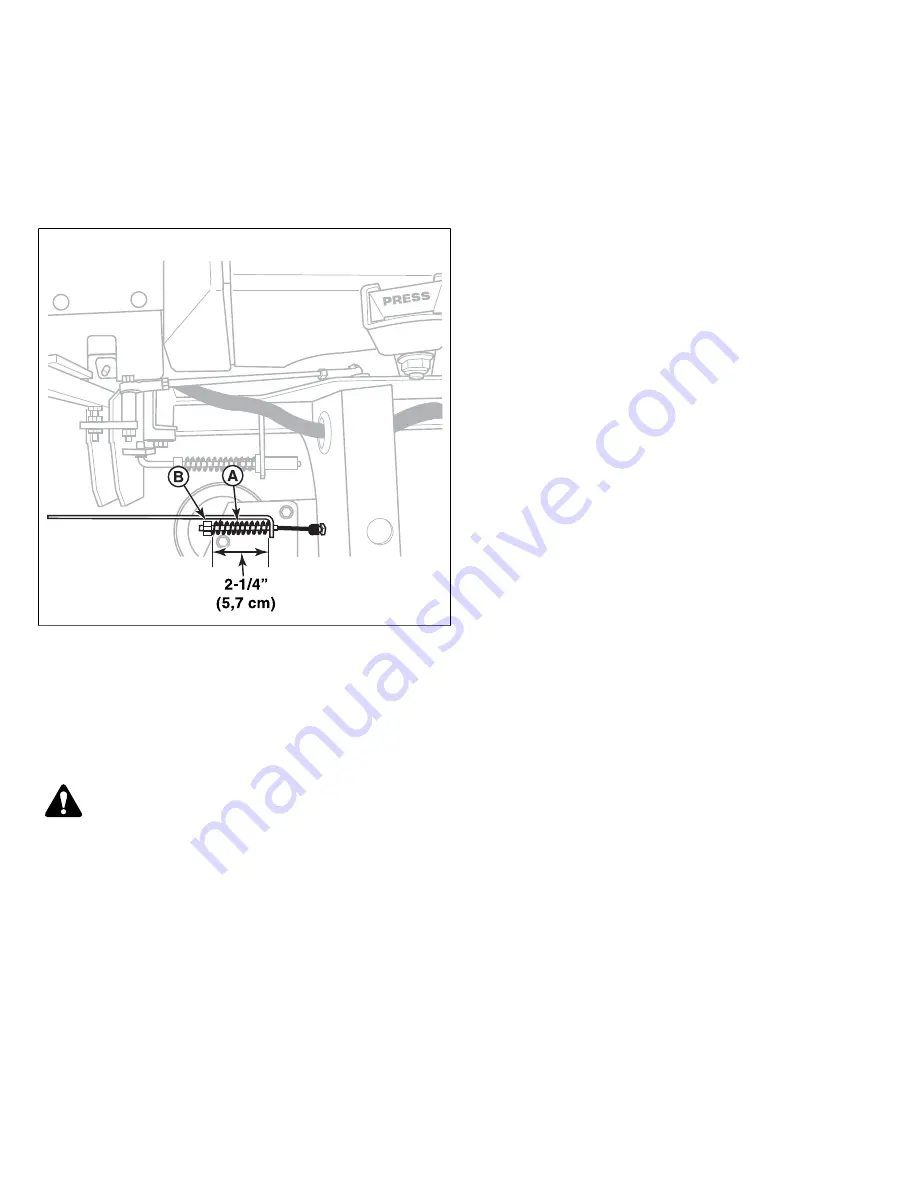
3. Locate the parking brake springs (A, Figure 33)


33

4. With the parking brake engaged measure the

compressed spring length. The spring should

measure 2-1/4" (5,7 cm) when compressed.

5. If the spring length is not 2-1/4" (5,7 cm), release

the parking brake, and turn the adjustment nut (B) to

compress or release the spring.
 

 CAUTION

Do not adjust the spring to be shorter than 2" (5,1 cm) when

compressed. This may damage the brake mechanism.

6. Engage the parking brake and re-measure the spring.

If this does not correct the braking problem, see your

dealer.

Содержание IS700Z series

Страница 1: ...N o t f o r R e p r o d u c t i o n ...

Страница 2: ...ck Check the mower deck drive belt Lubricate all grease and oil points Check Add fuel Start the engine PERFORM THE SAFETY CHECKS Check for LOOSE HARDWARE Check all OPERATOR CONTROLS Perform SAFETY INTERLOCK SYSTEM CHECK Register Product To register the product log onto www thepowerportal com select the appropriate brand click Sales Marketing select the Product Registration link and then select New...

Страница 3: ... the zero turn rider forward off the bottom skid 5 After moving the zero turn rider close the bypass valves run position E by raising the transmission release lever so that the back nut clears the slot push the lever towards the front of the machine Repeat this process for the other side of the zero turn rider Connect the Battery Cables WARNING Battery acid can cause severe burns Wear protective g...

Страница 4: ...ator 1 Unpack the seat 2 Install the seat A Figure 4 onto the seat mount plate B and secure with the 5 16 nylock flange nuts C 4 3 Connect the wire harness D to the seat switch E that is located in the bottom of the seat Assemble the Roll Bar Retainer Pins 1 Unpack the roll bar and hardware from the box 2 Lock the snap end A Figure 5 of the lanyard B through the retainer pin handle C and snap toge...

Страница 5: ...ve the rear tires from the unit 7 Loosely install the 4 1 2 bolts C Figure 7 and 1 2 washers D through the frame of the unit the roll bar the outer frame of the unit and loosely install the 1 2 lock nuts E 8 Tighten the 1 2 hardware that secures the upright tubes to the frame of the unit to 82 ft lbs 108 Nm of torque 9 Tighten the 1 2 bolt and side lock nuts that secure the top loop to the upright...

Страница 6: ... 1 72 bar Rear 15 psi 1 03 bar Check the Mower Blade Bolt Torque WARNING Avoid injury Mower blades are sharp Mower blades are sharp For your personal safety do NOT handle mower blades with bare hands Careless or improper handling of blades may result in serious injury Blade mounting bolts must each be installed with a flat washer and then securely tightened Torque blade mounting bolts to 120 ft lb...

Страница 7: ...een the rod pivots 5 Re fasten the ball joint to the lift pivot arm with the bolt spacer and nut in the same order that they were removed 6 Tighten the jam nut against the base of the ball joint 7 Remove the blocks from under the mower deck 8 Remove the cutting height adjustment pin from in front of the deck lift pedal arm Lift the mower deck and reinstall the adjustment pin in the desired cutting...

Страница 8: ...erify that the deck has been leveled correctly If the mower deck does not measure 4 10 2 cm in the front and 4 1 4 10 8 cm in the rear proceed with step 8 8 Loosen the jam nut A and turn the fine adjustment bolt B to adjust the deck height Turn the bolt clockwise to raise the deck Turn the bolt counter clockwise to lower the deck 9 Once the desired measurements are achieved re tighten the jam nut ...

Страница 9: ...ng Length chart to determine the correct spring length for your unit 3 Measure the coil length A Figure 19 of the mower belt idler tensioning spring B The measurement should equal the measurement as indicated in the chart If not continue with step 4 19 4 Loosen the jam nut C on the eyebolt D 5 Turn the adjustment nut E until the measurement as indicated in the chart is achieved 6 Re tighten the ja...

Страница 10: ...sters Interval Annually 1 Remove the 1 4 28 bolt A Figure 23 screwed into the caster and install a 1 4 28 grease fitting 23 2 Grease the front caster 3 Remove the 1 4 28 grease fitting and reinstall the 1 4 28 bolt 4 Repeat the process for the other side of the machine Checking Adding Fuel WARNING Gasoline is highly flammable and must be handled with care Allow engine to cool for at least 3 minute...

Страница 11: ...d you attempt to defeat the purpose of the safety system Functional Tests 1 Check the unit for loose bolts screws nuts etc 2 Start the engine and check all the controls for proper operation ground speed control levers parking brake throttle cable electric PTO clutch etc 3 Stop the engine and check for fluid leaks oil fuel and hydraulic oil 4 If any control fails to operate properly during testing ...

Страница 12: ...To Adjust the Handle Height Remove the mounting hardware and reposition the handle either up or down from its original position You will need to readjust the handle alignment as described above Speed Balancing Adjustment If the rider veers to the right or left when the ground speed control levers are in the maximum forward position the top speed of each of these levers can be balanced by turning t...

Страница 13: ...r consists of two neutral linkage rods and a pivot that connects the ground speed control lever to the transmission The lower rod that connects the transmission to the pivot is factory preset and should not be changed for neutral adjustment purposes The adjustment is achieved by changing the length of the upper rod A Figure 29 that connects the ground speed control lever to the pivot 29 Determinin...

Страница 14: ...he PTO engage the parking brake turn the ignition switch to OFF and remove the ignition key 2 Chock the wheels of the unit to prevent movement 3 Raise the seat to gain access to the neutral lockout components 4 Loosen the jam nuts A Figure 31 on the neutral lockout bolts B 31 5 Engage the parking brake The neutral lockout bolts will enter the notches of the neutral lockout plates C 6 Position the ...

Страница 15: ...stands Chock the front wheels to prevent the machine from rolling 3 Remove the rear drive tires WARNING Use two hands when adjusting the shock springs This will prevent the wrench from slipping while pressure is applied 4 See Figure 32 Using the supplied spanner wrench p n 5022853 insert the tip of the wrench into the notch in the pre load adjuster While holding the wrench in place with one hand t...

Страница 16: ...Locate the parking brake springs A Figure 33 33 4 With the parking brake engaged measure the compressed spring length The spring should measure 2 1 4 5 7 cm when compressed 5 If the spring length is not 2 1 4 5 7 cm release the parking brake and turn the adjustment nut B to compress or release the spring CAUTION Do not adjust the spring to be shorter than 2 5 1 cm when compressed This may damage t...

Отзывы: