


6
EN
CDA1168 Charger adapter
CDA1170 Quick charger
CDA1172 Quick charger
The batteries of the FX-POWER 20V battery
platform are interchangeable with all the FERM
FX-POWER battery platform tools.
Vibration level
The vibration emission level stated in this
instruction manual has been measured in
accordance with a standardised test given in
EN 60745; it may be used to compare one tool
with another and as a preliminary assessment of
exposure to vibration when using the tool for the
applications mentioned:
- using the tool for different applications, or with
different or poorly maintainted accessories,
may significantly increase the exposure level
- the times when the tool is switched off or when
it is running but not actually doing the job, may
significantly reduce the exposure level.
Protect yourself against the effects of vibration by
maintaining the tool and its accessories, keeping
your hands warm, and organizing your work
patterns.
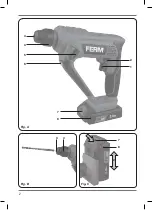
Description
The numbers in the text refer to the diagrams on
page 2.
1. On/off switch
2. Left/right rotation switch
3. Chuck
4. Locking sleeve
5. Function selection switch
6. Work light
7. Battery unlock button
8. Battery (not included)
3. ASSEMBLY
Before any work on the power tool,
remove the battery.
The battery must be charged before first
use.
Inserting the battery into the machine (Fig. C)
Ensure that the exterior of the battery is
clean and dry before connecting to the
charger or machine.
1. Insert the battery (8) into the base of the
machine as shown in Fig. C.
2. Push the battery further forward until it clicks
into place.
Removing the battery from the machine (Fig. C)
1. Push the battery unlock button (7).
2. Pull the battery out of the machine like shown
in Fig. C.
Exchanging and removing drill bits (Fig. B)
Caution: drills and chisels can get very
hot.
Before exchanging bits, first remove the
battery.
Inspect bits regularly during use. Blunt
bits should be re-sharpened or replaced.
Lightly oil the bit shaft before inserting it
into the chuck.
• SDS drills can be inserted by pushing the drill
into the chuck until a click can be heard. If
needed rotate the SDS drill a little to ensure the
keyway in the bit fits the chuck well.
DO NOT slide the locking sleeve (4) to
the rear when inserting bits.
• To remove the SDS drill, slide the locking
sleeve (4) to the rear and remove the SDS drill
while keeping the sleeve (4) in this position.
4. OPERATION
Hammer drills require very little operator
pressure. Excessive pressure on the tool
can lead to unnecessary overheating of
the motor, and burning of the driven tool.
It also may happen the drill bit deforms
and cannot be removed from the
machine again.
Содержание HDM1052
Страница 2: ...2 Fig C Fig B Fig A 2 1 4 3 3 4 6 5 7 8 7 8 1 2...
Страница 20: ...20 RU 1 a b c 2 a b c d e...
Страница 21: ...21 RU f 3 a b c d e f g h 4 a b c d...
Страница 22: ...22 RU e f g h 5 a b c d e f 130 C 130 C 265 F g 6 O b...
Страница 24: ...24 RU 2 1 2 3 4 5 6 7 8 3 p 1 8 2 p 1 7 2 SDS SDS 4 SDS 4 SDS 4 4 1 1 1 2 2...
Страница 25: ...25 RU 5 5 5 5 C 2012 19 EC FERM FERM...
Страница 26: ...26 AR FERM HDM1052 Ferm Ferm 1...
Страница 27: ...27 AR 1 a b c 2 a b c d e f RCD 3 a b c d e f g h 4 a b c d e f g...
Страница 29: ...29 AR 2 1 2 3 4 5 6 7 8 3 8 1 2 7 1 2 SDS SDS 4 4 SDS 4 SDS 4 1 1 1 2 2 5 5 5...
Страница 36: ...36 TR...
Страница 37: ...37...
Страница 38: ...38 Exploded view...
Страница 40: ...WWW FERM COM 2021 FERM 2109 14...


