


10
EN
When using the machine sideways
always use the sidewheel
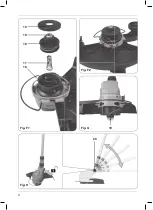
Mounting of the side wheel (Fig. E)
• Slide side wheel (13) over the side wheel
holder (14).
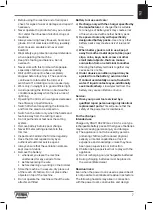
Mounting the wire spool (Fig. F1)
• Place the spring (17) into the spool housing
(18). Make sure the wider side of the spring is
placed on the trimmer head.
• Place the spool reel (16) over the spring (17).
Make sure the wires are passed through the
holes inside the housing (18). (Fig. F2)
• Cover the spool reel with the spool cover (15)
and fasten it by turning the cover tightly.
Before replacing the spool clean the
machine from any dirt.
Replacing the spool (Fig. F1)
• Remove the spool cover (15)
• Take out the spool reel (16) but leave the spring
(17) inside.
• Take the new spool reel (GTA1002) and place
it over the spring (17). Make sure the wires are
passed through the holes inside the housing
(18). (Fig. F2)
• Cover the new spool reel with the spool cover
(15) and fasten it by turning the cover tightly.
Using the tap and go system (Fig. G)
• When the wire is too short, switch the machine
on and press the tip of the spool reel (19) on
the ground (make sure this is done on a hard
surface).
• This will release the wire in order to get longer.
• The wire will be cut on the correct length
automatically by the blade mounted in the
protection guard (10).
Please keep power switched off and
disconnect the battery.
Tilting the trimmer head (Fig. H)
• Press the knob (20) of the trimmer head to tilt
the head in the desired position.
• When knob is released, the head will click and
lock in the chosen position
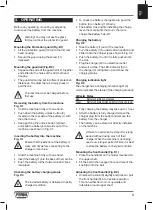
Turning the trimmer head (Fig. I)
• Press the ring (21) down towards the trimmer
head to turn the head in the desired position.
• When the ring is released, the head will click
and lock in the chosen position
Adjusting the pole height (Fig. J)
• To adjust the height of the machine, loosen the
lower adjustment ring (22)
• Carefully push the lower shaft (24) from the
upper shaft (23) down or upwards.
• Fasten the lower adjustment ring (22) to secure
the height of the machine
Before use, always visually inspect the
machine and its parts are correctly
mounted, not worn out or damaged.
Using your grass trimmer
• For your own safety and for best results read
the following user advice and do not use this
product for anything other than its intended
purpose.
• This grass trimmer is made for cutting grass.
All other use that is not specifically allowed in
this manual may lead to damage to the grass
trimmer or injury to the user.
Safety features
• The protection guard has a knife for cutting
the wire to the correct length. Do not touch the
knife to reduce the chance of injury to the user.
• The on/off switch (6) and safety switch (7)
must be operated together to start the motor.
If pressure on one of two switches is released,
the tool is designed to stop rapidly.
Switching On and Off
• To switch the trimmer on, press the safety
switch (7) and the start on/off switch (6) at the
same time.
• To switch off, release one or both switches.
Содержание GTM1003
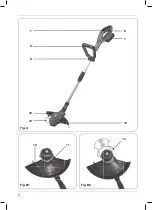
Страница 2: ...2 Fig B1 Fig B2 Fig A 1 14 6 11 12 10 7 8 9 10 12...
Страница 3: ...3 Fig D2 Fig E Fig C1 Fig C3 Fig D1 Fig C2 14 8 13 8 9 3 1 4 2 1 5 1...
Страница 4: ...5 4 3 2 1 4 Fig F1 Fig F2 Fig G Fig H 18 20 19 15 19 16 17...
Страница 5: ...5 Fig I Fig J 22 23 24 21...
Страница 24: ...24 Exploded view...
Страница 26: ...WWW FERM COM 2019 FERM 1911 01...