11
EN
proceed as follows:
• The wire which is coloured blue must be
connected to the terminal which is marked
with the letter N or coloured black.
• The wire which is coloured brown must be
connected to the terminal which is marked
with the letter L or coloured red.
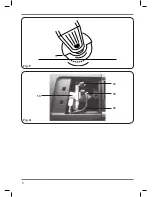
Checking and replacing the carbon brushes
(Fig. A & G)
If the carbon brushes are worn, the carbon
brushes must be replaced by the customer
service department of the manufacturer or a
similarly qualified person.
Only use the correct orginial type of
carbon brushes.
• Remove the carbon brush covers (4) by
untightening the screw, open the cover by
lifting it out of the machine.
• Release the spring (14) from the carbon brush
and hold the spring (14) by a screwdriver.
Remove the carbon brush (15) from its holder
(keep the copper wire (16) attached to the
machine).
• While holding the spring (14), place the new
carbon brush inside the holder.
• Release the spring (14) back into place making
sure it holds the brush (as shown in Fig. G).
• Loosen the screw (13) which will release the
copper wire (16) of the old brush. Tighten the
screw (13) again, making sure the copper wire
(16) of the new carbon brush is in between.
• Place the cover (4) back into place, make sure
no wiring gets jammed and tighten the screw.
• Always make sure to replace both carbon
brushes at the same time.
• After mounting the new carbon brushes, let the
machine run at no load for 15 minutes.
WARRANTY
The warranty conditions can be found on the
separately enclosed warranty card.
ENVIRONMENT
Faulty and/or discarded electrical or
electronic apparatus have to be collected
at the appropriate recycling locations.
Only for EC countries
Do not dispose of power tools into domestic
waste. According to the European Guideline
2012/19/EC for Waste Electrical and Electronic
Equipment and its implementation into national
right, power tools that are no longer usable must
be collected separately and disposed of in an
environmentally friendly way.
The product and the user manual are subject to
change.
Specifications can be changed without further
notice.
Содержание AGM1066S
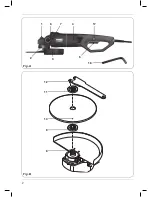
Страница 2: ...2 Fig A Fig B 8 9 10 11 12 18 5 2 7 1 6 4 17 3 ...
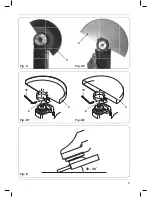
Страница 3: ...30 40o 3 Fig D1 Fig D2 Fig E Fig C Fig C2 2 2 3 3 3 3 18 18 ...
Страница 4: ...4 Fig G Fig F 14 15 16 13 ...
Страница 170: ...170 ...
Страница 171: ...171 ...
Страница 173: ...173 Exploded view ...
Страница 174: ...174 ...
Страница 176: ...WWW FERM COM 2014 FERM B V 1412 11 ...


