Fenix Mistral 2-0
2
Rev. 0.5
MISTRAL 2-0 is an high-competition, high-quality, 1/10-scale model car intended for persons aged 16 years and older with previous
experience building and operating RC model racing cars. This is not a toy; it is a precision racing model. This model racing car is not
intended for use by beginners, inexperienced customers, or inexperienced racers or by children without direct supervision of a
responsible, knowledgeable adult.
Before building and operating your MISTRAL 2-0, YOU MUST read through all of the operating instructions and instruction manual and
fully understand them to get the maximum enjoyment and prevent unnecessary damage. Read carefully and fully understand the
instructions before beginning assembly.
Contents of the box may differ from pictures. In line with our policy of continuous product development, the exact specifications of the
kit may vary without prior notice.
Take appropriate safety precautions prior to operating this model. You are responsible for this model‘s assembly and safe operation!
Please read the instruction manual before building and operating this model and follow all safety precautions
IMPORTANT NOTES – GENERAL
• This product is not suitable for children under 16 years of age without the direct supervision of a responsible and knowledgeable
adult.
• Carefully read all manufacturers warnings and cautions for any parts used in the construction and use of your model.
• Assemble this kit only in places away from the reach of very small children.
• First-time builders and users should seek advice from people who have building experience in order to assemble the model correctly
and to allow the model to reach its performance potential.
• Exercise care when using tools and sharp instruments.
• Take care when building, as some parts may have sharp edges.
• Keep small parts out of reach of small children. Children must not be allowed to put any parts in their mouth, or pull vinyl bag over
their head.
• Read and follow instructions supplied with paints and/or cement, if used (not included in kit).
• Immediately after using your model, do NOT touch equipment on the model such as the motor and speed controller, because they
generate high temperatures. You may seriously burn yourself seriously touching them.
• Follow the operating instructions for the radio equipment at all times.
• Do not put fingers or any objects inside rotating and moving parts, as this may cause damage or serious injury as your finger, hair,
clothes, etc. may get caught.
• Be sure that your operating frequency is clear before turning on or running your model, and never share the same frequency with
somebody else at the same time. Ensure that others are aware of the operating frequency you are using and when you are using it.
• Use a transmitter designed for ground use with RC cars. Make sure that no one else is using the same frequency as yours in your
operating area. Using the same frequency at the same time, whether it is driving, flying or sailing, can cause loss of control of the RC
model, resulting in a serious accident.
• Always turn on your transmitter before you turn on the receiver in the car. Always turn off the receiver before turning your transmitter
off.
• Keep the wheels of the model off the ground when checking the operation of the radio equipment.
• Disconnect the battery pack before storing your model.
• When learning to operate your model, go to an area that has no obstacles that can damage your model if your model suffers a collision.
• Remove any sand, mud, dirt, grass or water before putting your model away.
• If the model behaves strangely, immediately stop the model, check and clear the problem.
• To prevent any serious personal injury and/or damage to property, be responsible when operating all remote controlled models.
• The model car is not intended for use on public places and roads or areas where its operation can conflict with or disrupt pedestrian
or vehicular traffic.
• Because the model car is controlled by radio, it is subject to radio interference from many sources that are beyond your control. Since
radio interference can cause momentary loss of control, always allow a safety margin in all directions around the model in order to
prevent collisions.
• Do not use your model:
- Near real cars, animals, or people that are unaware that an RC car is being driven.
- In places where children and people gather
- In residential districts and parks
- In limited indoor spaces
- In wet conditions
- In the street
- In areas where loud noises can disturb others, such as hospitals and residential areas.
- At night or anytime your line of sight to the model may be obstructed or impaired in any way.
To prevent any serious personal injury and/or damage to property, please be responsible when operating all remote controlled models.
Failure to follow these instructions will be considered as abuse and/or neglect.
We have made every effort to make these instructions as easy to understand as possible.
However, if you have any difficulties, problems, or questions, please do not hesitate to
contact the Fenix support team at
. Also, please visit our Web site
at www. Fenix-racing.com or
or
https://www.facebook.com/FenixRacing.it/
the latest updates, set-up information, option parts, and many other goodies. We pride ourselves on taking excellent care of our
customers.
Just a quick note…. Read the manual “before” and not after….
Содержание Mistral 2-0
Страница 1: ...Fenix Mistral 2 0 1 Rev 0 5 Fenix Mistral 2 0 Rev 0 5 September 2019...
Страница 3: ...Fenix Mistral 2 0 3 Rev 0 5 Bag A Front End...
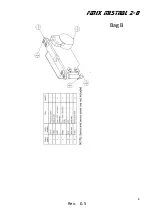
Страница 8: ...Fenix Mistral 2 0 8 Rev 0 5 Bag B...
Страница 13: ...Fenix Mistral 2 0 13 Rev 0 5 Bag C...
Страница 18: ...Fenix Mistral 2 0 18 Rev 0 5 How about a cup of coffee now You deserve it...
Страница 19: ...Fenix Mistral 2 0 19 Rev 0 5 Bag E Rear V link and common parts...
Страница 24: ...Fenix Mistral 2 0 24 Rev 0 5 Bag F Central shock holder...
Страница 28: ...Fenix Mistral 2 0 28 Rev 0 5 Bag G Wing to chassis...


