background image


4CH  DVR_FXV-H1304  User  Manual 

38 


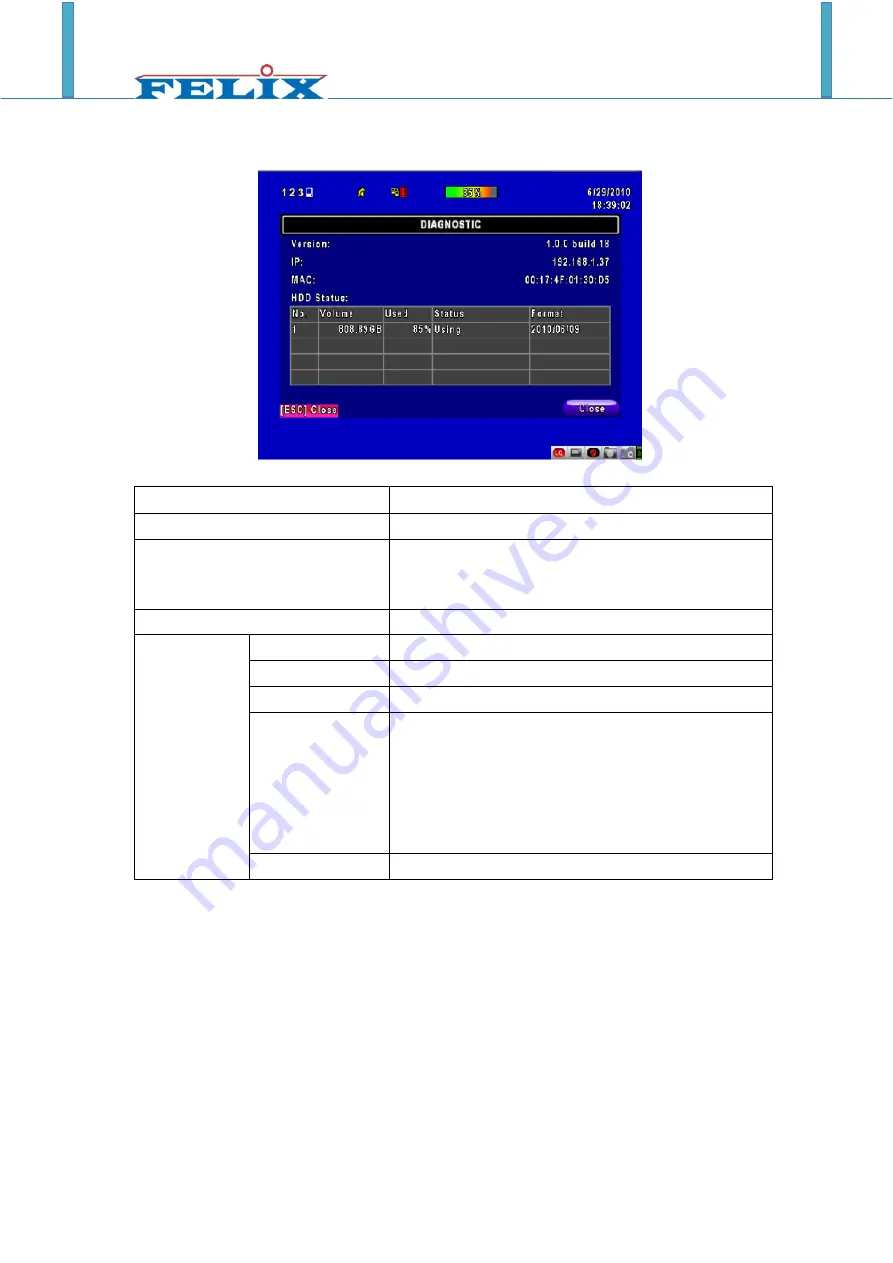
4-10 DIAGNOSTIC 


Item   

Description 

Version 

The current firmware version of DVR 

IP 

The  connected  IP  address  of  DVR.  If  disconnected 

from  network,  the  screen  will 

display”  NETWORK 

DISCONNECT

”. 

MAC 

MAC Address of DVR 

HDD  Status 

No. 

HDD  number 

Volume 

HDD  Capacity 

Used Rate 

Percentage of space used on HDD. 


Status 

Shows HDD status. 

USING

 means the HDD is being used for recording 

now 

GOOD/BAD

 means the HDD has a known/unknown 

format for the DVR. (Note: Please initialize your 

newly-installed HDD before using it.) 

Format Time 

The latest format time of HDD 


Содержание FXV-H1304

Страница 1: ...1 FXV H1304 USER MANUAL 4CH DVR This document contains preliminary information and subject to change without notice...

Страница 2: ...cause harmful interference to radio communications Operation of this equipment in a residential area is likely to cause harmful interference in which case the user will be required to correct the inte...

Страница 3: ...Permission Setup______________________________________ 24 4 5 2 User Picture Setup ____________________________________ 25 4 6 NETWORKING SETUP_______________________________________ 25 4 6 1 NETWORKI...

Страница 4: ...58 9 3 1 View DVR Group List _________________________________ 58 9 3 2 View Event Logs ______________________________________ 59 9 4 Local PC Information and Control ____________________________ 59...

Страница 5: ...er Manual 5 CHAPTER 1 PACKING DETAIL AND INSTALLATION 1 1 PACKING 1 DVR 2 Quick Start 3 IR Remote Control 4 SATA Cord 1pcs 5 CD 6 Screws x4 7 Power Adaptor Note Standard shipping products include neit...

Страница 6: ...4CH DVR_FXV H1304 User Manual 6 1 2 Hard Disk Installation Step Take out the screws as pictures show Back panel 3 screws Left 1 screw Right 1 screw Step 2 Open the cover follow the arrow direction...

Страница 7: ...Step Fix the Hard Disk with four screws on the bottom case as the picture indicated Step Put the cover back and fix it with 5 screws as Step 1 indicated Note After installation please initialize Hard...

Страница 8: ...s to increase value In PLAYBACK mode press to play forwards In SETUP mode press to reduce value In PLAYBACK mode press to play rewind ENTER MODE In SETUP mode press to enter values In PLAYBACK mode sw...

Страница 9: ...ONNECTORS VGA VGA port DC 12V DC 12V power jack MAIN SPOT monitor MAIN SPOT monitor BNC Video output VIDEO IN For cameras BNC input 8 ports AUDIO IN RCA input For CH1 AUDIO OUT RCA output For CH1 RS48...

Страница 10: ...ANEL CONNECTORS DC 12V DC 12V power jack VIDEO OUT MAIN SPOT monitor BNC Video output VIDEO IN For cameras BNC input 4 ports AUDIO IN RCA input For CH1 AUDIO OUT RCA output For CH1 VGA VGA port USB Fo...

Страница 11: ...hannels listen to audio signal and have some related operations under LIVE mode This paragraph describes the IR remote control mouse operation and on screen graphical icons under LIVE mode Table 3 1 1...

Страница 12: ...sting the cursor on this icon will bring up the following four menu icons Main menu Search menu Backup menu PTZ mode Turn on off recording Playback Resting the cursor on this icon will bring up the fo...

Страница 13: ...nnel Video loss detected on the channel USB device detected Connected to the LAN cable AUTO seq is on Freeze is on screen is frozen LOCK is on PTZ control is on Shows the current hard disk space has b...

Страница 14: ...le 3 2 1 Remote control functions under the PLAYBACK mode Button Description ENTER MODE Switch to full screen quad MENU Turn on off PAUSE PLAY Play back at normal speed SLOW Play back at slower speed...

Страница 15: ...ription Fast rewind Fast forward Play pause SLOW slow playback stop playback Playback channel by channel with snap shot display Full screen display Quad display 9 screen display Zoom in display If you...

Страница 16: ...n at pre set number N TOUR press to activate pre set tour PIP Set current PTZ location as the start of line scan FREEZE Activate line scan ZOOM Set current PTZ location as the end of line scan To move...

Страница 17: ...Please check the Account Setup for related setup of other log in users Table 4 0 1 Some definition of virtual keyboard Item Description Switch between capital and small letters Switch between numbers...

Страница 18: ...ILITY SETUP for detail 4 1 RECORD SETUP Item Description HDD FULL Select STOP to stop recording or OVERWRITE to reuse the HDD when HDD is full Stop Stop Recording Overwrite Start to overwrite that beg...

Страница 19: ...0 PAL 352X288 704X288 704X576 Record Type You can setup quality and FPS separately for record type No Check uncheck the box enable disable selected channel recording Quality Select quality Below Basic...

Страница 20: ...Drag the white bar or press to set up Sensitivity from valu e 1 to 10 for each channel The lower value you set the highe r sensitivity it will be Motion Area Setup Enter to setup motion detection are...

Страница 21: ...tinue setup Exit Save Save setup and leave Exit Discard Cancel setup and leave 4 3 SCHEDULE SETUP Except from starting recording manually you can also setup the recording time by weeks and schedule in...

Страница 22: ...tup Click on the time on the left side The setup menu will be displayed You can have detail setup by dates Time and event 4 3 2 Holiday Setup Since holidays are different by different country and regi...

Страница 23: ...from value 1 to 255 The default value is 128 Contrast Drag the bar or press to adjust Contrast of your camera from value 1 to 255 The default value is 100 Chroma U V Drag the bar or press to adjust C...

Страница 24: ...username Password Set up password for each user Password is 8 digits required and can be mixed by letters and numbers with case sensitive Letters can be mixed with capitals or lowercases Permissions...

Страница 25: ...ure wished to be changed to from hard drive 4 6 NETWORKING SETUP Item Description Connect type Setup mode for network connection ADSL DHCP LAN 3G HTTP Setup Enter to set up HTTP DDNS Setup Enter to se...

Страница 26: ...CP server automatically 4 6 1 2 LAN Select LAN for network connection the following information is required Item Description IP Address Enter IP address provided by ISP Subnet Mask Enter IP address of...

Страница 27: ...User Name Enter user name provided by ISP Password Enter password provided by ISP 4 6 1 4 3G Select 3G for network connection the following information is required Item Description Dial up Number Dial...

Страница 28: ...ure currently only supports the Huawei 3G card 4 6 2 HTTP Setup Item Description Enable HTTP Server Check to enable HTTP server Users can remotely access into the DVR over the network if the HTTP func...

Страница 29: ...ver ez dns I DVR NET DYNDNS ORG NO IP ORG 3322 ORG Host Name Enter the completed registered SMTP Server Including username Server If the user name is h 264 and you choose i dvr as your server you shou...

Страница 30: ...function SMTP Server Enter to set up SMTP Server name Varies according to the user User Name Enter to set up User Name Password Enter to set up Password Sender E mail Enter to set up e mail address of...

Страница 31: ...sable PTZ function for each channel Protocol Set up the protocol of PTZ cam The supported protocol are PELCO P PELCO D KND LI LIN SAMSUNG LG AVTECH PTZ ID Click or press to set up PTZ ID The valid ID...

Страница 32: ...location of DVR will be shown when users login from remote access Language Click or press to select OSD language Remote ID Default ID is 0 DVR is controlled by standard remote control Display Setup E...

Страница 33: ...ay Show Channel Name Turn On Off channel name display CRT Deflicker only for CRT monitor Border Color Set up the color of border in LIVE PLAYBACK mode Red Green Blue 4 8 2 DATE TIME SETUP Item Descrip...

Страница 34: ...rding to user s local time 4 8 2 2 TIME ZONE AND DAYLIGHT SAVING TIME SETUP Set up time zone and activate Daylight Saving Time function according to user s DVR location Item Description Select Time Zo...

Страница 35: ...nction Effective by this option selected DVR will automatically synchronize the time upon rebooting or by every 24 hours after booting Update Now Effectively Date and Time show on DVR will immediately...

Страница 36: ...4CH DVR_FXV H1304 User Manual 36 Item Description Key Tone Enable Disable keystrokes Buzzer Enable Disable buzzer operation when the alarm is triggered for HDD Error Motion and Vloss Video Loss...

Страница 37: ...to clean up all data on your USB The initialization is done when it s showed Succeed System Recovery Restore system default values Reset System Events Reset all the recording events in DVR Copy Setup...

Страница 38: ...will display NETWORK DISCONNECT MAC MAC Address of DVR HDD Status No HDD number Volume HDD Capacity Used Rate Percentage of space used on HDD Status Shows HDD status USING means the HDD is being used...

Страница 39: ...tem Description From The start time of backup file To The end time of backup file Device Select USB or PC as the backup device Free Space The available space in your backup device not available for PC...

Страница 40: ...Fileplay software to your PC You can get iFileplay file from the CD with DVR Packing PS When you using USB to backup file iFileplay exe will copy to USB with the backup file automatically Step 2 Setup...

Страница 41: ...DVR_FXV H1304 User Manual 41 Step 4 Ifileplay software will play the backup file automatically Step 5 If there is no display on the screen The backup file is not our DVR recording format Please check...

Страница 42: ...annel information included If there is recording data for an event a yellow signal will be shown on the left side of time information Rest your cursor under the line and press enter or left click your...

Страница 43: ...Logout user log out over the network Power On DVR Power on HDD Full HDD Space FULL HDD Error Detect HDD error Reboot DVR Reboot Info The channel where event occurs or login user 5 2 1 1 CRITERIA SETU...

Страница 44: ...with recording data are marked with a red square System will start playing back according to the date you selected Calendar will be shown by using mouse to click on year and month Click date to displa...

Страница 45: ...p s Operation system currently supports Windows XP SP2 and above and Window s Vista Windows 7 Step One Enter the IP address of DVR in IE browser Step Two Windows as below will show up Please enter the...

Страница 46: ...our AP software Step Five If you choose to run the software Start window will be shown up Please enter information of login DVR IP Port Username and Password or choose Play Recorded File to open backu...

Страница 47: ...ther related setup about user account and password please check 4 5 Account Setup The user name and password appeared in this image is only for demonstration Actual user name and password depend on th...

Страница 48: ...ly for demonstration Actual address is depending on the setup of on site DVR Step Two Windows as below will show up Please enter the user name and password Default user name and password is admin 1234...

Страница 49: ...4CH DVR_FXV H1304 User Manual 49 Step Three Click on Jpeg Viewer Step Four DVR images appear PS Only for viewer without any operation function...

Страница 50: ...d Needed to support DirectX9 0 Above Note 1 Others DirectX 9 0 above Note 1 Known VGA card that support DirectX9 0 currently NVIDIA Geforce FXseries Geforce 6series Geforce 7series Geforce 8series Gef...

Страница 51: ...hedule Method By resolution fps and quality Setup fps and quality separately for normal and event recording 3 SATA DEVICE Capacity Internal Storage 1 HDD External Storage Not support Type SATA SATA co...

Страница 52: ...ients accessible 12 OTHERS OS Embedded Linux Multi Task Pentaplex Live Record Playback Network Backup Control Device Front Keys Remote Control Virtual Keyboard Mouse AP Software PC Viewer Direct monit...

Страница 53: ...on and Operation for Symbian Please refer to shipping the Mobile Symbian directory CD 8 2 Mobile Application Installation and Operation for Windows Mobile Please refer to shipping the Mobile WindowsMo...

Страница 54: ...tra space for storage VGA Card needs to support DirectX9 and function well while running it Please refer to p48 Note 1 Installation 1 Connect to the manufacturer s website and download the CMS softwar...

Страница 55: ...4CH DVR_FXV H1304 User Manual 55 6 Select Close to finish installation when the Installation Complete window shows...

Страница 56: ...password after CMS upgrade If an error message occurs as shown in the image please follow the instruction to solve the error Step 1 Please enter file manager to enter folder Windows and then folder Sy...

Страница 57: ...ut DVRs groups and events See 9 3 Information List for more detail PC information and control Information about local PC s hard disk volume recording etc See 9 4 PC Information and Control for more de...

Страница 58: ...the DVR list double left click on a connected DVR will show its image in main display See 9 6 2 DVR Administration for further information On the Group list double left click on a group will show liv...

Страница 59: ...of available space HDD capacity of C drive where CMS is installed Recording Directory Setting Recording Directory Default is C Program files iCMS Recording Cycle Set the capacity size of the Recording...

Страница 60: ...the location of screen for each channel and turn on off audio signal with mouse click 9 5 1 Audio Control In live mode you can turn on off the audio signal of Ch1 Ch4 Audio signal is On Audio signal...

Страница 61: ...pressing will bring the e MAP drag down menu If the channel has been set up to use e MAP the menu will show all the e MAP titles that have been entitled to this channel otherwise No eMaps will be sho...

Страница 62: ...ilable Icon Description 8 direction key Rotate the PTZ ZOOM Zoom in ZOOM Zoom out Setup the PTZ spot as pre set N FOCUS Focus in FOCUS Focus out Move to pre set N Set PTZ Preset Setup 16 pre set N Got...

Страница 63: ...stration Please see 9 6 2 DVR Administration Group Administration Please see 9 6 3 Group Administration eMap Administration Please see 9 6 4 eMap Administration Remote Playback Please see 9 6 5 Remote...

Страница 64: ...efault is none of the authority is assigned The administrator should assign proper authority to each user These user accounts can be deleted or edited later on Select OK to save the setup Icon Descrip...

Страница 65: ...different DVRs to be set in a group This function allows you to monitor and manager channels from multiple DVRs easily and flexible Steps 1 Add a new group and set its name and description 2 Click Sel...

Страница 66: ...up to select 64 camera 4 Click OK to return to the previous window 5 Select a display mode 6 Drag a channel from the lower left panel into the main display to a preferred location Or change the chann...

Страница 67: ...cture can be picked by the user and channels from multiple DVRs can be placed and dragged around on the picture Steps to follow 1 Click and a path for the picture will be prompted 2 Select a picture c...

Страница 68: ...4CH DVR_FXV H1304 User Manual 68 5 Click OK to save...

Страница 69: ...unction select a DVR and a display mode on top of the screen After the recorded segments are listed below double click on one to show its image on the right Icon Description Start playing Pause Fast f...

Страница 70: ...D that s uninstalled from DVR by CMS See the picture below the left part of screen is recording data in list that s separated by hour and the right part is main display You can change the display mode...

Страница 71: ...7 File Playback You can play the recorded irf files by File Play in CMS It allows you to change the display mode forward or rewind the file and drag the time bar Icon Description Start playing Pause S...

Страница 72: ...splay mode 2 Select a date 3 Double click an event and play back the images on the right Use buttons at the bottom to control the playback 9 6 9 Snapshot Data It can display all the snapshots you ve t...

Страница 73: ...elete them here Steps to follow 1 Choose the recording time at upper left corner it will be played on the main display 2 You can choose the display mode 3 Time bar will be shown at right lower corner...

Страница 74: ...ess if any or press the Add New button if none Step 3 The Host Manager dialog will show insert succeed when user setup successfully The host domain column will show up the setup just entered Next ente...

Страница 75: ...functions and input related information Step 5 Back to the i dvr net on this page by pressing F5 Refresh IP will be automatically updated into the DVR of the real IP location DDNS work properly when...

Страница 76: ...server may be used To register DDNS on ez dns com please follow the steps as shown Step 1 Please open IE browser and then enter http ez dns com in IE browser bar First time please click on the top of...

Страница 77: ...IP address by pressing F5 refresh button Step 4 Enter DVR Main Menu Network Setup DDNS Activate DDNS functions and input related information host domain is named by your choice demodvr ez dns com is...

Страница 78: ...k to the ez dns com on this page by pressing F5 Refresh IP will be automatically updated into the DVR of the real IP location DDNS work properly when this option selected This part of the information...

Страница 79: ...te monitoring for the first time IE ActiveX Control is needed to be downloaded 1 When remote monitoring on IE for the first time an alert message occurs Install ActiveX control on the tool bar 2 Click...

Страница 80: ...monitoring image appears 5 If message Your security Settings do not allow web sites to use ActiveX controls installed on your computer pops on when logging in please follow the next instruction 6 Firs...

Страница 81: ...er Manual 81 7 Select Security Trusted Sites Sites 8 Enter DVR address This address is only for demonstration Please use the address depends on the setup of on site DVR into the blanks shown in pictur...

Страница 82: ...4CH DVR_FXV H1304 User Manual 82 9 Newly added website will appear at the trusted web sites list Press close 10 Go back to IE window press refresh button or F5...

Отзывы: