


- 8 -
EN
5. Operation
5.1 Power ON/ OFF
Before power on the gimbal, make sure you have balanced gimbal, and toggle the tilt lock, roll
lock, and pan lock levers to the unlocked position.
If you haven't unlocked all the 3 axes, gimbal will enter sleep mode to protect itself. Please
single tap power button to wake up gimbal after unlocked all the 3 axes.
! Please set motor power first after power on gimbal for the first time or after change a new
camera/lens.
Long press the power button and release it when you hear the beep sound to power on/ off.
When the remote control handle is installed on gimbal, both two power butons can
power on the whole combination. When the handle is detached, please power on each
part separately.
1
2
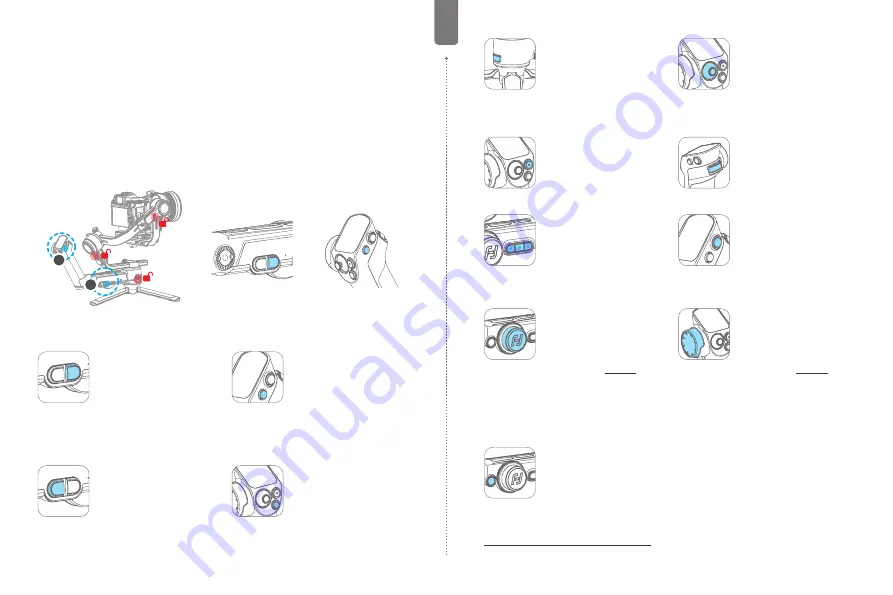
① Gimbal power button
② Handle power button
5.2 Button operation
Gimbal power button
Long press:
Power on/off the whole
combination (Remote control
handle installed)
Power on/off the gimbal (Remote
control handle detached)
Single tap:
Wake up
Double tap:
Enter sleep mode
Handle power button
Long press:
Power on/off the whole
combination (Remote control
handle installed)
Power on/off the handle (Remote
control handle detached)
Single tap:
Wake up
Double tap:
Enter sleep mode
Gimbal mode button
Single tap:
Pan follow/Lock
mode (Switch in turn)
Double tap:
PTF
Triple tap:
FPV
Handle mode button
Single tap:
Pan follow/Lock
mode (Switch in turn)
Double tap:
PTF
Triple tap:
FPV
Long press:
Motion sensing
mode (Release to exit)
Motion sensing mode is using while
the handle is detached
Trigger button
Double tap:
Recenter
Triple tap:
Enter/Exit selfie
mode
(Pan axis turn 180° )
Press and hold:
PTF (Release to
exit)
You can custom the function via APP.
Joystick
Push:
Control the movement of
the tilt and pan axes.
Shutter button*
Press half way:
Focus
Single tap (Fully):
Start/Stop
recording
Long press (Fully):
Take photo
Focusing wheel*
Turn:
Control electronic focusing
The camera must support this
function.
A/B/C button
Long press:
Mark the current
position as A/B/C
Single tap:
Return to the position
A/B/C that you have marked.
Can be used to mark axes/focus
position.
Home button
Single tap:
(1) Lock/Unlock screen (In home
page)
(2) Return to home page (In other
pages)
Multifunction knob (Main
knob)
Turn:
(1) Control the movement
of the roll, tilt and pan axes.
(2) Control focus.
(3) Contol focus
motor 1
.
(4) Adjust the parameter in the
touch screen.
Set current control option as option
(1) or (2) or (3) through long press
the knob function switching button
or swipe up in home page.
Multifunction knob (Handle
knob)
Turn:
(1) Control the movement
of the roll, tilt and pan axes.
(2) Control focus.
(3) Contol focus
motor 2
.
(4) Adjust the parameter in the
touch screen.
Set current control option as option
(1) or (2) or (3) through swipe up in
home page.
Knob function switching button
Single tap:
Switch the control object while the multifunction knob(manin knob)
controlling the movement of the 3 axes (Tilt/Pan/Roll)
Long press:
Switch the control options of multifunction knob(manin knob) in turn
(The movement of the 3 axes/Electronic focus/Focus motor 1)
*Need to connect with camera. Refer to the camera compatibility list on
https://www.feiyu-tech.com/feiyu-scorp-pro/
More button function introductions please refer to the user manual.


