

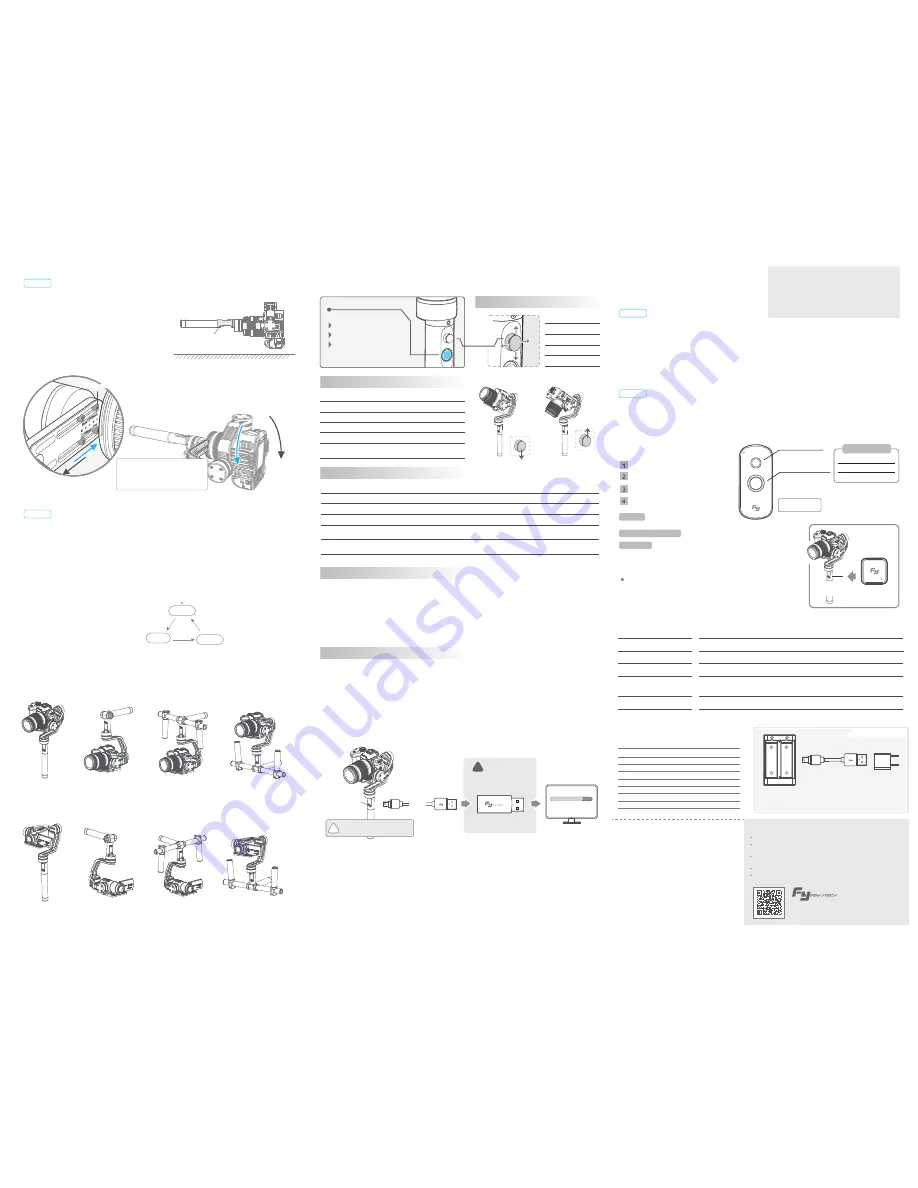
Joystick Direction
Up
Down
Left
Joystick down
Joystick up
Down
Up
Left
Right
Ringt
Reset the tilting axis of the gimbal to initial
orientation and initial mode
Operation
Double tap
Single tap
Function
Explanation
Panning mode / Lock mode
Panning and Tilting mode
Triple tap
Under panning and tilting mode, single tap to switch to lock mode
Rotation 180°in horizontal
Make the camera lens precision rotation 180 °
Single tap to switch between panning mode and lock mode
Quadruple tap
Reset
Single tap again to awake the gimbal, or triple tap
to initialize the gimbal
Long press
for 1 second
Standby
Operating Instructions of Function Button
LED status
Mode / Status
Single flash
Double flashes
Panning mode
Panning and Tilting mode
Lock mode / Initialize the gimbal
Always on
Flash quickly
Rolling angle adjustment /
Initialization failure / Malfunction
Three flashes
Standby
Explanation of LED indicator status
Explanation of joystick control
Realize other functions
Switch the working mode
Start the gimbal
Identify the current mode of the
gimbal by the indicator lights
Function Button
(Indicator light)
5. Operation
7. Gimbal Horizontal Angle
Adjustment
8. Using the RC
9. Parameters
1865
0
1865
0
Charger
5V USB
Power Adapter
USB Cable
mini port
( 70cm )
(Equipped by users)
821g(not including the accessories of batteries, camera,camera lens and ect.)
Panning Increments
3°/s ~ 150°/s
Adaption
Weight
Sony NEX-5N/NEX-7 and other N-series, SONY A7RII / ILCE-7R / ILCE-5100,
Panasonic LUMIX GH4 and other cameras with similar dimensions with weight less 1070g
(The camera weight including the accessories of lens and ect.)
Usage Time
6 Hours
Tilting Increments
2°/s ~ 75°/s
Tilting / Rolling / Panning
360°
STEP 1
STEP 2
STEP 3
Balance adjustment of the panning axis
The horizontal angle needs to be adjusted
whenever the following situations happen to the
gimbal, user can adjust the horizontal angle by
gimbal initialization and joystick.
(1)The tilt angle is not leveled with the horizontal surface.
(2)The roll angle is not parallel to the horizontal surface.
(3)Under lock mode, the panning angle drifts.
(1)After powering the gimbal on, hold down the function button for one second to enter standby mode,
and the LED indicator shall flash for three times.
(2)Consecutively tap the function button for three times, LED indicator shall be always on, place the
gimbal on a flat surface and keep it stationary.
(3)When the initialization is completed, the LED indicator will flash for three times.
Initialize the gimbal
Tap button for six times for rolling angle adjustment, the tilt and roll angle restore to the horizontal
status. Under the rolling angle adjustment state, move the joystick to the left or to the right to
adjust the rolling angle, single tap again to save the setting and exit after adjusting.
Rolling angle adjustment
When the initialization failed, the LED indicator will flash quickly, repeat step (2) & (3) to reinitialize.
After finishing the
STEP1,
the rolling angle still not paralles to the horizontal surface, you can use the joystick
to adjust the rolling angle according to
STEP 2
.
As shown, if the camera is tilted toward A, the vertical arm
live A direction, if tilted toward B, the vertical arm should be
live B direction.
Adjust balance of the panning after the balance adjustment of the tilting and rolling.
Keep the socket connector of the gimbal
parallel to the ground, refer the right picture:
leave hold of it and observe the camera status.
Prohibit any user for any illegal purpose.
Users will be responsible for all behaviors of purchase
and use products.
The Company assumes no liability for any risks related
to or resulting from the debug and use of this product
(including the direct, indirect or third-party losses).
For any unknown sources of using, we will not be at
any services.
Feiyu Tech reserves the right to amend this manual
and the terms and conditions of use the gimbal at
any time.
ATTENTION
D I S C L A I M E R
Please correctly assemble the gimbal in accordance with the diagram.
Please install the camera, complete the installation and balance
adjustment before power on the gimbal.
Please charge the battery with the standard charger.
When the gimbal is not in use or placed on the table, please ensure it
is powered off.
Please upgrade the firmware with the provided USB cable and USB
connertor.
Please visit the official website of Feiyu Tech
to get related information: www.feiyu-tech.com
Support email: [email protected]
Connect the Mini-USB port of the USB cable with the charger,
and the USB port with 5V USB power adapter.
How to Charge
Joystick
for
direction
control
Function
Interface
USB Cable
Attention !
Make sure that the
connection to the
computer is done by the
!
USB Connector
Upgrade steps
(2)
Install the batteries and turn on the gimbal.
(1) Download and install the USB driver and the software for updating and the latest firmware
from
www.feiyu-tech.com
Connect the USB cable to mini port as the diagram.
Attention please use the USB connector.
Please update the firmware as the manual.
(3)
(4)
6. Firmware Upgrade
Joystick
Wireless
Remote Control
Function Button
Turn on the wireless remote control
Install the receiver of wireless
remote control.
Turn on the gimbal.
Use the wireless remote control
to control the gimbal.
Connect the Micro interface of
wireless remote control with 5V charger by USB cable.
15 meters in an open environment.
RC needs to be matched code whenever the following situations:
(1) Connecting properly, but still fail to control.
(2) Change the receiver or wireless remote control
Charging
Match Code
Remote Control Distance
* Tip:
It will be automatically
powered off to save battery if
there is no operation within
three minutes.
Power on / off
Long press
Power
3 seconds
0.5 second
ON
OFF
Keep the gimbal powered on, restart the remote control
and connect the receiver of RC to the gimbal, press the remote control
function button for 7 times in 5 seconds, if the indicator on the RC flashes
5 times it means the receiver and the transmitter of RC match successfully,
then customer can control the gimbal by the RC.
a.
b.
c. After the adjustment tighten the screws on cross arm.
Vertical arm
B
A
If the camera leaning left or right, use the mini
spanner unscrew the 4 screws on the vertical arm,
adjust the vertical arm to leaning opposite direction,
until the camera keep the current position after
adjustment.
Thumb screw
PC
Upgrade........
70cm
mini port
Be sure to insert the
batteries before upgrading
!
Receiver
for wireless
remote control
Please install
the receiver
properly before
power on
Working Modes
Other Functions
Panning Mode
The camera is allowed to pan left or right. Vertical tilts or rolls are restricted.
Panning and Tilting Mode
The camera is allowed to pan left or right and tilt up and down. Rolls are restricted.
Lock Mode
The camera stays in its current orientation. All panning, tilting and rolls are restricted.
Reset
Reset the tilting axis of the gimbal to initial orientation and initial mode.
Standby
In standby model, keep the gimbal in power-up state, the motor stops working, the indicator
light flashes for three times, and single tap again to wake the gimbal.
Horizontal
Socket connector
Function
Interface
A
B
Tips:
Please don’t fully unscrew
the screws that secure the motor
while adjust the balance.
Unscrew till loose is advisable.
STEP 4
Camera adaptation parameter adjustment
After finishing the stabilizer balance adjustment , turn on the gimbal for a testing, please refer to
point 6 in "install" chapter. If there is a slight vibration happen when turn on the gimbal , it means
the adaptation parameter needs to be adjusted.
(1) Long press the function button for 1 second to enter the standby mode.
(2) Five tap the function button during the standby mode for a parameter switching.
Parameter switching cycle“Strong - Middle - Weak - Strong”.
Default setting: Strong
(3) Finish the parameter setting , single tap to awake the gimbal.
For more adjustment, please repeat the step above.
Parameters and weight
matching reference
Strong:850g - 1070g
Middle:600g - 850g
Weak:350g - 600g
Note: weight include the
weight of camera, lens and
the other components.
Strong
Default
Middle
Weak
For most video cameras equipment , highly recommended pitch axis left way installed.
(* The relative position about the pitch axis with the lens facing the user as a reference. )
4. Used Method
(* The relative position about the pitch axis with the lens facing the user as a reference. )
MG gimbal supports the pitch axis left or right installed, please select one of the methods
according to the convenience of device operations.
For most cameras equipment , highly recommended pitch axis right way installed.
Portable
Dual Handheld
Dual Portable
Handheld
Portable
Dual Handheld
Dual Portable
Handheld
Pakcage List
Product model
MG gimbal
Handle
Adjusting clamping plate
Connector
Corss bar
Hand grip
Batteries (type:
18650
)
Charger
Quantity
1
1
1
1
1
2
2
4
1
USB cable
(mini port, 70cm)
1
Mini allen key
3
Thumb screw
Thumb screw for fixing lens 1
Product model
Wireless RC (
2.4G
)
Wireless RC receiver
Quantity
1
1
USB cable
(micro port, 50cm)
1
USB connector
1