21
en
Changing the tool.
Before mounting or replacing cutting tool or accessories, pull the power plug.
This preventive safety measure rules out the danger of injuries through acci-
dental starting of the power tool.
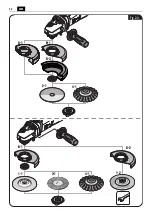
Mounting a grinding disc (figure 8).
Press the locking button only when the
motor is stopped.
Press the locking button fully through and
hold it in place. Loosen the quick-clamping
nut.
Unscrew the quick-clamping nut.
Replace the used-up grinding accessory
or insert a new one.
Pay attention that the grinding acces-
sory is properly centered between the
support flange and the quick-clamping
nut.
Manually screw the quick-clamping nut on
again.
Press the locking button fully through and
hold it in place. Tighten the quick-clamping
nut.
Note:
Observe the mounting direction of the
quick-clamping nut.
Offset grinding discs must be mounted in
such a manner that their grinding surface is
2 mm below the bottom edge the of the
wheel guard.
Grinding accessories that do
not meet these requirements cannot be ade-
quately covered off and are not permitted.
WARNING
Fig. 8
2.
3.
3.
1.
1.
4.
1.
4.
4.
4.
2.
3.
3.
3.
Содержание CG15-125BL Inox Series
Страница 2: ...2 Instruction Manual Mode d emploi Instrucciones de uso en 3 fr 34 es 66...
Страница 32: ...32 en Bild 12 Fig 20 B 1 1 1 3 1 4 1 B 1 A 1 2 1 4 1 B 3 B 2 1 2...
Страница 33: ...33 en Bild 12 Fig 21 3 2 3 3 4 2 5 1 P 1...
Страница 64: ...64 fr Bild 12 Fig 20 B 1 1 1 3 1 4 1 B 1 A 1 2 1 4 1 B 3 B 2 1 2...
Страница 65: ...65 fr Bild 12 Fig 21 3 2 3 3 4 2 5 1 P 1...
Страница 96: ...96 es Bild 12 Fig 20 B 1 1 1 3 1 4 1 B 1 A 1 2 1 4 1 B 3 B 2 1 2...
Страница 97: ...97 es Bild 12 Fig 21 3 2 3 3 4 2 5 1 P 1...

