background image

65

es

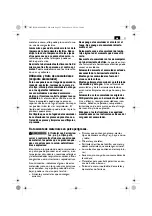
Selección del sentido de giro 
(Figura 12).

Coloque el selector de sentido de giro en la 
posición central para evitar una puesta en 
marcha accidental, p. ej., durante el trans-
porte.
Ajuste el sentido de giro deseado con el selec-
tor del sentido de giro.

Únicamente accione el selector del sen-
tido de giro con el motor detenido.

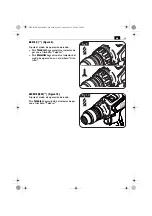
Ajuste de la etapa velocidad
(ASB18 Q (**), ABS 18Q (**)) 
(Figura 13).

Seleccione la 1ª velocidad para trabajar a bajas 
revoluciones con un torque elevado. Este 
ajuste es apropiado para taladrar con brocas 
de gran diámetro.
Ajuste la 2ª velocidad para trabajar a altas 
revoluciones con un torque reducido. Este 
ajuste es apropiado para taladrar con brocas 
de pequeño diámetro.
Se recomienda determinar probando cual es 
la etapa de velocidad más adecuada al material 
a trabajar.
Siempre empuje hasta el tope el selector de 
velocidad. De lo contrario podría dañarse la 
herramienta eléctrica.

Solamente accione el selector de veloci-
dades con el motor detenido.

Fig. 12

Selector de sentido de giro

Selector de velocidad

Fig. 13

OBJ_BUCH-0000000311-001.book  Page 65  Friday, May 4, 2018  9:20 AM

Содержание 7 113 23 62 09 0

Страница 1: ...an Power Tool Company 323 Traders Boulevard East Mississauga Ontario L4Z 2E5 Telephone 905 8901390 Phone 1 800 265 2581 www fein com Headquarter C E Fein GmbH Hans Fein Straße 81 D 73529 Schwäbisch Gmünd Bargau www fein com FEIN Service FEIN Power Tools Inc 2735 Hickory Grove Road Davenport IA 52804 Phone 800 441 9878 magdrillrepair feinus com ABS18 Q 7 113 ASB18 Q 7 113 ASCM 18 QSW 7 116 OBJ_DOKU...

Страница 2: ...2 Instruction Manual Mode d emploi Instrucciones de uso en 3 fr 25 es 48 OBJ_BUCH 0000000311 001 book Page 2 Friday May 4 2018 9 20 AM ...

Страница 3: ...d power tools Unmodified plugs and matching outlets will reduce risk of electric shock b Avoid body contact with earthed or grounded surfaces such as pipes radia tors ranges and refrigerators There is an increased risk of electric shock if your body is earthed or grounded c Do not expose power tools to rain or wet conditions Water entering a power tool will increase the risk of electric shock d Do...

Страница 4: ... mis alignment or binding of moving parts breakage of parts and any other condi tion that may affect the power tool s operation If damaged have the power tool repaired before use Many accidents are caused by poorly maintained power tools f Keep cutting tools sharp and clean Properly maintained cutting tools with sharp cutting edges are less likely to bind and are easier to control g Use the power ...

Страница 5: ...essive accumulation of metallic dust can cause an electrical hazard Never look or stare into the light of the power tool s lamp from a short distance Never point the light of the lamp into the eyes of other persons in close vicinity The radiation pro duced by the lamp can be harmful for the eye Do not direct the power tool against yourself other persons or animals Danger of injury from sharp or ho...

Страница 6: ...g metal continuous sunlight or high ambient temperatures To prevent this Avoid overheating the material being sanded and the power tool Empty the dust collector container in time Observe the material manufacturer s working instructions Observe the relevant regulations in your country for the materials being worked Hand arm vibrations While working with this power tool hand arm vibrations occur The...

Страница 7: ...evel measured at the workplace LpA re 20 μPa in decibels 76 91 77 9 Measuring uncertainty KpA in decibels 3 3 3 Measured A weighted sound power level LwA re 1 pW in decibels 87 102 88 9 Measuring uncertainty KwA in decibels 3 3 3 C weighted peak sound pressure level measured at the workplace LpCpeak in deci bels 89 107 89 5 Measuring uncertainty KpCpeak in decibels 3 3 3 Vibrations Mean vibrationa...

Страница 8: ...ery against heat e g against continuous intense sunlight Observe the notes in the text aside Switching on Switching off This symbol confirms the certification of this product for the USA and Canada Confirms the conformity of the power tool with the guidelines of the European Community This sign warns of a directly imminent dangerous situation A false reac tion can cause a severe or fatal injury Th...

Страница 9: ...ke rate at no load nS rpm min min 1 r min Impact rate P W Electrical power Angle width U V Electric voltage f Hz Frequency I A Electric current intensity m kg lbs Mass l ft in Length width height depth diameter or thread Ø ft in Diameter of a round part K Uncertainty m s2 Vibrational emission value according to EN 60745 vector sum of three directions m s kg A mm V W Hz N C dB min m s2 Basic and de...

Страница 10: ...l starting of the power tool Not all accessories described or shown in this instruction manual will be included with your power tool WARNING Gripping surface Battery Rotational direction switch Gear selector Torque setting Drill chuck Battery Unlocking button Light Tool holder On Off switch Belt hook Bit garage Operating mode selector switch Fig 1 OBJ_BUCH 0000000311 001 book Page 10 Friday May 4 ...

Страница 11: ...ood 2 in 50 mm 2 in 50 mm 1 5 8 in 40 mm Drilling diameter stone 1 2 in 13 mm Chuck clamping range 1 16 1 2 in 1 5 13 mm 1 16 1 2 in 1 5 13 mm 1 16 1 2 in 1 5 13 mm Screw diameter 5 16 in 8 mm 5 16 in 8 mm 5 16 in 8 mm Weight according to EPTA Proce dure 01 power tool without battery and application tool 2 07 lbs 0 94 kg 2 16 lbs 0 98 kg 1 87 lbs 0 85 kg Weight according to EPTA Proce dure 01 dril...

Страница 12: ...he first time Release the battery by pressing the battery unlocking button and pull the battery out of the handle Do not exert any force when doing this Connect the battery charger to a socket out let slide the battery onto the battery charger and charge the battery After the charging process is over insert the battery into the power tool and pull the plug of the battery charger out of the socket ...

Страница 13: ...t the bit garage fit the spacer as well as the bit garage to the tool and fasten both with the screw To mount the belt hook together with the bit garage fit the spacer the belt hook and the bit garage to the tool and fasten all parts with the screw 1 3 2 1 3 2 Belt hook Bit garage Fig 3 Spacer Screw 1 3 4 2 OBJ_BUCH 0000000311 001 book Page 13 Friday May 4 2018 9 20 AM ...

Страница 14: ...uck onto the spindle Release the ring Turn the drill chuck to lock it Removing the drill chuck figure 5 When changing the drill chuck avoid debris from entering the drill chuck and the spindle Slide the ring frontwards and pull the drill chuck off the spindle 1 Fig 4 Drill chuck Ring 2 4 3 2 1 Fig 5 Drill chuck Ring OBJ_BUCH 0000000311 001 book Page 14 Friday May 4 2018 9 20 AM ...

Страница 15: ...juries through accidental starting of the power tool Mounting application tools figure 6 Open the keyless drill chuck Afterwards insert the desired application tool Tighten the keyless drill chuck Mounting application tools figure 7 Insert the application tool WARNING Fig 6 Drill chuck 2 3 1 Fig 7 OBJ_BUCH 0000000311 001 book Page 15 Wednesday May 9 2018 11 55 AM ...

Страница 16: ...sed and intended for the respective application Setting the operating mode Change the operating mode only when the power tool is switched off Otherwise the machine can become damaged Always turn the operating mode selector switch to the stop Otherwise the machine can become damaged ASB18 Q figure 8 Set the desired operating mode For drilling set the operating mode selec tor switch to the drilling ...

Страница 17: ...o the drilling symbol For screwdriving set the operating mode selector switch to the screwdriving sym bol ASCM18 QSW figure 10 Set the desired operating mode For drilling adjust the torque setting to the drilling symbol Fig 9 Fig 10 OBJ_BUCH 0000000311 001 book Page 17 Friday May 4 2018 9 20 AM ...

Страница 18: ...nds on the force with which the power tool is pressed against the screw Low torque Small screws High torque Large screws Determine the torque setting with which the screws are screwed flush into the material by practical testing Fig 11 2 4 6 8 10 12 14 16 18 20 22 Torque setting 20 1 ASB18 Q ABS18 Q ASCM18 QSW Torque setting OBJ_BUCH 0000000311 001 book Page 18 Friday May 4 2018 9 20 AM ...

Страница 19: ...with low speed and high torque This gear setting is suitable for drilling with large drill bit diameters Adjust gear setting 2 to work with high speed and a lower torque This setting is suitable for drilling with small drill bit diameters The material dependent gear setting can be determined by practical testing Always slide the gear selector to the stop Otherwise the machine can become dam aged A...

Страница 20: ...dent gear setting can be determined by practical testing Adjust the rotation direction only when the machine is at a complete stop Switching on and off figure 15 Always hold the power tool firmly Otherwise you could lose control over the power tool In case of overload the machine switches off Thermal overload of the power tool is indi cated through flashing of the LED in the han dle Switching on P...

Страница 21: ... procedure the battery tem perature must be within the battery operat ing temperature range Battery charge control indicator figure 17 Press the button to activate the LED indica tion The real percentage of the battery charge condition is only indicated when the power tool motor is stopped The electronics automatically switch off the motor prior to the battery being deep dis charged WARNING Fig 16...

Страница 22: ...tivated impact function only the drill chuck from our accessories program may be used When using other QuickIN accessories the power tool the application tool the accessory or the workpiece can become dam aged OBJ_BUCH 0000000311 001 book Page 22 Friday May 4 2018 9 20 AM ...

Страница 23: ...oing this Do not attempt to clean clogged or dirty ventilation openings of the power tool with pointed metal objects use nonmetal tools or objects if necessary Do not use cleaning agents and solvents that can cause damage to plastic parts These include Gas oline carbon tetrachloride chloric solvents ammonia and domestic cleaning agents that contain ammonia Warranty and liability The warranty for t...

Страница 24: ...pped consulting an expert for hazardous material is required Dispatch batteries only when the housing is undamaged and no liquid is escaping from the bat tery Make sure that the battery contacts are not short circuited Use the original packaging Pack up the battery in such a manner that it cannot move around in the packaging Please also observe possibly more detailed national regulations Provided ...

Страница 25: ...Ne pas faire fonctionner les outils élec trique en atmosphère explosive par exemple en présence de liquides inflam mables de gaz ou de poussières Les outils électroportatifs produisent des étincelles qui peuvent enflammer les poussières ou les fumées c Maintenir les enfants et les personnes présentes à l écart pendant l utilisation de l outil Les distractions peuvent vous faire perdre le contrôle ...

Страница 26: ...llecteurs de poussière peut réduire les risques dus aux poussières 4 Utilisation et entretien de l outil a Ne pas forcer l outil Utiliser l outil adapté à votre application L outil adap té réalisera mieux le travail et de maniè re plus sûre au régime pour lequel il a été construit b Ne pas utiliser l outil si l interrupteur ne permet pas de passer de l état de mar che à arrêt et vice versa Tout ou...

Страница 27: ...lectrique sur l opérateur Faites attention aux câbles électriques conduites de gaz et d eau éventuellement cachés Avant de commencer le travail contrôlez la zone de travail à l aide d un détecteur de métaux par exemple Porter un équipement de protection indivi duelle En fonction de l application utiliser un écran facial des lunettes de sécurité ou des verres de sécurité Le cas échéant utiliser un ...

Страница 28: ...res en cas de démarrage non intentionnel de l outil électrique Ne retirez l accumulateur que lorsque l outil électrique est à l arrêt Maintenez les accumulateurs hors de la por tée des enfants Tenez toujours l accumulateur propre et pro tégez le de l humidité et de l eau Nettoyez les raccords encrassés de l accumulateur et de l outil électrique a l aide d un chiffon sec et propre N utilisez que de...

Страница 29: ...énérées lors du travail avec cet outil électrique Celles ci peuvent entraîner des effets néfastes sur la santé La valeur réelle des vibrations lors de l utili sation de l outil électrique peut dévier des valeurs indiquées en fonction de l utilisation de l outil électrique Pour protéger l opéra teur des mesures de sécurité doivent être déterminées sur la base de la sollicitation vibratoire estimée ...

Страница 30: ...ibel 89 107 89 5 Incertitude KpCpeak en décibel 3 3 3 Vibration Valeur de vibration moyenne pour le per çage dans le métal m s2 ft s2 1 5 4 9 1 5 4 9 1 0 3 26 Valeur de vibration moyenne pour le per çage à percussion dans le béton m s2 ft s2 12 39 5 moyenne arithmétique des valeurs totales des vibrations m s2 ft s2 0 6 2 0 0 5 1 6 1 2 4 0 Incertitude K en m s2 ft s2 1 5 4 9 1 5 4 9 1 5 4 9 REMARQU...

Страница 31: ...s instructions générales de sécurité Suivre les indications données dans le texte ou la représentation gra phique ci contre Avant d effectuer ce travail retirer l accumulateur de l outil électrique Sinon il y a des risques de blessures dues à un démarrage non inten tionné de l outil Lors des travaux porter une protection oculaire Lors des travaux porter une protection acoustique Lors des travaux u...

Страница 32: ...ristiques différentes peut contenir des chiffres ou des lettres partiellement fourni avec Symbole signe Explication AVERTISSEMENT ATTENTION Signe Unité nationale Explication n0 rpm min min 1 r min Nombre de courses à vide nS rpm min min 1 r min Fréquence de frappe P W Unité de mesure pour la puissance électrique Unité de mesure pour la largeur d angle U V Unité de mesure pour la tension électrique...

Страница 33: ...l électrique Il se peut que seule une partie des accessoires décrits ou représentés dans cette notice d utili sation soit fournie avec l outil électrique AVERTISSEMENT Surface de prise Accu Commutateur du sens de rotation Commutateur de vitesse Réglage du couple Mandrin de perçage Accu Touche de déverrouillage Lampe Porte outil Interrupteur Marche Arrêt Porte ceinture Logement d embouts Sélecteur ...

Страница 34: ...ge bois 2 in 50 mm 2 in 50 mm 1 5 8 in 40 mm Diamètre de perçage pierre 1 2 in 13 mm Plage de serrage du mandrin 1 16 1 2 in 1 5 13 mm 1 16 1 2 in 1 5 13 mm 1 16 1 2 in 1 5 13 mm Diamètre vis 5 16 in 8 mm 5 16 in 8 mm 5 16 in 8 mm Poids suivant EPTA Procedure 01 Outil électrique sans batterie et sans outil de travail 2 07 lbs 0 94 kg 2 16 lbs 0 98 kg 1 87 lbs 0 85 kg Poids suivant EPTA Procedure 0...

Страница 35: ...e char gez l accumulateur complètement Déverrouillez l accumulateur en appuyant sur la touche de déverrouillage et retirez le de la poignée Ne forcez pas Branchez le chargeur sur la prise de courant enfoncez l accumulateur sur le chargeur et chargez l accumulateur Une fois le processus de charge terminé montez l accumulateur sur l outil électrique et retirez la fiche du chargeur de la prise de cou...

Страница 36: ...uts posi tionner la pièce d écartement ainsi que le logement d embouts et les fixez à l aide de la vis Pour monter le porte ceinture avec le loge ment d embouts positionner la pièce d écar tement le porte ceinture ainsi que le logement d embouts et les fixez à l aide de la vis 1 3 2 1 3 2 Porte ceinture Logement d embouts Fig 3 Pièce d écartement Vis 1 3 4 2 OBJ_BUCH 0000000311 001 book Page 36 Fr...

Страница 37: ...elâcher l anneau Tourner le mandrin de perçage pour l arrêter et le verrouiller Démontage du mandrin de perçage figure 5 Lors du changement du mandrin de perçage veiller à ce qu il n y ait pas de pénétration de poussières ou d impuretés dans le mandrin de perçage et de la broche Poussez la bague vers l avant et retirez le mandrin de perçage 1 Fig 4 Mandrin de perçage Bague 2 4 3 2 1 Fig 5 Mandrin ...

Страница 38: ... par un démarrage non intentionné de l outil électrique Montage de l outil de travail figure 6 Ouvrez le mandrin de perçage à serrage rapide Montez ensuite l outil de travail souhaité Serrez le mandrin de perçage à serrage rapide manuellement Montage de l outil de travail figure 7 Monter l outil AVERTISSEMENT Fig 6 Mandrin de perçage 2 3 1 Fig 7 OBJ_BUCH 0000000311 001 book Page 38 Wednesday May 9...

Страница 39: ...il FEIN conçus et autorisés pour l utilisation correspondante Régler le mode de service Ne changez le mode d exploitation que quand l outil électroportatif est éteint Sinon l outil électroportatif pourrait être endommagé Poussez le commutateur du mode de service toujours jusqu à la butée L outil électroportatif risquerait d être endommagé ASB18 Q figure 8 Réglez le mode souhaité Pour percer positi...

Страница 40: ... sur le symbole Perçage Pour visser positionnez le commutateur du mode de service sur le symbole Vissage ASCM18 QSW figure 10 Réglez le mode souhaité Pour percer positionnez le réglage du couple sur le symbole Perçage Fig 9 Fig 10 OBJ_BUCH 0000000311 001 book Page 40 Friday May 4 2018 9 20 AM ...

Страница 41: ...util électrique est pressé contre la vis petit couple petites vis couple important vis de taille importante En effectuant des essais pratiques déterminez le réglage approprié pour pouvoir visser cor rectement les vis afin que leur tête affleure le matériau Fig 11 2 4 6 8 10 12 14 16 18 20 22 Réglage du couple 20 1 ASB18 Q ABS18 Q ASCM18 QSW Réglage du couple OBJ_BUCH 0000000311 001 book Page 41 Fr...

Страница 42: ... couple éle vé Cette vitesse est appropriée pour le perçage de diamètres importants Réglez sur la vitesse de rotation 2 pour tra vailler avec une vitesse élevée et un petit cou ple Cette vitesse est appropriée pour le perçage de petits diamètres La vitesse de rotation ainsi que le couple dépendent du matériau à travailler et peuvent être déterminés à l aide d essais pratiques Poussez le commutateu...

Страница 43: ...ller et peuvent être déterminés à l aide d essais pratiques Ne changer la vitesse de rotation qu à l arrêt du moteur Mise en fonctionnement Arrêt figure 15 Toujours bien tenir l outil électroportatif Vous risquez sinon de perdre le contrôle de l outil électri que En cas de surcharge l outil électroportatif s arrête Une surcharge thermique de l outil électrique est indiquée par un clignotement de l...

Страница 44: ...ur doit se situer dans la plage de température de service de l accu Voyant lumineux indiquant l état de charge de l accumulateur figure 17 Appuyez sur la touche pour activer l affichage LED L état de charge actuel en pourcentage de l accumulateur n est indiqué que lorsque le moteur de l outil électroportatif est à l arrêt L électronique stoppe automatiquement le moteur pour éviter toute décharge a...

Страница 45: ...ppe est activée utiliser uniquement le mandrin de perçage de notre programme d accessoires En cas d utilisation d autres accessoires QuickIN l outil électri que l outil de travail les accessoires ou la piè ce à travailler peut être endommagé OBJ_BUCH 0000000311 001 book Page 45 Friday May 4 2018 9 20 AM ...

Страница 46: ...toyer les orifices de ventilation à l aide d objets métalliques pointus utilisez des outils non métalliques N utilisez pas de détergents ou de solvants qui peuvent endommager les parties en matière plastique Par exemple l essence le tétrachlorure de carbone solvants chlorés l ammoniaque et produits de nettoyage domestiques contenant de l ammoniaque Garantie La garantie du produit est valide confor...

Страница 47: ... faire appel à un expert en transport des matières dangereuses N expédiez les batteries que si le carter ne présente pas de dommages et aucun liquide ne s écoule Veillez à ce que les contacts de la batterie ne puissent pas être court circuités Utilisez l emballage d origine Emballez la batterie de manière à ce qu elle ne se déplace pas dans l emballage Veuillez également respecter les règlementati...

Страница 48: ...plosión en el que se encuentren combustibles líqui dos gases o material en polvo Las herramientas eléctricas producen chis pas que pueden llegar a inflamar los materiales en polvo o vapores c Mantenga alejados a los niños y otras personas de su puesto de trabajo al emplear la herramienta eléctrica Una distracción le puede hacer perder el control sobre el aparato 2 Seguridad eléctrica a La clavija ...

Страница 49: ...vo asegúrese de que éstos estén apropiadamente conectados y que sean utilizados correctamente El empleo de estos equipos reduce los riesgos deriva dos del polvo 4 Trato y uso cuidadoso de herramientas eléctricas a No sobrecargue el aparato Use la herra mienta prevista para el trabajo a reali zar Con la herramienta adecuada podrá trabajar mejor y más seguro dentro del margen de potencia indicado b ...

Страница 50: ...abajar explore la zona de tra bajo p ej con un detector de metales Utilice un equipo de protección personal Dependiendo del trabajo a realizar use una careta una protección para los ojos o unas gafas de protección Si procede emplee una mascarilla antipolvo protectores auditivos guantes de protección o un mandil especial adecuado para protegerle de los pequeños fragmentos que pudieran salir proyect...

Страница 51: ...ta eléctrica Mantenga los acumuladores fuera del alcance de los niños Mantenga limpio el acumulador y protéjalo de la humedad y del agua Si los contactos del acumulador y de la herramienta eléctrica están sucios límpielos con un paño seco y lim pio Solamente use los acumuladores originales FEIN previstos para su herramienta eléctrica Si se utilizan o recargan acumuladores inco rrectos dañados repa...

Страница 52: ...erramienta eléctrica puede ser dife rente del valor indicado según el modo en que sea utilizada la herramienta Con el fin de proteger al usuario es necesario fijar medidas de seguridad en base a una estima ción de la exposición resultante bajo las con diciones de uso actuales El nivel de vibraciones indicado en estas ins trucciones ha sido determinado según el pro cedimiento de medición fijado en ...

Страница 53: ...a medido con filtro A en el puesto de trabajo en decibelios 76 91 77 9 Inseguridad KpA en decibelios 3 3 3 Nivel de potencia acústica LwA re 1 pW medido con filtro A en decibelios 87 102 88 9 Inseguridad KwA en decibelios 3 3 3 Valor pico del nivel de presión sonora LpC peak medido con filtro C en el puesto de trabajo en decibelios 89 107 89 5 Inseguridad KpCpeak en decibelios 3 3 3 Vibración prom...

Страница 54: ...alor p ej de una exposición prolongada al sol Seguir las instrucciones indicadas al margen Conexión Desconexión Este símbolo confirma que este producto ha sido certificado en USA y Canadá Atestigua la conformidad de la herramienta eléctrica con las directivas de la Comunidad Europea Este símbolo advierte sobre una situación peligrosa inminente Un com portamiento incorrecto puede dar lugar a una le...

Страница 55: ...e medida de la potencia Unidad de medida del ángulo U V Unidad de medida de la tensión eléctrica f Hz Unidad de medida de la frecuencia I A Unidad de medida de la intensidad m kg lbs Unidad de medida de la masa l ft in Unidad de medida para la longitud ancho altura pro fundidad diámetro o roscas Ø ft in Diámetro de una pieza redonda K Incertidumbre m s2 Valor de vibraciones emitidas según norma EN...

Страница 56: ...uministrado con su herramienta eléctrica puede que no corresponda en su totalidad al material descrito o mostrado en estas instrucciones de servicio ADVERTENCIA Área de agarre Batería Selector de sentido de giro Selector de velocidad Ajuste del par de giro Portabrocas Botón de extracción de batería Lámpara Portaútiles Switch Enganche para cinturón Almacén de bits Modo de funcionamiento Selector Fi...

Страница 57: ...n 13 mm Diámetro de taladro en madera 2 in 50 mm 2 in 50 mm 1 5 8 in 40 mm Diámetro de taladro en piedra 1 2 in 13 mm Capacidad del broquero 1 16 1 2 in 1 5 13 mm 1 16 1 2 in 1 5 13 mm 1 16 1 2 in 1 5 13 mm Diámetro del tornillo 5 16 in 8 mm 5 16 in 8 mm 5 16 in 8 mm Peso según EPTA Procedure 01 herramienta eléctrica sin batería y sin útil 2 07 lbs 0 94 kg 2 16 lbs 0 98 kg 1 87 lbs 0 85 kg Peso se...

Страница 58: ...ha cargue completamente la batería Libere la batería presionando el botón de extracción y sáquela hacia delante de la aga rradera No proceda con brusquedad Conecte el cargador al enchufe inserte en éste la batería y cargue la batería Una vez finalizado el proceso de carga monte la batería en la herramienta eléctrica y saque la clavija del cargador del enchufe Una batería nueva alcanza su plena pot...

Страница 59: ...cén de bits coloque éste y el distanciador en el orden y posición correc tos y sujete ambos con el tornillo Para montar el enganche para cinturón junto con el almacén de bits coloque éstos y el dis tanciador en el orden y posición correctos y sujete todos ellos con el tornillo 1 3 2 1 3 2 Enganche para cinturón Almacén de bits Fig 3 Distanciador Tornillo 1 3 4 2 OBJ_BUCH 0000000311 001 book Page 5...

Страница 60: ... el husillo Suelte el anillo Gire el broquero para asegurarlo y blo quearlo Desmontaje del broquero Figura 5 Al cambiar el broquero cuide que ni éste ni el husillo se ensucien Desplace hacia delante el anillo y retire el bro quero 1 Fig 4 Portabrocas Anillo 2 4 3 2 1 Fig 5 Portabrocas Anillo OBJ_BUCH 0000000311 001 book Page 60 Friday May 4 2018 9 20 AM ...

Страница 61: ...eran presen tarse en caso de una puesta en marcha involuntaria Montaje del útil Figura 6 Abra el broquero de sujeción rápida A continuación monte el útil deseado Apriete a mano el broquero de sujeción rápi da Montaje del útil Figura 7 Monte el útil ADVERTENCIA Fig 6 Portabrocas 2 3 1 Fig 7 OBJ_BUCH 0000000311 001 book Page 61 Wednesday May 9 2018 11 56 AM ...

Страница 62: ...l trabajo que vaya a realizar Ajuste del modo de operación Solamente cambie el modo de operación estando desconectada la herramienta eléctrica De lo contrario podría dañarse la herramienta eléctrica Siempre gire hasta el tope el selector del modo de operación De lo contrario podría dañarse la herramienta eléctrica ASB18 Q Figura 8 Ajuste el modo de operación deseado Para Taladrar haga coincidir el...

Страница 63: ... símbolo Taladrar Para Atornillar haga coincidir el selector del modo de operación con el símbolo Ator nillar ASCM18 QSW Figura 10 Ajuste el modo de operación deseado Para Taladrar haga coincidir el selector de par con el símbolo Taladrar Fig 9 Fig 10 OBJ_BUCH 0000000311 001 book Page 63 Friday May 4 2018 9 20 AM ...

Страница 64: ...rza con la que es presionada la herra mienta eléctrica contra el tornillo Torque pequeño tornillos pequeños Torque grande tornillos grandes Determine probando el torque que debe ajustar para enroscar los tornillos al ras con el material Fig 11 2 4 6 8 10 12 14 16 18 20 22 Ajuste del par de giro 20 1 ASB18 Q ABS18 Q ASCM18 QSW Ajuste del par de giro OBJ_BUCH 0000000311 001 book Page 64 Friday May 4...

Страница 65: ...con un torque elevado Este ajuste es apropiado para taladrar con brocas de gran diámetro Ajuste la 2ª velocidad para trabajar a altas revoluciones con un torque reducido Este ajuste es apropiado para taladrar con brocas de pequeño diámetro Se recomienda determinar probando cual es la etapa de velocidad más adecuada al material a trabajar Siempre empuje hasta el tope el selector de velocidad De lo ...

Страница 66: ...determinar probando cual es la etapa de velocidad más adecuada al material a trabajar Solamente accione el selector de veloci dades con el motor detenido Conexión y desconexión Figura 15 Siempre sujete firmemente la herramienta eléctrica En caso contrario podría perder el control sobre la herramienta eléctrica En caso de sobrecarga se desconecta la herra mienta eléctrica Si la herramienta eléctric...

Страница 67: ... dentro del margen especificado para su operación Indicador del estado de carga de la batería figura 17 Pulse la tecla para activar el indicador LED El porcentaje del estado de carga real del acu mulador solamente se indica estando dete nido el motor de la herramienta eléctrica Antes de que el acumulador llegue a descar garse excesivamente el sistema electrónico desconecta el motor de forma automá...

Страница 68: ...eberá usar exclusivamente el broquero que se incluye en nuestro programa de accesorios Si utiliza unos accesorios QuickIN diferentes puede que se dañe la herramienta eléctrica el útil el accesorio o la pieza de trabajo OBJ_BUCH 0000000311 001 book Page 68 Friday May 4 2018 9 20 AM ...

Страница 69: ...nta eléctrica con objetos metálicos en punta emplee para ello objetos que no sean de metal No aplique agentes de lim pieza ni disolventes que pudieran atacar a las piezas de plástico Algunos de estos agentes son gasolina tetra cloruro de carbono disolventes cloratados amoniaco y detergentes domésticos que con tengan amoniaco Garantía La garantía del producto se realiza de acuerdo a las regulacione...

Страница 70: ...ervicios de un experto en mercancías peligrosas al preparar la pieza para su envío Solo envíe baterías cuya carcasa no esté dañada y que no pierdan líquido Asegúrese que los contactos de la batería no puedan llegar a cortocircuitarse Emplee el empaque original Empa que la batería de manera que no pueda moverse dentro del empaque Observe también las prescripciones adicionales que pudieran existir a...

Отзывы: