background image

HDCAM-WiFi Using the App

7

Fein 

[email protected]

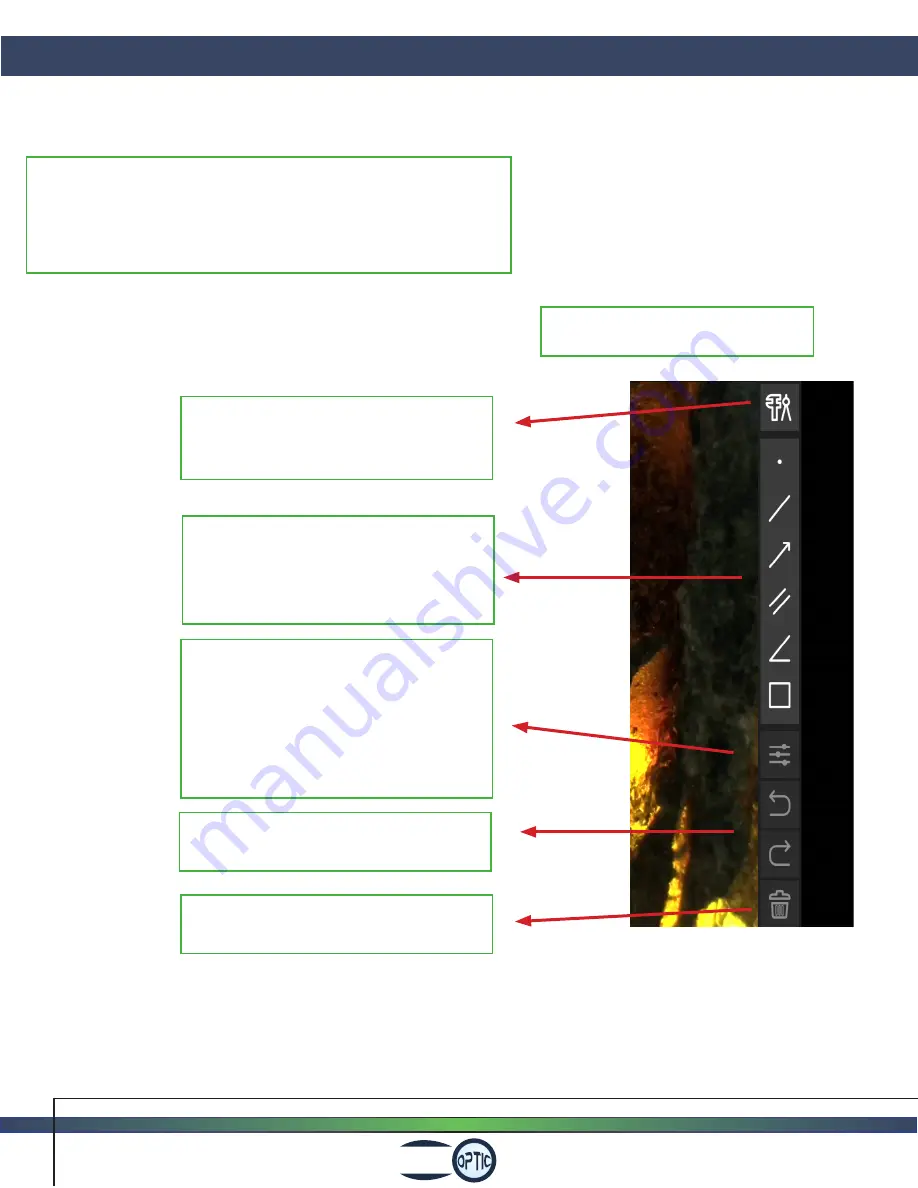
•  Toolbar on Right side of display.

•  Tap to begin process to calibrate 

instrument.

•  Calibrated measurements can be made 

with the style options located in this 
portion of the toolbar.

•  Tap the settings icon to make style 

adjustments to a measurement. 
Change the color and width of a line 
measurement. Scroll up for more 
options.

•  Tap to undo or redo an action.

•  Tap to delete a measurement.

•  This toolbar is for calibration and measurement functions.
•  Tap on each icon to select and use the function.
•  If more than one function option is available, scroll up to select.

Содержание HDCAM-WiFi

Страница 1: ...Fein HDCAM WiFi High Definition WiFi Microscope Camera Software User s Manual ...

Страница 2: ...2V power adapter input on the camera Insert the SD card into the SD card slot Insert the WiFi dongle into the W LAN Mouse port This port is used for the WiFi dongle when using the camera in WiFi mode or for the USB mouse when using the camera in HDMI output mode HDCAM WiFi Set up info feinoptic com ...

Страница 3: ...ay Store for Android 2 Fein info feinoptic com HDCAM WiFi Getting Connected Using your smartphone locate the ToupView app in the App Store for IOS or in Google Play for Android Download the app App Store for IOS ...

Страница 4: ...era is on and ready for operation HDCAM WiFi Getting Connected After the camera and computer configurations are completed the camera is ready to stream live video to anyone connected to the network info feinoptic com In the settings menu on your smartphone locate the WiFi menu Locate the camera s WiFi signal The WiFi signal name will appear as the camera s factory model number Connect to the camer...

Страница 5: ...on any illumination that will be required to view the sample With the smartphone connected to the camera s WiFi launch the Toupview App The app will open with the Camera Demo image Allow the app a moment to connect and the view will change over to the microscope stage The camera name will appear below the image of the microscope stage ...

Страница 6: ...e image of the sample on the microscope stage will appear The image is now ready to work with Fein info feinoptic com 5 To begin working in the app tap on the image or tap on the icon HDCAM WiFi Using the App ...

Страница 7: ...unction If more than one function option is available scroll up to select Tap to return to home screen Tap to return to your live image screen Tap to access your snapped photos Tap to snap a photo of the image There are multiple function options below the color adjustment function Scroll up to make them available for selection Toolbar on Left side of display ...

Страница 8: ... this portion of the toolbar Tap the settings icon to make style adjustments to a measurement Change the color and width of a line measurement Scroll up for more options Tap to undo or redo an action Tap to delete a measurement This toolbar is for calibration and measurement functions Tap on each icon to select and use the function If more than one function option is available scroll up to select ...

Страница 9: ...e using a stage micrometer ruler that is 25mm 25 000um long Helpful Tip Make sure to use the proper stage micrometer for your microscope If you are using a stereo microscope use a stage micrometer for a stereo microscope If you are using a compound biological microscope use a stage micrometer for a compound biological microscope Items required to perform calibration HDCAM WiFi camera Stage microme...

Страница 10: ... the calibration icon A magnification box will appear Tap on the blue plus button to input the magnification being used to perform the calibration Fein info feinoptic com HDCAM WiFi Calibrating and Measuring 9 ...

Страница 11: ...bration line and drag it to a measurement line on the stage micrometer Tap on the other circle at the end of the calibration line and drag it to another measurement line on the opposite side of the stage micrometer For a magnified view of the line placement tap on the circle release then tap and hold the circle A blue outlined box will appear showing a magnified view of the selected end of the cal...

Страница 12: ... calibration box Select from nm µm mm cm m and in Helpful Tip If using a Stereo Microscope ensure the microscope has detents also known as click stops This feature is necessary for ensuring accurate repeatable measuring with a Stereo Microscope as it allows for precise magnification to be determined Tap on the Calibration button when all required information has been input A full screen view of th...

Страница 13: ...olbar to the left A single measurement line with a measurement box will display on the image Tap one end of the measurement line moving the measurement line to the inside edge of a line on the stage micrometer Tap the other end of the measurement line moving the measurement line to the outside edge of a line on the stage micrometer ...

Страница 14: ...g 13 The measurement box will reflect the unit of measure that was initially selected when the calibration was performed With the calibration set and tested the system is ready to perform measurements using the various measurement options found on the tool bar ...

Страница 15: ...t be accurate A calibration must be performed for each magnification being used to make measurements Tap the single line icon to begin a single line measurement A single measurement line will display on the image Tap and drag each end of the measurement line to the desired place on the image The measurement within the measurement box will change as the line is moved Use the magnified view of the m...

Страница 16: ...nd size of the measurement can be changed Scroll up or down to change the color and thickness of the measurement line Tap the blue eye icon to remove the text box displayed above the measurement line The trash can icon is used to delete any measurement or annotation selected Tap on the measurement or annotation then tap the trash icon ...

Страница 17: ...ake annotations tap the Text icon A text box will display over the image Using the two circles adjust the size and position of the text box Double tap within the text box The smart device s keyboard will appear allowing for text to be entered Input desired text and tap OK ...

Страница 18: ...Fein info feinoptic com HDCAM WiFi Measurements and Annotations 17 The text will appear on the image Access the style menu through the settings icon to adjust the color and width of the text ...

Страница 19: ...s If satisfied with the measurements and annotations made tap the snap icon to capture an image Look for the Snapshot successful to ensure the image was captured Captured images are stored in the app s photo gallery and are accessed by tapping the photo gallery icon ...

Страница 20: ...he bottom right side of the images within the photo gallery Tapping on a blue circle will select that image showing a check mark inside of the blue circle With the image selected blue circle with check mark tap on the trash can icon Fein info feinoptic com HDCAM WiFi Measurements and Annotations 19 ...

Страница 21: ...Fein info feinoptic com 20 HDCAM WiFi Measurements and Annotations Tap Delete to delete the image from the photo gallery The image has been deleted from the photo gallery ...

Страница 22: ...Fein info feinoptic com HDCAM WiFi Measurements and Annotations 21 Select an image by tapping on the image in the photo gallery The selected image will display Tap the edit image icon ...

Страница 23: ...HDCAM WiFi Measurements and Annotations Perform any additional measurements or annotations using the toolbar to the right When image is ready tap the burn mode icon This will burn save the measurements annotations onto the image ...

Страница 24: ...r Tap OK to save the modifications made to the image Tap Modify for the final image to be saved The modified image with all measurements annotations will be saved in the app s photo gallery The image will also be saved in the smart device s photo gallery where the image can be sent via email or text ...

Страница 25: ...blinking light is fully illuminated Live image is dark Adjust the illumination on the microscope Use the white balance option on the control panel Live image is upside down or backwards Use the Rotate and Flip features on the tool bar Dust or dirt is visible in the live image Clean the sample Clean the objective Clean the C mount Clean the lens on the camera Solution ...

Отзывы: