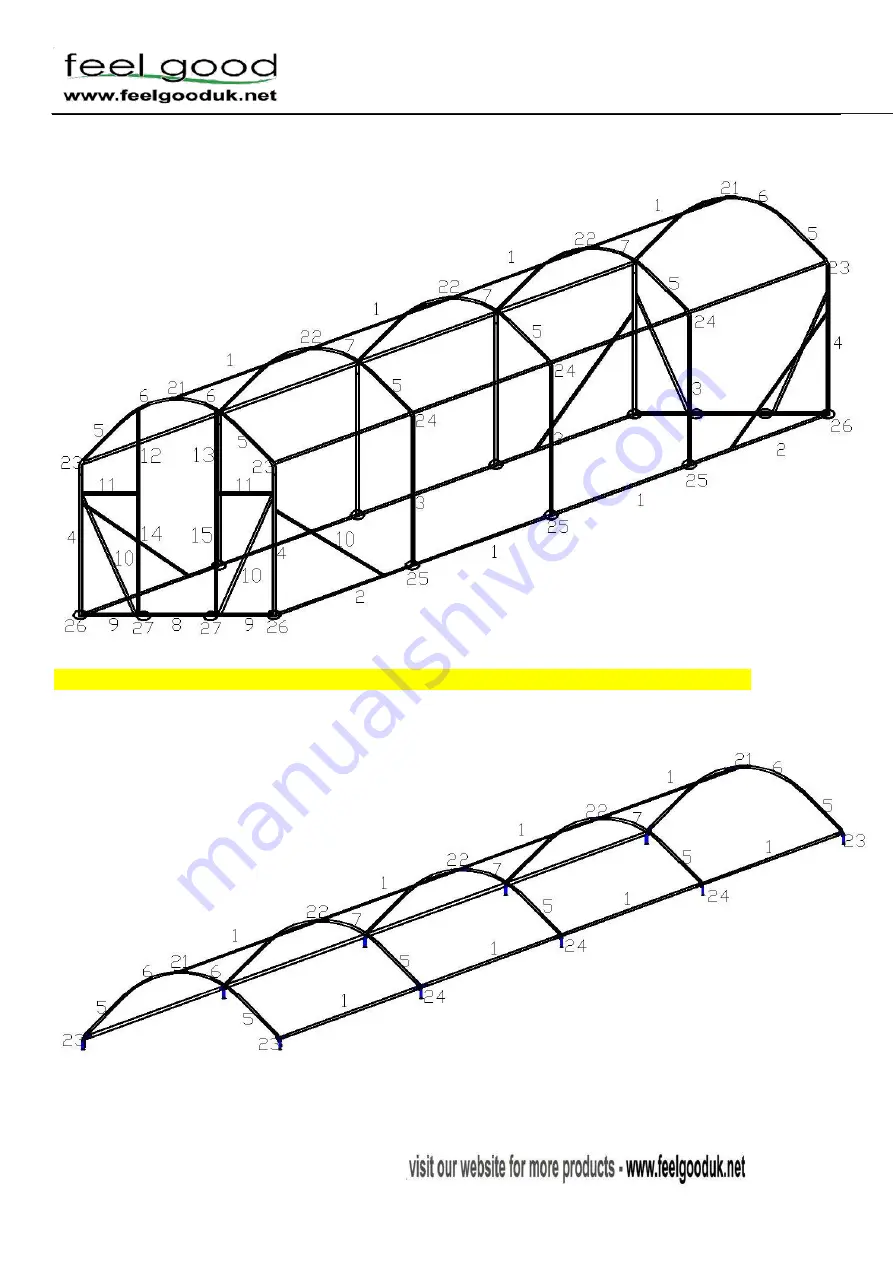
STEP I - Lay all roof parts (1, 5, 6 and 7) flat on the floor and connect like below with part 21, 22, 23, 24.
Page 3 of 6
Страница 1: ... 3 1110MM 6 BOX 1 NO 4 1110MM 4 BOX 1 NO 5 1080MM 10 BOX 1 NO 6 670MM 4 BOX 1 NO 7 670MM 6 BOX 1 NO 8 1263MM 2 BOX 1 NO 9 775MM 4 BOX 1 NO 10 1170MM 8 BOX 2 NO 11 1055MM 2 BOX 2 NO 12 994MM 1 BOX 2 NO 13 994MM 1 BOX 2 NO 14 994MM 1 BOX 2 NO 15 994 1 BOX 2 NO 16 710MM 1 BOX 2 NO 17 330MM A B A 1 B 1 BOX 2 ...
Страница 2: ...NNECTER AND ACCESSORIE SHEET Number QUANTITY Number QUANTITY NO 21 2 BOX 2 NO 22 3 BOX 2 NO 23 4 BOX 2 NO 24 6 BOX 2 NO 25 6 BOX 2 NO 26 4 BOX 2 NO 27 4 BOX 2 NO 28 28 BOX 2 NO 29 14 BOX 2 NO 30 1 BOX 2 NO 31 1 BOX 2 NO 32 COVER SET 1 BOX 2 NO 32 1 BOX 2 Page 2 of 6 ...
Страница 3: ...STEP I Lay all roof parts 1 5 6 and 7 flat on the floor and connect like below with part 21 22 23 24 Page 3 of 6 ...
Страница 4: ...TEP II Inserting legs Lift up one side insert tube No 3 and No 4 leg 4 at both ends leg 3 in the middle STEP III Repeat step II lift up and install the other legs STEP IV Create ground frame Page 4 of 6 ...
Страница 5: ...e fitted door cover to match the hole that is pre drilled on the door Tube No 15 make it small enough so just a screw can fit through Next thread through the locking screw and tighten use screw M6X37 STEP VII Screw tube 12 13 14 and 15 to tubes 6 screw bolt in from the other side of tube 8 Use screw M6X40 STEP VIII Position and screw bracing bars 10 and 11 into place see first diagram to view all ...
Страница 6: ...enhouse cover over the main frame and secure the cover to the frame by using the Velcro STEPIX Side water collector Use and adjust the buckle ties on the waterspout fabric to make it gather water when is needed Page 6 of 6 ...