NOTE: FedEx Ship Manager
®
at fedex.com supports only nondoc-tab labels.
3
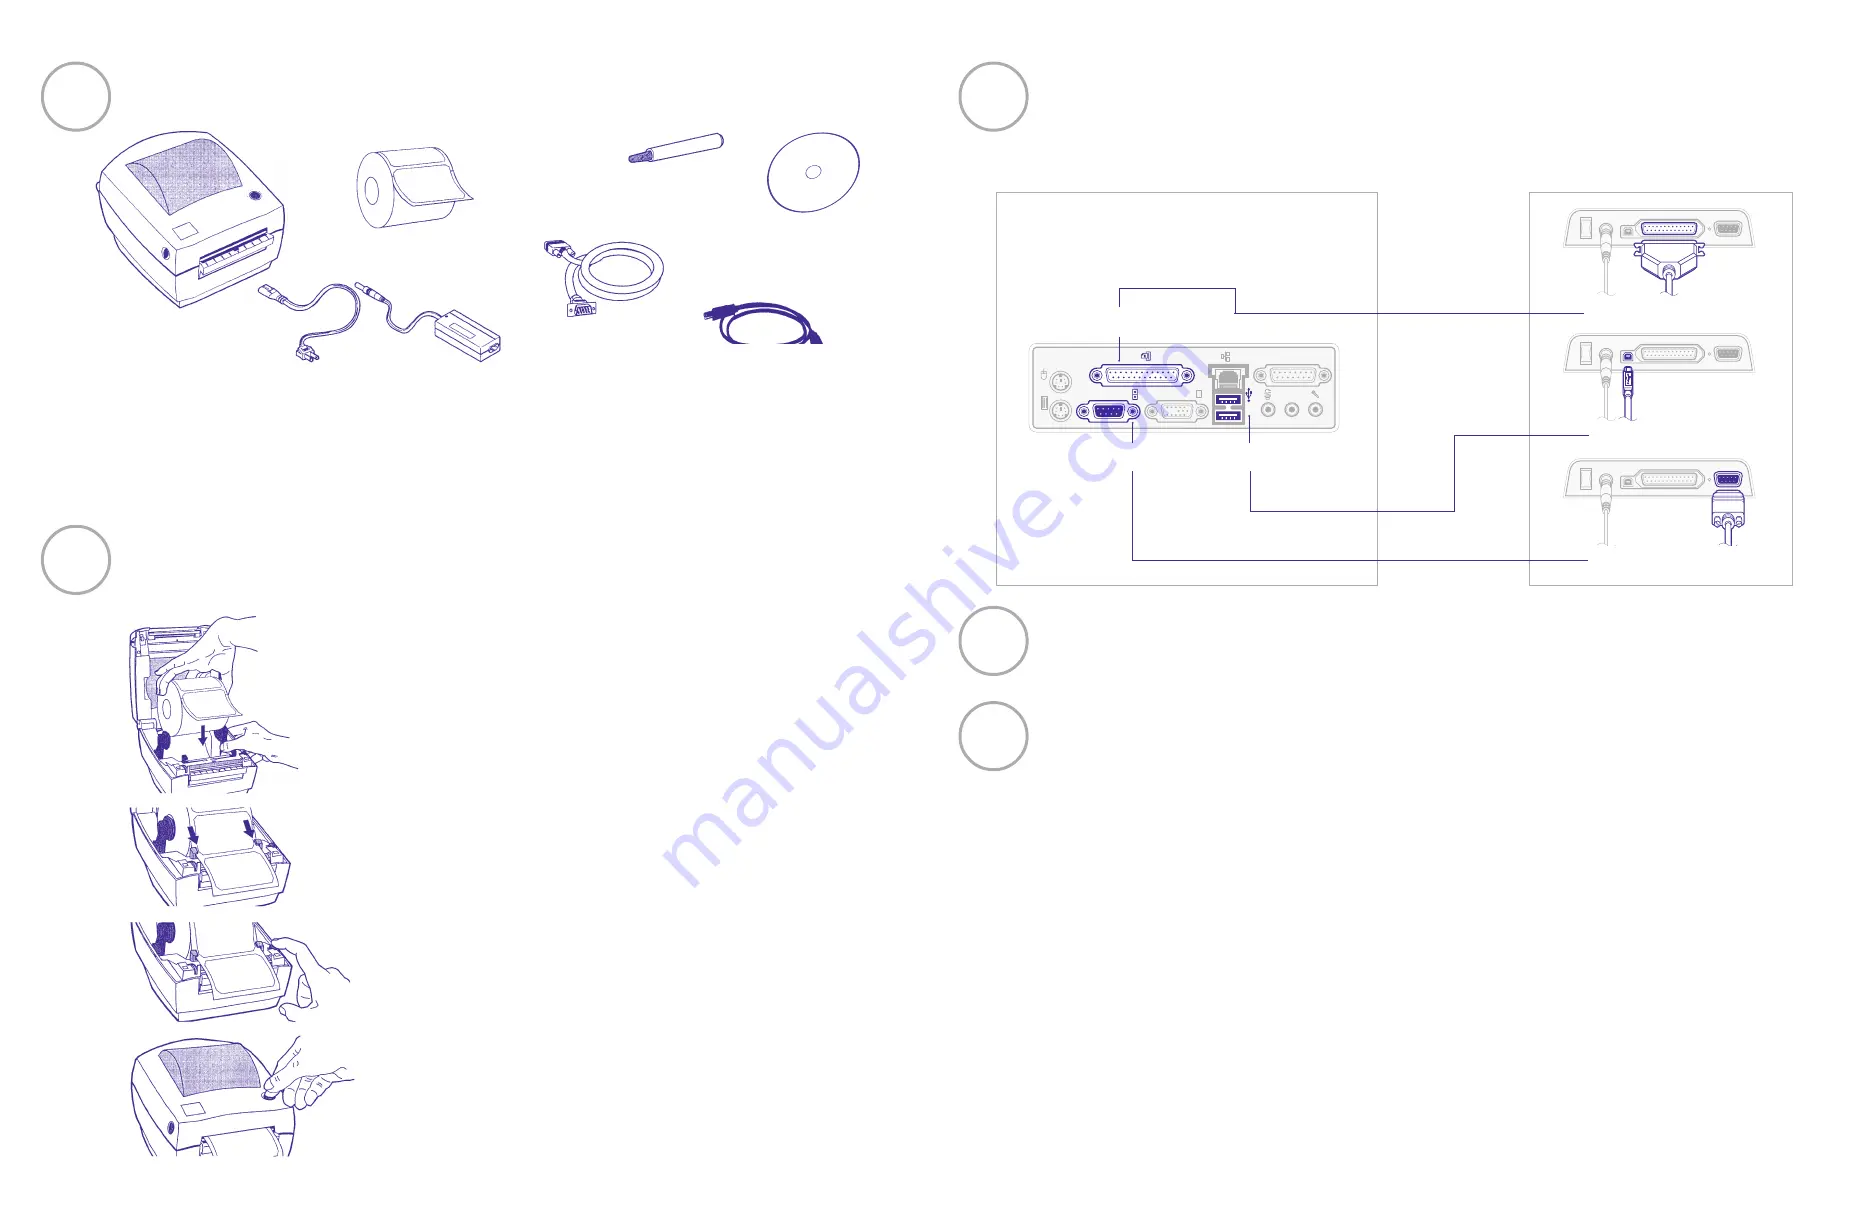
Turn off your computer before connecting printer. Connect the printer by using the
supplied serial or USB cable. You may also use a parallel cable (not included).
1
Your printer kit contains
Thermal Printer
Serial Cable
OR USB Cable
Power Supply
and Cord
The Clean Penn
Install the printer labels as indicated in the steps below.
The instructions can also be found in the inside of the top of the printer cover.
Close printer cover, connect power cord, then press the TAB
FEED button to ensure the labels are installed correctly.
Zebra Printer Driver
Install CD
Use The Clean Penn
TM
to clean ink and dirt buildup on the thermal print head whenever you are
replacing a roll of labels.
Thermal Labels
2
Open the printer by pressing the cover release buttons on the
sides of the printer. Load the thermal printer labels as shown.
Feed the labels through the guides.
Adjust guides so that there is minimal space between the sides
of the label and the guides themselves.
Mouse
Printer
Serial
Monitor
USB
SPK
MIC
LAN
KB
Parallel (LPT) port
Back of printer
Parallel connection
Back of computer
Serial (COM) port
USB port
NOTE: USB cable cannot be used with FedEx Ship Manager at fedex.com
5
Now that you have installed the thermal printer driver, follow the instructions
below to complete the setup of your thermal printer driver with the appropriate
FedEx Ship Manager
®
solution:
USB connection
Serial connection
If you are using FedEx Ship Manager at fedex.com:
1.
Log in to FedEx Ship Manager at fedex.com. (Go to
fedex.com
and click Ship to access the login screen.)
2.
On any screen, click Preferences at the top of the screen.
3.
In the Customize your features area of the Preferences screen, click Thermal printer or Set up thermal
printing. The Thermal printer setup instructions screen displays.
4.
Follow the steps on the Thermal printer setup instructions screen to set up your thermal printer, including
printing a test page to ensure the printer is properly configured.
5.
Once completed, click Done and then click Save/Update on the Preferences screen.
If you are using FedEx Ship Manager Software and have not installed the software:
1.
Insert the FedEx Ship Manager Software CD and follow the installation instructions.
If you are using FedEx Ship Manager Software and have already installed the software:
1.
Launch FedEx Ship Manager Software.
2.
From the tool bar, click Customize and select System Settings.
3.
Select the appropriate system number and click modify.
4.
Select the tab 2 – FedEx Express Cust Admin.
5.
At the bottom of the screen in the section labeled Set Default Printers, browse to find the thermal printer
driver you just installed. Select thermal printer and click OK.
6.
Click OK. To verify that the printer is properly configured, from the tool bar, click Utilities and select Printer
Setup. From the drop-down menu, select the label printer you just installed and click Test Printer. Click OK.
4
After connecting the printer, turn your computer on, insert the Zebra Printer Driver
Install CD, and follow the instructions.


