


Mounting Rumbler
®
Speakers in a 2011 and Newer Chevy
®
Caprice
4
Model RB-CAP11 Speaker Mounting Kit
SPEAKER MOUNTING PRECAUTION—To avoid reduction of sound output and
damage to the speaker, ensure that the speaker is mounted with the slots facing
the ground.
NOTE:
The band halves included with the Rumbler speaker are not used in this installation.
To mount the speakers:
1.
To gain access to the area inside the rear bumper, disassemble the vehicle according to the instructions
in the manufacturer’s service manual.
DRILLING PRECAUTIONS—Before drilling holes, check the area you are drilling into
to be sure you do not damage vehicle components while drilling. All drilled holes
should be de-burred and all sharp edges should be smoothed. All wire routings
going through drilled holes should be protected by a grommet or convolute/split
loom tubing.
2.
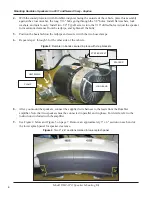
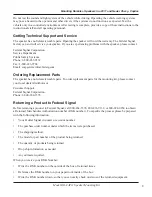
See Figures 1 below and Figure 2 on page 3. Position a step bracket on the cross member as shown and
mark the centers of the four mounting holes. Drill the upper holes 3/16" in diameter and the lower holes
3/8" in diameter. Remove any burrs to ensure that the brackets and mounting hardware fit properly.
Figure 1
Step bracket and bands positioned against cross member
CROSS MEMBER BEHIND
REAR BUMPER
SPARE-TIRE WELL
STEP BRACKET
LONG BAND FACING
REAR OF VEHICLE
290A6752
3.
See Figure 2 on page 5 and Figure 3 on page 6. Loosely assemble the Rumbler speaker in the long and
short bands using a 5/16
"
x 1-1/4
"
bolt in the hole in the bottom of the band tabs. The short band faces
the front of the vehicle. Insert two 5/16"-18 x 2-1/2" bolts through the step bracket and bands, and then
place two spacers on each bolt.


