
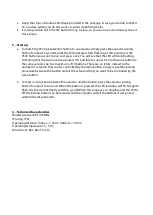

Using the strips of double-sided tape provided in the package, in case you decide to stick it
on a surface where you do not want or cannot make xing holes.
It is also possible not to x the button to any surface, so you can move it and always have it
close to you.
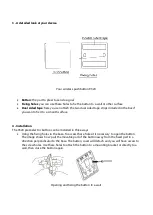
5 – Start up
To match the 9320 piezoelectric button to an actuator, simply press the actuator pairing
button for about 3 seconds, until the LED indicator starts ashing, at this point press the
9320 button you want to pair. Just press once. You will see that the LED will stop ashing,
indicating that the two have been paired. It is possible to connect more than one button to
the same actuator, up to a maximum of 10 buttons. There are no limits, instead to the
number of actuators that can be controlled by the same button, simply repeat the pairing
procedure between the button and all the actuators that you want to be controlled by the
same button.
To reset a connection between the actuator and the button, press the actuator pairing
button for about 12 seconds. When the button is pressed, the LED indicator will rst begin to
ash, it will remain lit brie y and then go off. When this sequence is complete and the LED is
off, the pairing button can be released and the actuator and all the buttons it was paired
with will be disconnected.
6 – Technical characteristics
Wireless network: RF 433MHz
IP rating: IP67
Operating distance: Indoor <= 25m / Outdoor <= 60 m
Operating temperature: -5 - 50°C
Dimensions: 86 x 86 x 16 mm