background image

Basic Drum Module Settings

Basic

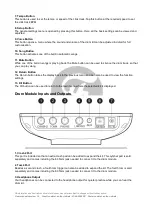
The drum module is the brain of this electronic drum kit and offers a number of options and functions. 

The control panel of the drum module has a central control knob, and various buttons for fast menu


navigation, selection, and parameter adjustments.

The most-used and easy to access controls are the display, headphone volume control, plus and minus 
buttons, and the large rotary control knob.

Using these controls, you can browse through all the menu options, scroll through and choose


one of the 

different preset drum kits, and so on. 

Further to these controls, a number of buttons are provided to offer short-cuts to specific menus with 
functions for making adjustments in more detail.

The difference between the Central rotary control and the Plus and Minus buttons:

Please note that the endless rotary encoder (Central control knob) is intended for quick adjustments made in 
larger steps. This means that when adjusting a parameter that offers a setting between 0 and 100, the 
Central control knob will make the adjustment in larger steps rather than one by one. 

To make more accurate, one by one adjustments, use the Plus and Minus buttons.

Return Button

The Return button is used to save any changes that have been made to a parameter before returning to the 
previous or main menu.

Power Button (Switching On)

Before using the power button to switch on the drum module, make sure to turn all volume levels down to a 
minimum to avoid any shock for anyone who strikes one of the drums if the volume has been left at too high 
a level. This may not only damage any connected headphones, but may also damage the hearing of the 
person wearing them. Always counter


this by beginning at a lower volume and slowly adjusting as needed 

while gently striking one of the triggers.

Power Button (Switching Off)

When switching off the drum module, it’s a good idea to reduce all the volume levels once more. By pressing
and holding the power button down for at least 2 seconds, the drum module shall be powered off.

If the drum kit will not be used for a long period of time, it is advised to unplug it entirely from the mains 
power socket. 

Drum Kit Selection  

Selecting a drum kit (preset kit) is an easy process. Once the module has been switched on, press the Kit 
button and use the Central control knob to browse through the various listed drum kits. Each built-in preset 
kit has been numbered between 1 and 20 and slots 21 to 25 have been provided for saving custom user kits.

The display will show a number of details about the kit, including the kit number, the kit type, the last trigger 
that was hit, and the kit name. 

User Drum Kits

It’s possible to put together your own kits and save them to the module. An existing preset can be copied and
then edited or an entirely new kit can be put together. 

To create a kit, simply follow these steps:

All information and illustrations shown in this user manual are subject to change without further notice.

User manual version: 1.0

Creation date + author initials: 07-05-2020 RV Revision date + author initials: 

Содержание DDK-080

Страница 1: ...rum Kit User Manual All information and illustrations shown in this user manual are subject to change without further notice User manual version 1 0 Creation date author initials 07 05 2020 RV Revision date author initials ...

Страница 2: ... Drum Frame 1x Central Cable Tree 1x Kick Drum Trigger Pedal 1x Hi Hat Pedal 1x Drum Key 1x Quick Start Guide 1x Assembly Instruction Book Check the electronic drum kit and any included accessories If you notice that the drum kit or any included accessories are defective or have been damaged in transit immediately contact your retailer Please note The products seen in the images included in this m...

Страница 3: ...he device needs to be cleaned Do not pull on the cable to remove a connector as this could cause damage Do not use any cables other than the ones described in this manual Do not use defective cables Please contact your dealer if the included or necessary cables do not function properly with this device In the event that the device is exposed to extreme temperature changes e g transported through a...

Страница 4: ...d technician if you are unsure about the state of the device Check the device and the screws for corrosion Corrosion must not be present on this device Contact your dealer or a qualified technician if you find any corrosion on the screws Every power and signal connector should be securely mounted Do not use the device if the connectors are not secure Avoid dust and dirt build up Clean the device o...

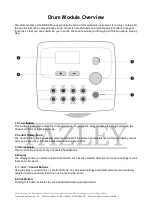
Страница 5: ...he various parameters scroll through display menus and can be used as a fast track parameter and volume control 3 Volume Knob This controls the volume of any connected headphones 4 Display The display shows you all the relevant information such as the selected drum kit and various settings menus that can be browsed 5 and Control Buttons Using the plus and minus control buttons any individual setti...

Страница 6: ...so be used to view the function settings 13 Kit Button The Kit button can be used to return to the main menu where the selected kit is displayed Drum Module Inputs and Outputs 1 Crash2 Port This port is included so that an extra crash pad can be added to expand the kit This cymbal pad is sold separately and comes including the 6 35mm jack needed to connect it to the drum module 2 Tom4 Port Besides...

Страница 7: ...be connected Music can then be played through the drum module from the external audio device so that you can play along Here you can play along to a library of your own tracks or follow online video tutorials 6 USB MIDI Port The drum module has a USB B port that can be used to connect it to a computer This can be used to send MIDI data to a computer and can only be used in combination with music p...

Страница 8: ... levels down to a minimum to avoid any shock for anyone who strikes one of the drums if the volume has been left at too high a level This may not only damage any connected headphones but may also damage the hearing of the person wearing them Always counter this by beginning at a lower volume and slowly adjusting as needed while gently striking one of the triggers Power Button Switching Off When sw...

Страница 9: ...h the song yourself Press the mute button once more to un mute the drum part of the song Playing Along with an External Audio Source The DDK 080 is able to take a signal from an external audio source like a phone tablet MP3 player or computer This puts the sound of any music tutorials or other audio media through the module and any connected headphones so that you can play along To connect an exte...

Страница 10: ...strike has a more extreme effect on the volume of the sample LOG1 LOG2 Logarithmic curves where LOG2 is the more extreme curve where a lighter trigger strike has more effect on the volume of the sample SPLINE Large volume difference between soft and hard trigger strikes LOUD1 LOUD2 Get a powerful volume when the trigger is struck lightly Dynamic Range 0 80 This controls the dynamic range of the tr...

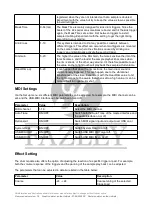
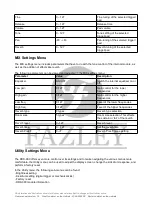
Страница 11: ... happen due to the vibrational transference of the strike Experiment with the Head Rim value to hit the right balance but be aware that when set to a high value it can be more difficult to trigger a rim shot MIDI Settings Via the Set up menu six different MIDI parameters can be adjusted For example the MIDI channel can be set and the USB MIDI interface can be switched on and off Parameter Value De...

Страница 12: ...ower frequencies High freq 0 127 Level of the higher frequencies Reverb type 8 types Reverb type selection Room size 5 types Room size selection This effects the sustain or tail of the reverb Reverb level 0 127 Reverb level Reverb time 0 127 Set the reverb time Reverb PreLF 0 7 Reverb PreLF range setting Utility Settings Menu The DDK 080 offers even more control over its settings and to make navig...

Страница 13: ...anical kick trigger Factory Reset By using the Factory Reset function any adjusted settings of the drum module will be returned to their original factory settings Any adjustment made manually including user kits and so on shall be removed If you select Yes next to System Reset the factory reset shall be carried out and cannot be reversed Module Information This displays information about the drum ...

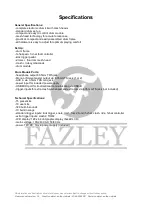
Страница 14: ...mm TRS mini jack power input for included power supply USB MIDI port for bi directional communication via USB B trigger inputs for extra crash cymbal pad and extra tom via 6 35 mm TS jack not included Technical Specifications 15 preset kits 10 user kits 329 built in sounds 10 built in songs standard trigger inputs kick trigger snare tom1 tom2 tom3 hi hat crash ride hi hat controller extra trigger ...

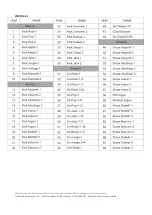
Страница 15: ...KIT List All information and illustrations shown in this user manual are subject to change without further notice User manual version 1 0 Creation date author initials 07 05 2020 RV Revision date author initials ...

Страница 16: ...List All information and illustrations shown in this user manual are subject to change without further notice User manual version 1 0 Creation date author initials 07 05 2020 RV Revision date author initials ...

Страница 17: ...All information and illustrations shown in this user manual are subject to change without further notice User manual version 1 0 Creation date author initials 07 05 2020 RV Revision date author initials ...

Страница 18: ...All information and illustrations shown in this user manual are subject to change without further notice User manual version 1 0 Creation date author initials 07 05 2020 RV Revision date author initials ...

Страница 19: ...All information and illustrations shown in this user manual are subject to change without further notice User manual version 1 0 Creation date author initials 07 05 2020 RV Revision date author initials ...

Страница 20: ...All information and illustrations shown in this user manual are subject to change without further notice User manual version 1 0 Creation date author initials 07 05 2020 RV Revision date author initials ...

Отзывы: