Challenger RSS35
5
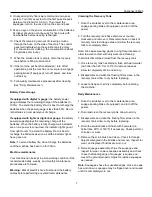
5. Insert the AC power cord of the charger into outlet or
other power source.
6. Insert the DC cable of the charger into the battery
charging socket on the rear panel of the recovery tank.
7. The charger will automatically begin charging, and will
automatically turn off when batteries are fully charged.
Note:
The machine will not be operable when the charger
is connected. Note: If you must discontinue charging
before the charging is completed, do not unplug the DC
cable of the charger from the socket first. To avoid electric
arc discharge, please unplug the AC power cord first.
8. After charging, check the electrolyte level of batteries
again (if using non-standard non-maintenance-free wet
batteries).
Install the Squeegee Assembly
1. Park the machine on level ground, engage parking
brake (if equipped), and take out the key.
2. Install the squeegee rubber on the installation bracket
as shown in the photo below. Be sure that the fastening
knobs are properly inserted into the sockets and then
tighten the knobs (see arrows in photo below).
3. Connect the vacuum hose with the squeegee assembly.
(see circled area in photo.)
4. Check that the squeegee is securely fastened and
meets the floor properly. Adjust if necessary.
Install the Sweeper Brush
1. Park the machine on level ground, engage parking
brake, (if equipped) and take out the key.
2. Open the brush cab and install the cylindrical brush as
shown in the photo: (We recommend mid grit cylindrical
brushes. Bristles must meet the floor. If not, adjust the
position of the brush closer to the ground.
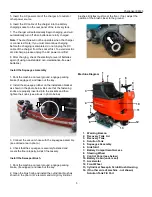
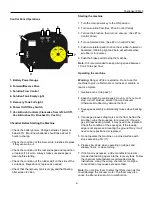
Machine Diagram
1. Warning Beacon
2. Recovery Tank Lid
3. Recovery Tank
4. Solution Tank
5. Squeegee Assembly
6. Side Skirt
7. Battery Compartment Access
8. Steering Wheel
9. Control Panel (see below)
10. Battery Cabin (under seat)
11. Accelerator
12. Front Wheel
13. Cylindrical Sweep & Scrub Brush Housing
14. (On other side of machine - not shown)
Solution Tank Fill Port
1
3
4
5
6
8
9
10
11
9
12
13
2
7


