Farris Engineering Curtiss-Wright 1890 Series Скачать руководство пользователя страница 10

9

8. Testing Procedures (continued)

Seat Leakage Test:

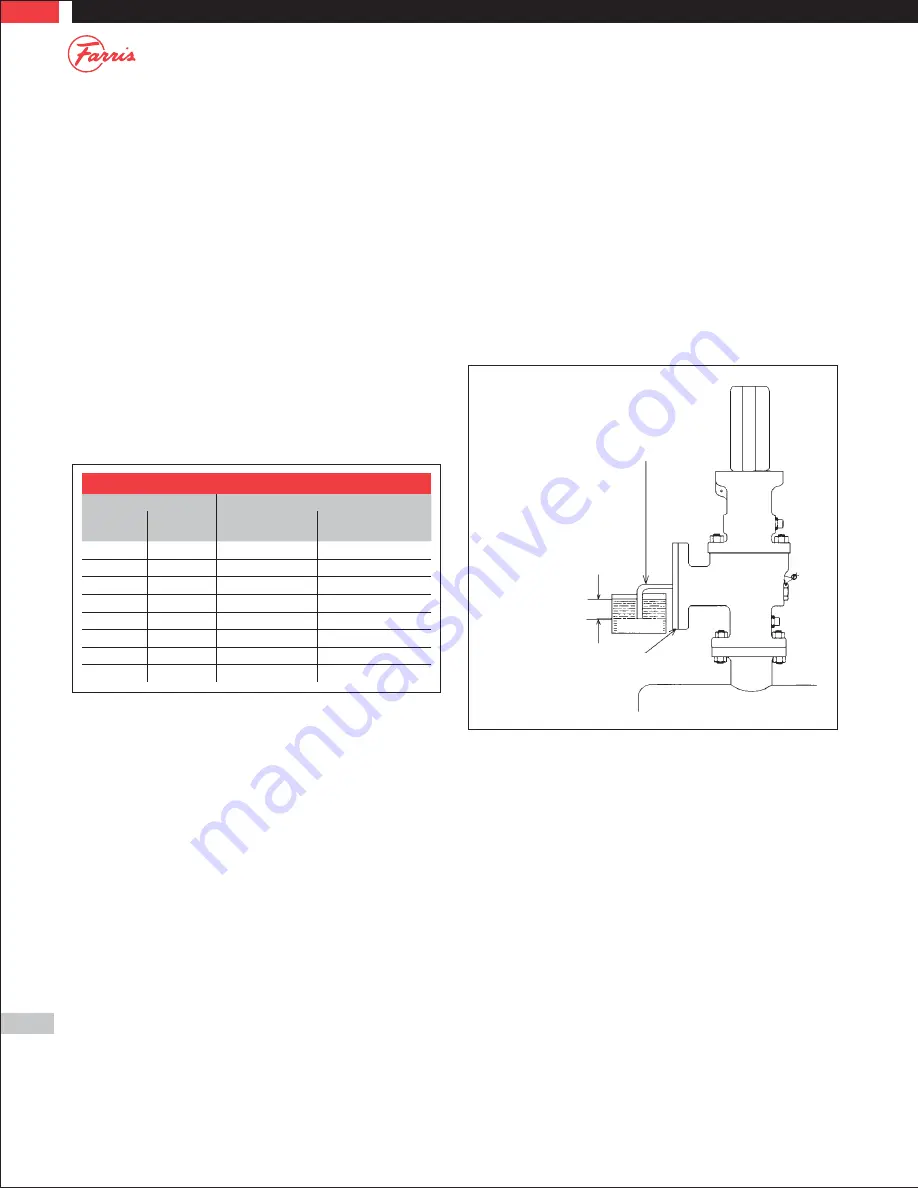
1. Next perform a seat leakage test. With the valve mounted on the test 

stand, attach a blind flange test fixture as shown in Figure 6 (air, gas, & 
vapor service valves only). For steam and water seat leakage testing, 
see paragraphs 4 and 5.

2. For metal and soft seated valves the pressure is held at 90% of cold 

differential test pressure when the CDTP is greater than 50 psig. For 
CDTP 50 psig and below, the pressure should be held 5 psig below the 
CDTP.

3. Bring the pressure up and hold it for one minute for valves up to 2" inlet 

size, 2 minutes for valves from 2 1/2" to 4" inlet size, and 5 minutes for 
valves with inlet sizes 6" and larger. Then count the number of bubbles 
for one minute. The acceptance criteria for metal seat valves are per the 
following table. For O ring and soft seat valves, there should be no 
leakage (zero bubbles per minute).

Table 3

Seat Tightness: Air, Gas & Vapor Service

Set Pressure

Leakage Rate in Bubbles Per Minute

psig

barg

Orifice Size ≤ 0.307 

Sq. In (200 mm

2

)

Orifice Size < 0.307  

Sq. In (200 mm

2

)

15 to 1000

1.03 to 68.9

40

20

1500

103

60

30

2000

138

80

40

2500

172

100

50

3000

207

100

60

4000

276

100

80

5000

345

100

100

6000

413

100

100

4. Steam: Test pressure per paragraph 2 shall be applied for 3 minutes 

before the seat tightness test. The valve should be observed for leakage 
for at least one minute. There should be no visible sign of leakage at the 
valve outlet when viewed against a black background.

Where the Code allows ASME Section VIII steam valves to be tested on air, 
seat leakage may be verified using the procedure for air, gas, and vapor 
service valves as listed in paragraphs 1 to 3. 

5. Water: Liquid valves are tested on water. Test pressures per paragraph 

2 should be applied for a period of two minutes. There should be no 
visible sign of leakage.

Note: When performing the seat leakage test on valves with open levers, a 
plain screwed test cap must be used. This will prevent the venting of the 
test pressure through the top of the bonnet.

Tube 5/16" (7.9 millimeters)  

OD x 0.035 inch  

(0.89 millimeter) Wall

Note: The cover plate should be fitted with a 

suitable device to relieve body pressure in case 

of accidental popping of the valve.

1/2" (12.7 millimeters)

WATER

AIR RECEIVER

Figure 6

Содержание Curtiss-Wright 1890 Series

Страница 1: ...Technical Manual 1098T R1 Pressure Relief Valve Maintenance Manual ...

Страница 2: ...r will lead to potentially dangerous operating conditions When following these instructions refer to the drawing for your specific product 2 Safety Tips Make sure that the Pressure Relief Valve is isolated from the pressure source before it is removed Wear protective clothing when removing valves from service in order to prevent coming in contact with any toxic or corrosive fluids which may be tra...

Страница 3: ... spring and buttons Note on some valves the upper and lower spring buttons are different 11 Pull up on stem and lift out the trim assembly consisting of the sleeve guide stem retainer disc holder disc and bellows if so equipped 12 Hold the top of the stem retainer and pull up on stem and turn counterclockwise to remove from the stem retainer Remove the sleeve guide 13 Remove the disc from the disc...

Страница 4: ...Nozzle 16 Bellows Gasket 27 Pipe Plug Body 6 Disc Holder 17 Spring Button 28 Pipe Plug Bonnet 7 Blow Down Ring B D R 18 Body Stud 29 Flat Head Machine Screw 8 Sleeve Guide 19 Hex Nut Body 30 O Ring Retainer 9 Stem 20 Spring 31 O Ring Seat Seal 10 Spring Adjusting Screw 21 Cap Gasket 32 Jack Screw Plug 11 Jam Nut Spr Adj Scr 22 Body Gasket Conventional design does not use bellows and bellows gasket...

Страница 5: ...e 8 On 2850 2856 Series remove the blow down ring lock screw and gasket 9 Thread a pipe into the outlet and turn the bonnet counterclockwise removing it from the body 10 Remove the stem with spring and buttons attached On Series 2850 and 2856 valves the upper and lower spring buttons are different 11 Remove the spring and buttons from the stem 12 On the 2850 and 2856 Series the disc is held to the...

Страница 6: ... Nut Spr Adj Scr 16 Lift Stop Ring 3 Cap 10 Blow Down Ring 17 Retaining Ring Stem Shoulder 4 Disc 11 Lock Screw B D R 18 Cap Gasket 5 Disc Holder 12 Spring 19 Body Gasket 6 Guide 13 Spring Button 20 Guide Gasket 7 Stem 14 Stem Shoulder 21 B D R Lock Screw Gasket Series 2700 Series 2850 2856 Figure 3 ...

Страница 7: ...hreaded Valves B Threaded Valves Parts List Lever Assemblies Item Part Name Item Part Name 1 Cap 12 Test Lever Fork 2 Test Lever 13 Lever RD HD Rivet 3 Cam 14 Groove Pin 4 Cam Shaft 15 Set Screw 5 Gland 16 Gland Nut 6 Stem Test Washer 17 Cap Screw 7 Stem Jam Nut 18 Cap Stud 8 Button Head Rivet 19 Fork RD HD Rivet 9 Packing Ring 20 Cotter Pin 10 Plain Washer 21 Gland Nut Gasket 11 Lever hex Jam Nut...

Страница 8: ...ling Gaskets and soft goods such as O ring seals should always be replaced Never perform a repair using the old gaskets and O rings To ensure proper valve performance the nozzle seat and disc must be lapped flat to a mirror finish This can be accomplished using cast iron lapping blocks Pyrex lapping glasses or on a lapping machine These devices are used in conjunction with special lapping compound...

Страница 9: ...ens at the required pressure designated as the cold differential test pressure CDTP The set pressure tolerance is equal to 3 of the set pressure Pressure Relief Valve Test Fluids Service Fluid Test Fluid Air gas vapor Air or gas Steam Steam Liquid Water Table 2 Air may be used for ASME Code Section VIII valves 6 Lock the jam nut in place and pop the valve once more to ensure the set pressure adjus...

Страница 10: ...ifice Size 0 307 Sq In 200 mm2 15 to 1000 1 03 to 68 9 40 20 1500 103 60 30 2000 138 80 40 2500 172 100 50 3000 207 100 60 4000 276 100 80 5000 345 100 100 6000 413 100 100 4 Steam Test pressure per paragraph 2 shall be applied for 3 minutes before the seat tightness test The valve should be observed for leakage for at least one minute There should be no visible sign of leakage at the valve outlet...

Страница 11: ...10 ...

Страница 12: ...lter or improve the designs or specifications of the products described herein Repair valve FAST tags New valve FAST tags Farris Aftermarket Services FAST Track Turnaround Farris Engineering is dedicated to making our FAST Program work for you which is why we have the FAST Track Center at our headquarters in Brecksville OH For urgent service requirements our FAST Track Center has a large inventory...

Отзывы: