background image

34

V I D E O                                                 N T S C

                P I X E L   C L O C K
                P O S I T I O N
                P I C T U R E
                S O U N D
                O P T I O N S
                S O U R C E

D E C O D E R
L A N G U A G E


A U T O ( N T S C )
E N G L I S H

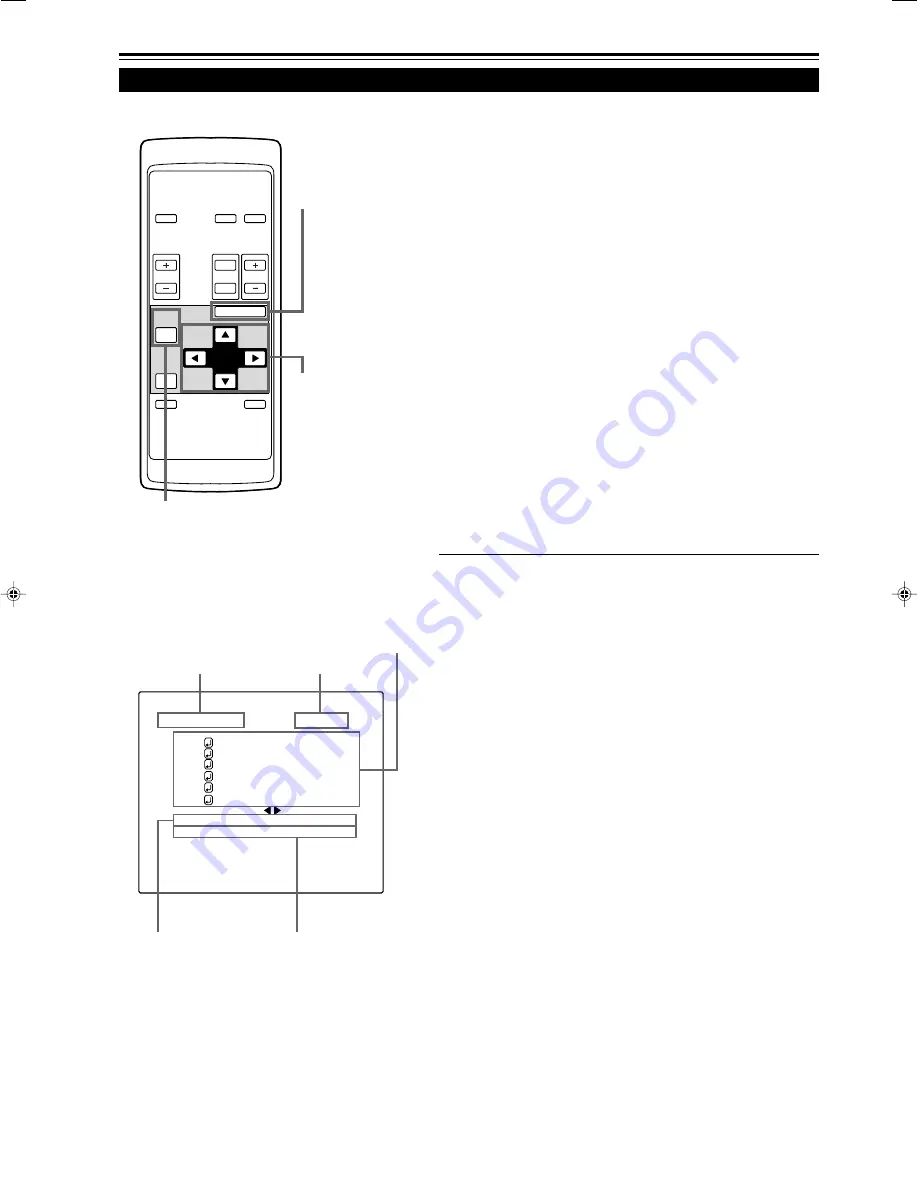
Operating the Main Menu (Cont.)

Operating the Main Menu (Basic Operation of the Main Menu)

Submenu items

Input line

Source

Decoder (color system)

Language

For projector’s menus, the setting menu and the main menu are
available.
Here, we explain about the operation of the main menu. (see pages
34 to 47)
For the setting menu, refer to “Making Basic Settings” on page 31.

1

Press the MENU/ENTER button.

• The main menu is displayed on the screen.

2

Select an item with the cursor button

5

 or 

.

• The selected item (displayed text) is shown in magenta color

on the screen.

3

Set (adjust) the item.

When you have selected DECODER or LANGUAGE,

• Set it with the cursor button 

2

 or 

3

.

* To finish the main menu, press the PAGE BACK button.

When you have selected an item on the submenu,

• Press the MENU/ENTER button to display the submenu, then

set (adjust) the item with the cursor buttons 

2

 / 

3

 or 

5

 / 

.

* To return to the main menu, press PAGE BACK again. (To

finish the main menu from the submenu, press PAGE BACK
twice.)

About main menu display:

Line display:

The selected input-mode designation is
displayed. For input-mode designation, “Y/
C”, “VIDEO”, “Y, P

B

/B-Y, P

R

/R-Y”,

“COMPUTER 1” and “COMPUTER 2” are
available.

Source display: The type of signal being input is displayed.

With this projector, unique designations are
previously given to specific horizontal and
vertical frequencies. This allows the source
selected under SOURCE (submenu item) to
be indicated. The source setting can be
selected from AUTO mode and dedicated
(forced) modes. When AUTO is selected, the
horizontal and vertical frequencies of a
signal being input are detected and the
matched designation is displayed in (  ).
Display example: “AUTO (NTSC(480i))”
Therefore, be careful as the source display
does not always correspond to the indication
or type of the input signal.
For the unique designations for the specific
horizontal and vertical frequencies, see
pages 19 and 46.

Submenu item display:

PIXEL CLOCK: See page 37.
POSITION

: See page 38.

PICTURE

: See pages 39~41.

SOUND

: See page 42.

OPTIONS

: See pages 43~45.

SOURCE

: See pages 46 and 47.

Decoder (Color system) display : See page 35.
Language display

See page 36.

Remote control unit

Main menu

(Example: During video signal input)

OPERATE

VOL.

PAGE
BACK

PRESET

ZOOM

FOCUS

COMPUTER VIDEO

QUICK
ALIGN.

AV

MUTING

W

T

MENU/ENTER

MENU/ENTER
button

Cursor buttons

PAGE BACK button

Содержание FDP-DILA1

Страница 1: ...ns Manual NOTICE THIS PROJECTOR HAS BEEN SIGNIFICANTLY MODIFIED AND OPTIMIZED TO PRODUCE VERY HIGH QUALITY IMAGES USING THE FAROUDJA PROCESSOR ANY CHANGES MADE TO THESE SETTINGS CAN CORRUPT THIS PROCESS RESETTING THE OPTIMIZATION IS NOT COVERED UNDER WARRANTY ...

Страница 2: ... the wall outlet before cleaning Do not use liquid cleaners or aerosol cleaners Use a damp cloth for cleaning Do not use attachments not recommended by the product manufacturer as they may be hazardous Do not use this product near water Do not use immediately after moving from a low temperature to high temperature as this causes condensation which may result in fire electric shock or other hazards...

Страница 3: ...ndicates a need for service When replacement parts are required be sure the service technician has used replacement parts specified by the manufacturer or with same characteristics as the original part Unauthorized substitutions may result in fire electric shock or other hazards Upon completion of any service or repairs to this product ask the service technician to perform safety checks to determi...

Страница 4: ...ntrol the Projector 21 Connecting to Computer Devices 22 Connecting the Power Cord Supplied 24 When Turning On the Devices Connected to the Projector 25 Basic Operations 26 1 Turning on the Power 26 2 Select the video input to be projected 27 3 Adjust the screen size 27 4 Adjust focus 28 5 Adjust sound volume 28 For Operating Other Functions 29 Operating the Setting Menu 31 Making Basic Settings 3...

Страница 5: ...tion cable approx 2 m 6 56 ft D sub 3 row 15 pin Conversion adapter for Mac for Macintosh Audio cable approx 3 m 9 84 ft 3 5 mm dia stereo mini plug AV connection cable approx 1 5 m 4 92 ft BNC RCA conversion plug Accessories The following accessories are included with this projector Check for them if any item is missing please contact your dealer ...

Страница 6: ...ful to keep its balance Do not carry it while the light source lamp is on or the cooling fan is operating This could cause personal injury 4 Adjustable foot for adjusting upper lower angles It is adjusted to be level when shipped from the factory Turning to extend the foot allows adjustment up to 7 5 Built in speaker left 6 Built in speaker right 7 Lens Projection lens which is an electrically dri...

Страница 7: ...rojector goes into stand by state and the STAND BY indicator on the control panel comes on ON The main power turns on OFF The main power turns off w Connector panel For details refer to Connector Panel on page 11 e Adjustable foot for horizontal angle adjustment It is set at the shortest position when shipped from the factory Turn the foot to make the projector level Adjustment can be made in the ...

Страница 8: ... reduce the cooling effect causing heat to build up inside which could cause a fire or malfunction t Opening for replacing the light source lamp For replacing the light source lamp refer to Replacing the Light Source Lamp on page 48 y Fixing foot u Position selecting screw for ceiling mounting When using the projector in an upside down ceiling mounted position inverted top to bottom and right to l...

Страница 9: ...fer to Replacing the Light Source Lamp on page 48 5 TEMP indicator ON The temperature inside the projector has abnormally risen Note While the TEMP indicator is on during abnormal temperature the power is automatically cut off and an emergency mode is shown with the EMERGENCY indicator blinking 6 EMERGENCY indicator Blinking Something abnormal has occurred with the projector Memo About the emergen...

Страница 10: ...n 3 button The value for the selected item increases 2 button The value for the selected item decreases When no menu is shown Press the 3 button and 2 button at the same time QUICK ALIGNMENT is displayed on the screen and the quick alignment function works TRACKING PHASE H POS and V POS are automatically adjusted When the adjustment is finished the display goes off automatically Memo The quick ali...

Страница 11: ...AUDIO OUT terminal produce the same sound from both L and R Memo To select the proper audio input for video input The video input terminals AV IN input terminals can be switched with the projector s or remote control s VIDEO button However since this projector has only single audio input terminal reconnect audio input in accordance with the AV device to be used 5 AUDIO OUT audio output terminal st...

Страница 12: ...hen input to COMPUTER 2 is selected the audio signal input is reproduced by the projector s speakers Also signals can be output from theAUDIO OUT audio output terminal However if a cable is connected to AUDIO OUT audio output terminal audio sound does not come out from the projector s speakers q COMPUTER IN computer input 1 terminal D sub 3 row 15 pin This is an input terminal PC dedicated for com...

Страница 13: ...in makes the video image and audio sound to resume 9 QUICK ALIGN Quick Alignment button Use this button to automatically adjust TRACKING PHASE H POS and V POS of the projected video During the automatic adjustment QUICK ALIGNMENT appears on the screen and disappears after it is finished Memo Quick alignment function Does not work for video input AV IN input terminal signals Works only for computer...

Страница 14: ...following Do not mix new and old batteries Do not mix different types of batteries as they differ in characteristics Place batteries so they match the polarities indicated to and to Be sure to put the minus end in first to avoid short circuiting Use only designated batteries Remove the batteries if not used for a prolonged period of time When the batteries are exhausted replace them immediately Ot...

Страница 15: ...ce around the projector When the projector is enclosed in a space of the following dimensions use an air conditioner so the temperature inside becomes equal to the outside temperature Allowable minimum space required CAUTION Do not install the projector in the following places There is much water humidity or dust The projector may be subjected to oil smoke or cigarette smoke On a soft surface such...

Страница 16: ...with the extended center line of the projector s lens That way the lower edge of the picture projected on a 4 3 aspect ratio screen aligns with the extended center line of the lens Also the screen must be at right angles with the extended center line of the lens so that projection occurs at right angles with the screen When installing the screen use a 4 3 aspect ratio picture A 16 9 aspect ratio p...

Страница 17: ...21 approx 1 323 cm Projection distance Projection screen size diagonal length Minimum projection screen size Tele end Maximum projection screen size Wide end For 16 9 aspect ratio screens 8 2 ft 2 5 m 39 approx 100 cm 57 approx 144 cm 9 84 ft 3 0 m 47 approx 120 cm 69 approx 175 cm 13 12 ft 4 0 m 63 approx 161 cm 93 approx 236 cm 16 4 ft 5 0 m 79 approx 201 cm 117 approx 297 cm 19 68 ft 6 0 m 95 a...

Страница 18: ...e in color images shading which otherwise would occur in ceiling mounting To revert to normal desltop setting turn the position selecting screw for ceiling mounting back to the initial position factory shipped When using the projector in an upside down ceiling mounting position inverted top to bottom and right to left Turn the position selecting screw for ceiling mounting counterclockwise fully un...

Страница 19: ...eset Input terminal NTSC 2 PAL 3 High vision signal Y PB B Y PR R Y G B R H CS V Screen resolution standard name Horizontal frequency Vertical frequency Scanning method 640 400 PC 9801 24 8kHz 56 4Hz Non interlace 640 350 VGA1 31 5kHz 70 1Hz Non interlace 640 480 VGA3 31 5kHz 59 9Hz Non interlace 640 480 Macintosh 13 35 0kHz 66 7Hz Non interlace 640 480 VGA VESA 37 5kHz 75 0Hz Non interlace 800 60...

Страница 20: ... audio input terminal reconnect audio input in accordance with the AV device to be used Video devices VCR Video Cassette recorder Laser video disc player Camcorder Connecting to Hi Vision Devices Before connection be sure to turn off both the projector and Hi Vision devices Read the manual which comes with each Hi Vision device thoroughly Use separately available BNC cables and audio cables to con...

Страница 21: ... make an infrared remote sensor extension unit and connect it to the REMOTE terminal of the projector Obtain connection cables as required For details consult your dealer or service center Connecting to Other Devices Connecting to Various Devices Cont Y AUDIO AUDIO OUT REMOTE Y C VIDEO Y PB B Y PR R Y L R RS 232C BNC RCA conversion plug supplied Cable supplied with the game device or supplied AV c...

Страница 22: ...w the computer s LCD to work if an external display is connected With such a note type the LCD display and external display output need to be switched To monitor connector RGB output devices Laser video disc player etc When connecting an audio output terminal such as a computer sound source to the projector connect to theAUDIO terminal using the supplied audio cable Computer cable supplied To COMP...

Страница 23: ...evices Cont Desktop type Connecting to Various Devices Cont PC AUDIO AUDIO AUDIO REMOTE Y C L R H CS V R G B COMPUTER OUT RS 232C When connecting an audio output terminal such as a computer sound source to the projector connect to the AUDIO terminal using the supplied audio cable Other connections are the same as in the connection example for IBM PC or IBM compatible PCs Conversion adapter for Mac...

Страница 24: ...t put a heavy object on heat or pull the power cords otherwise they may be damaged Do not insert or pull out the plugs with a wet hand S T A N D B Y O P E R A T E L A M P T E M P E M E R G E N C Y V ID E O C O M P U T E R S E T T IN G Q U IC K A L IG N 2 3 1 Insert the supplied power cord into the power input terminal AC IN of the projector 2 Insert the plug of the supplied power cord into a wall ...

Страница 25: ...me do not turn off the main power switch After the cooling of the light source lamp is finished the fans stop and the STAND BY indicator comes on then turn off the main power switch If you press the OPERATE button immediately after the light source lamp lights it takes about 40 seconds for the lamp to go off To turn the lamp on again wait 10 seconds or more before pressing the OPERATE button When ...

Страница 26: ...Turning off the Power 1 Press the OPERATE button Or press the remote control s OPERATE button for one second or more The STAND BY indicator changes to blinking and the projector goes into cool down mode 2 Turn off the MAIN POWER switch after the STAND BY indicator changes to steady on 2 1 1 2 Remote control unit Projector or Example of the projector s button Projector Projector 2 1 1 Turning on th...

Страница 27: ...W button To reduce the screen size Press the ZOOM T button Remote control unit Note The adjustment of the screen size zoom adjustment can also be made on the setting menu For operating the setting menu refer to Making Basic Settings on page 31 Press the VIDEO button or the COMPUTER button to switch the input Each time you press either button the selected input changes as follows When you press VID...

Страница 28: ...VOL buttons When you press the VOL button The sound volume becomes higher 0 50 When you press the VOL button The sound volume becomes lower 50 0 When you press either button the corresponding AUDIO VOL level is displayed on the screen the display will disappear in about five seconds Remote control unit Note Sound volume can be adjusted on the setting menu For operating the setting menu refer to Ma...

Страница 29: ...tment QUICKALIGNMENT appears on the screen and disappears automatically after the adjustment is completed Note This function works only for computer system inputs It does not work for AV inputs CAUTION When performing automatic adjustment using the quick alignment function Use a bright still picture screen It may not function correctly on a dark or motion picture screen If the condition adjusted b...

Страница 30: ... switched For operating the setting menu refer to Making Basic Settings on page 31 Press the projector s SETTING button The setting menu is displayed on the screen Note To change the menu language displayed English is set when the projector is shipped from the factory The language displayed can be selected from the following six languages Japanese ENGLISH DEUTSCH German ESPAÑOL Spanish ITALIANO It...

Страница 31: ...the screen 2 Press the SETTING button to select the desired item The selected item is shown in magenta color Each time you press the button the selected item changes as follows TRACKING PHASE H POS V POS Menu clearing AUDIO VOL ZOOM FOCUS Memo To select items using the remote control unit Items can be selected using the cursor buttons 5 backward or forward on the remote control unit In this case m...

Страница 32: ...amp pulse s position at the back porch BP or on the sink tip ST Normally the clamp pulse is used at BP If with some PCs or workstations the screen becomes unstable such as being too dark or too bright try to switch to ST RESIZE Does not work with AV video input RESIZE is shown in gray BACK COLOR Specifies the background color when there is no video signal Background color can be selected from BLUE...

Страница 33: ...le such as being too dark or too bright try to switch to ST RESIZE When the number of pixels resolution sought by the video image input is smaller than that resolution of D ILA device the video image is then enlarged to a virtually full screen size of D ILA device and projected Resizing indication BACK COLOR Specifies the background color when there is no image signal Background color can be selec...

Страница 34: ...display The selected input mode designation is displayed For input mode designation Y C VIDEO Y PB B Y PR R Y COMPUTER 1 and COMPUTER 2 are available Source display The type of signal being input is displayed With this projector unique designations are previously given to specific horizontal and vertical frequencies This allows the source selected under SOURCE submenu item to be indicated The sour...

Страница 35: ... AUTO The color system of a signal being input is automatically identified NTSC 480i Dedicated to NTSC 480i NTSC4 43 Dedicated to NTSC4 43 PAL Dedicated to PAL SECAM Dedicated to SECAM Memo About automatic signal identification AUTO is selected when shipped from the factory In AUTO the color system DECODER of the signal being input is automatically identified and indicated in Refer to the main men...

Страница 36: ...the selected language changes as follows 3 Forward 2 Backward Japanese English German Spanish Italian French Memo About language display English is selected when the projector is shipped from the factory The languages in the menu display are the following six Japanese ENGLISH DEUTSCH German ESPAÑOL Spanish and FRANÇAIS French However some text such as QUICKALIGNMENT is displayed only in English Un...

Страница 37: ...buttons Adjust the tracking and phase of the video screen being projected To adjust the phase first check for correct tracking adjustment To reset to the factory set adjustment values press the remote control s PRESET button Tracking and phase are reset to the factory set adjustment values To return to the main menu press the PAGE BACK button To finish the main menu press PAGE BACK again To finish...

Страница 38: ...ected To reset to the factory set adjustment values press the remote control s PRESET button H POS and V POS are reset to the factory set adjustment values To return to the main menu press the PAGE BACK button To finish the main menu press PAGE BACK again To finish the menu display from the submenu display POSITION menu press PAGE BACK twice The screen moves to the left 255 0 255 The screen moves ...

Страница 39: ...ar on the screen When AV signals are input PICTURE menu PICTURE menu When computer related signals are input 4Select the item to adjust with the cursor button or The items to adjust shown in text is displayed in magenta color Remote control unit Main menu Notes The selected item is shown in magenta color Items shown in gray color cannot be operated or set in the current mode Adjustment items on th...

Страница 40: ...T button The selected item is reset to the factory set adjustment value Gets darker 30 0 30 Gets brighter 30 0 30 Gets lower 30 0 30 Gets higher 30 0 30 Gets softer 0 7 Gets sharper 0 7 Gets softer 30 0 30 Gets deeper 30 0 30 Gets reddish 30 0 30 Gets greenish 30 0 30 Resets all adjustment values of items on the PICTURE menu to the factory set values 0 Adjustment item Button Adjustment content BRI...

Страница 41: ...and CONTRAST 0 changing CONTRAST to 1 changes the adjustment values as follows R GAIN 1 G GAIN 6 and B GAIN 1 Also when the adjustment value of any of R GAIN G GAIN and B GAIN has reached 30 minimum or 30 maximum CONTRAST cannot be adjusted to any higher value For example when R GAIN is 0 G GAIN is 5 B GAIN is 0 and CONTRAST is 0 increasing CONTRAST allows the other adjustment values to increase u...

Страница 42: ...To reset to the factory set adjustment values press the remote control s PRESET button The treble and bass are reset to the factory set adjustment values To return to the main menu press the PAGE BACK button To finish the main menu press PAGE BACK again To finish the menu display from the submenu display SOUND menu press PAGE BACK twice Gets weaker 5 0 5 Gets stronger 5 0 5 Gets stronger 5 0 5 Get...

Страница 43: ...ress the MENU ENTER button The main menu appears on the screen 2Select the OPTIONS with the cursor button 5 or The selected item displayed in text is shown in magenta color on the screen 3Press the MENU ENTER button The submenu items of the OPTIONS menu are displayed OPTIONS menu Remote control unit Main menu Note The selected item is shown in magenta color Items shown in gray color cannot be oper...

Страница 44: ...ON Inverses video image upside down Factory setting OFF OFF For normal set up ON For upside hanging from the ceiling OFF ON Sets the clamp pulse s position at the back porch BP or on the sink tip ST Normally the clamp is used at BP If with some PCs or workstations the screen becomes unstable such as being too dark or too bright try to switch to ST factory setting BP BP The clamp pulse is positione...

Страница 45: ...SC4 43 PAL SECAM 16 9 The aspect ratio of the screen becomes 16 9 Set it to 16 9 for Hi Vision devices W VHS VCR etc 4 3 16 9 Sets the length of sleep time which automatically brings the projector into stand by state You can select one of the following sleep times 10 minutes 20 minute 30 minutes and 60 minutes Factory setting 30 minutes 10 20 30 60 Adjustment item Button Adjustment content BACK CO...

Страница 46: ...e input mode SOURCE is VIDEO or Y C and if AUTO is set the automatic detecting function may work possibly causing the screen to be intermitted or disturbed In that case set to a dedicated source forced mode When special effect playback fast forward twice speed triple speed is performed on a video deck etc the picture may be disturbed or intermitted depending on the device When inputting 480p or 72...

Страница 47: ...AUTO is selected The selected item is shown in beneath the indicated text SOURCE at the top of the screen completing the setting procedure To finish the menu display press the PAGE BACK button twice the first press returns you to the main menu and the second press clears it The menu display is finished SOURCE NTSC 480i AUTO NTSC 480i SDTV 480p HDTV1 720p HDTV2 1080i PAL SECAM PC 98 VGA1 VGA3 MAC13...

Страница 48: ...uct for the light source lamp If you use other than a genuine product this could cause a malfunction Also never use an old light source lamp An old lamp could cause marked degradation in performance or explode itself possibly causing the projector to malfunction Also its broken pieces could come out of the projector and harm you when replacing the light source lamp Do not replace the light source ...

Страница 49: ...pecified due to a shortened lamp life a darkened screen etc To handle a new light source lamp hold its plastic part Never touch the metal part or the front glass surface CAUTIONS Install the lamp unit and close the lamp replacement opening cover correctly otherwise a safety switch is activated to prevent the projector from operating If the claw on the lamp replacement opening cover is damaged the ...

Страница 50: ...OPERATE indicators blink two seconds alternately and after blinking the projector returns to stand by state the STAND BY indicator lights This completes the resetting of the lamp use time Memo To check the lamp use time has been reset You can check it by LAMP TIME on the OPTIONS menu CAUTIONS After replacing with a new light source lamp be sure to reset the lamp use time When the lamp use time ind...

Страница 51: ...the claws 3 Clean the filter Clean the filter with a neutral detergent wash it in water and then dry it in the shade 4 Reinstall the filter Fasten the screw with a flat end screwdriver Notes Install the filter correctly Otherwise the projector does not operate Goes into an emergency mode If the filter s claws are damaged the projector may not operate Then replace with a new filter CAUTIONS Put on ...

Страница 52: ...e setting correctly selected Isn t a wrong source forced mode selected Insert the power cord plug firmly Turn on the MAIN POWER switch Turn off the MAIN POWER switch close the lamp replacement opening cover and turn on the main power switch again Turn off the MAIN POWER switch fit the air filter correctly and turn on the main power switch again Turn off the MAIN POWER switch replace with a new lig...

Страница 53: ...sync V and horizontal sync H signals Input signals with little jitter or distor tion Set the source setting to AUTO If the problem still persists set it to the correct dedicated source forced mode Turn on video picture and audio by pressing the remote control s AV MUTING Match the polarities of batteries correctly to and to Replace with new batteries Remove any shielding objects Use the remote con...

Страница 54: ...ma signal 0 286Vp p burst signal 75Ω NTSC 0 3Vp p burst signal 75Ω PAL VIDEO 1 line BNC 1 Composite video signal 1Vp p 75Ω negative sync Y PB B Y PR R Y 1 line BNC 3 Component Y B Y R Y signals Y 1Vp p 75Ω negative sync B Y 0 7Vp p 75Ω R Y 0 7Vp p 75Ω DTV format signals 480i ITU R BT 601 4 480p SMPTE 293M Y 1Vp p 75Ω negative sync PB PR 0 7Vp p 75Ω 720p SMPTE 296M 1080i SMPTE 274M Y 1Vp p 75Ω 3 va...

Страница 55: ...lt in speaker 6 3 cm 2 3 8 1 1 8 oval type 2 impedance 8Ω General Power requirements AC120 V 60 Hz Power consumption 8 A 7 W during stand by Allowable operation temperature 5 C to 35 C 41 F to 95 F Allowable relative humidity 20 to 80 no condensation Allowable storage temperature 10 C to 60 C 14 F to 140 F Maximum outside dimensions Approx W 425 H 246 D 375 mm 16 3 4 9 3 8 14 7 8 excluding protrud...

Страница 56: ...46 Unit Inch mm 1 Protrusion excluded φ4 1 8 DTV format signals The following are DTV format signals that can be input DTV Formats 480i 480p 720p 1080i Signal Standard ITU R BT 601 4 SMPTE 293M SMPTE 296M SMPTE 274M Scanning Line Frame 525 525 750 1125 Effective Samples x Scanning Lines 720 x 485 720 x 483 1280 x 720 1920 x 1080 Samples Total Line 858 858 1650 2200 Field Frequency Hz 59 94 59 94 6...

Страница 57: ... N C Pin number Signal name 1 Red 2 Green 3 Blue 4 N C 5 N C 6 GND Red 7 GND Green 8 GND Blue Pin number Signal name 9 N C 10 GND SYNC 11 GND 12 N C 13 H SYNC 14 V SYNC 15 N C Specifications Cont 2 3 4 5 6 7 1 8 9 1 2 3 4 5 6 7 8 9 10 11 12 13 14 15 Pin assignment Specifications for terminals Y C terminal Pin number Signal name 1 GND Y 2 GND C 3 Y 4 C 1 2 3 4 ...

Страница 58: ...ucts to Faroudja transportation charges prepaid Faroudja s only liability with respect to products that do not meet the foregoing warranty and for which appropriate transportation arrangements have been made will be to repair or at Faroudja s option replace defective products or portions thereof THE FOREGOING WARRANTY IS IN LIEU OF ALL WARRANTIES EXPRESS IMPLIED OR STATUTORY REGARDING THE PRODUCTS...

Отзывы: