Farnell D2001JW Скачать руководство пользователя страница 3


Digital Video Recorder


Digital Video Recorder


Troubleshooting Your Wireless Outdoor Camera


Poor Picture

:


Realign antennas until image quality improves, slightly adjust the position of the Camera or 
Receiver. Change the location of the Camera, or use a different height or angle to see if the 
image improves. In some cases interference may be caused by another device on a similar 
frequency to the channel you are using.


Lines only - no clear picture

:


Check to confirm there is no microwave oven or other 2.4GHz equipment-operating close by 
i.e.; Cordless Telephones, Wireless Baby Monitors, Wireless LAN equipment etc. Make sure 
the Receiver is on the correct channel.


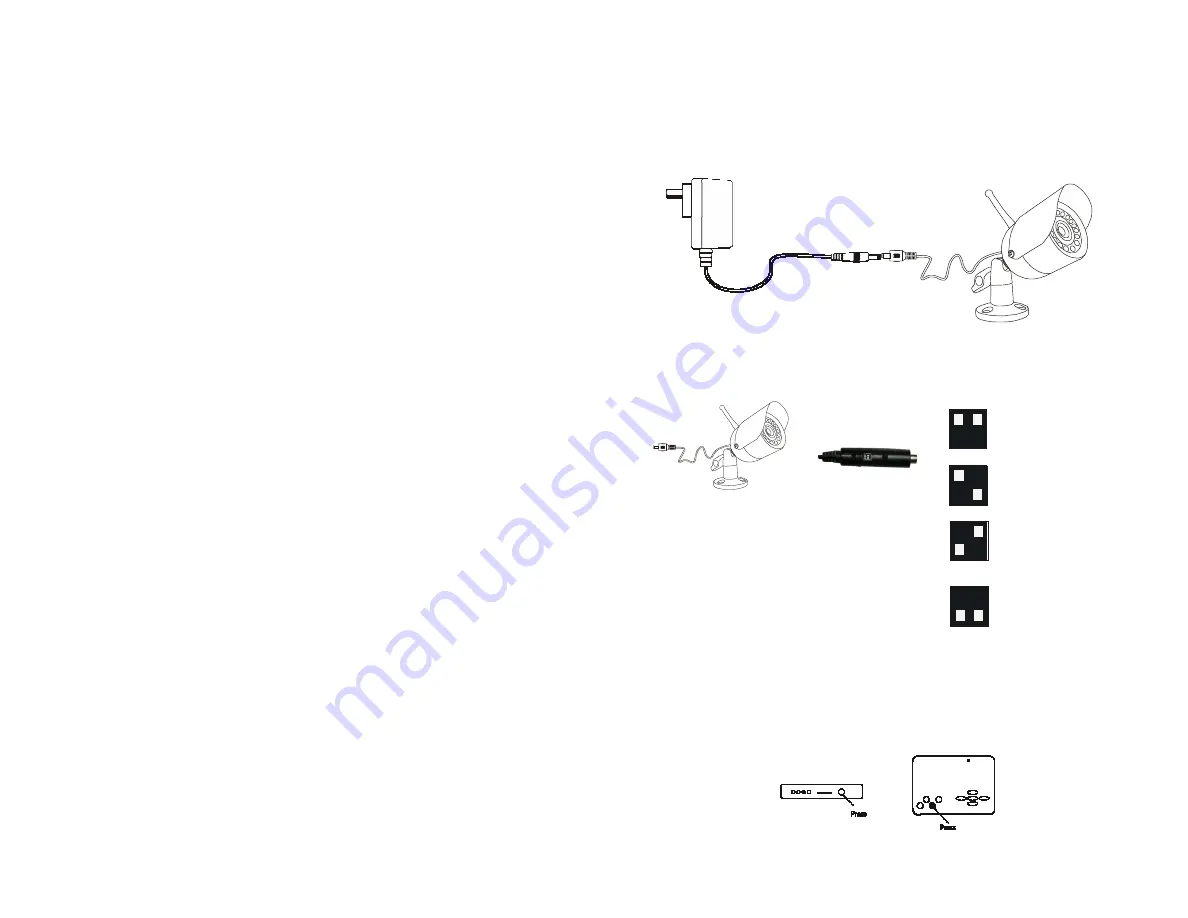
Connecting the Camera Power Supply


Camera Power Adaptor (12V)


Picture ghosting or interference

:


Some home appliances such as Wireless LANs, 2.4GHz portable telephones and


Microwave ovens operate on or near the 2.4GHz frequency. If you receive interference from 
such an appliance, try moving the Camera or Receiver to location further away from the 
appliance or in the event of interference from a Wireless LAN device, try changing the 
Wireless LAN to a different channel to improve the signal quality.


Changing the Camera Channels


Fig. (1)


Fig. (2)


Frequency Channel Settings


Channel 1


Both switches up


2414MHz


No picture

:


Check the receiver to confirm it is turned ON and make sure the A/V connection of the 
Receiver is not plugged into the Audio Out socket. Make sure the Receiver is on the correct 
channel. Check to ensure the camera is plugged in and has power. Check that the channel


on the receiver is the set to Channel x.


Locate the small plastic flap on 

the power connector end of the 

camera cable.


Side 

view 

of 

the 

Power 

connector  with  switches  inside, 
note the numbers 1 &


2 indicated at the bottom of the 
switch


1          2


Channel 2


Left up & right down


2432MHz


1          2


Channel 3


Left down & right up


2450MHz


Red haze over picture

:


In some cases where the sun shines into the front of the camera a faint red glow can be 
seen. Move the camera to a shaded location, or fit a hood to stop sunlight entering the 
camera lens directly.


Changing these switch settings changes the frequency that 

1         

2


the camera transmits on. Once you have set the channel on


the camera, select the same channel on your DVR. If you 
experience interference try different channels. Make sure 
multiple cameras are set to different


frequencies so you can use them in the same area with the 

1         

same receiver


Channel 4


Both switches down


2468MHz


Foreground is dark while background is too bright

:


If the camera is looking from a dark area towards a light area in some cases the automatic 
exposure can find it difficult to balance the image correctly. Change the location of the


camera so that the point of greatest interest has the largest area of the image. (If you want 
to see the bright area, move the camera so that almost the entire screen shows this area. If 
you  want  to  see  the  darker  area,  move  the  camera  so  that  most  of  the  image  shows  this 
area.


14


Changing the Wireless Camera Channel on Your DVR 


To change wireless channels on your DVR, push the SET button on the front casing.    The 
light indicates the current wireless channel i.e. CH1, CH2, CH3, CH4.    Push the display 
button (DISP) to change views between your wired and wireless cameras.


3

Содержание D2001JW

Страница 1: ...hout charge for parts and Labour or replaced at the sole discretion The repair or replacement will be warranted for either ninety days or the remainder of the original one year warranty period or whichever is longer The end user is responsible for all freight charges incurred to send the product to our repair centers The end user is responsible for all shipping costs incurred when shipping from an...

Страница 2: ...ard Slot Wireless Outdoor Camera WOC WOC Power Supply SD Card Video Out Cable Video In Cable Antenna Omni directional Transmitting Range 100m transmission range open air Weight 200 grams Operating Temperature 20 50 C Sensor 1 3 Color CMOS Horizontal Resolution 380 TV lines Minimum Illumination 0 lux IR on Insert an SD card with label facing up into the DVR The DVR can handle SD cards up to 2GB Onc...

Страница 3: ...t the channel on the receiver is the set to Channel x Locate the small plastic flap on the power connector end of the camera cable Side view of the Power connector with switches inside note the numbers 1 2 indicated at the bottom of the switch 1 2 Channel 2 Left up right down 2432MHz 1 2 Channel 3 Left down right up 2450MHz Red haze over picture In some cases where the sun shines into the front of...

Страница 4: ...st wireless signal Depending on local conditions wireless signals may vary A clear line of sight from the DVR to the camera will achieve the best image Walls metals and other wireless devices may impact the quality of an image If too much interference occurs on any channel move the camera or DVR to another location or change camera channels Tips and Shortcuts The DVR unit has 16MB of memory instal...

Страница 5: ... press the Display button to bring up the folder listing 2 Press Up Down to choose the folder you want to see and then press OK to confirm 5 Press Mode to exit playback and return to live view 12 3 Press OK to toggle Motion Detection ON or OFF 4 Press the Left Right buttons to highlight Exit and then press OK to exit the menu SHORTCUT When viewing your camera press the UP arrow to quickly toggle M...

Страница 6: ...the DVR 3 Press OK to toggle Photo or AVI video recording Viewing and Deleting Saved Images 4 Press the Left Right buttons to highlight Exit and then press OK to exit the menu SHORTCUT When viewing your camera press the DOWN arrow to quickly toggle between Photo or Video 1 When viewing a live image press Mode to enter playback mode and view saved images 2 Press Left Right to switch between images ...

Страница 7: ...detected the Current Value must be higher than the Target Value 10 Press Left Right to set the Target Value or sensitivity between 0 99 Adjust the sensitivity to the level needed for your conditions Press OK to return to the Setup menu Note In our example above Target Value is set to 10 Motion will only be recorded when the level of motion Current Value in the bounding box reaches 10 or more 10 TV...

Страница 8: ... Down Left Right to move detection box to a region you would like to detect motion and then press OK to confirm and return to the Setup menu 4 Press Left Right to highlight Motion Detect Count in the Setup menu Motion Detect Count indicates how many photos will be taken per motion detection Note This feature applies to photo recording only 5 Press OK to change the Motion Detect Count This value ca...

Отзывы: