background image

FARMI 290

16

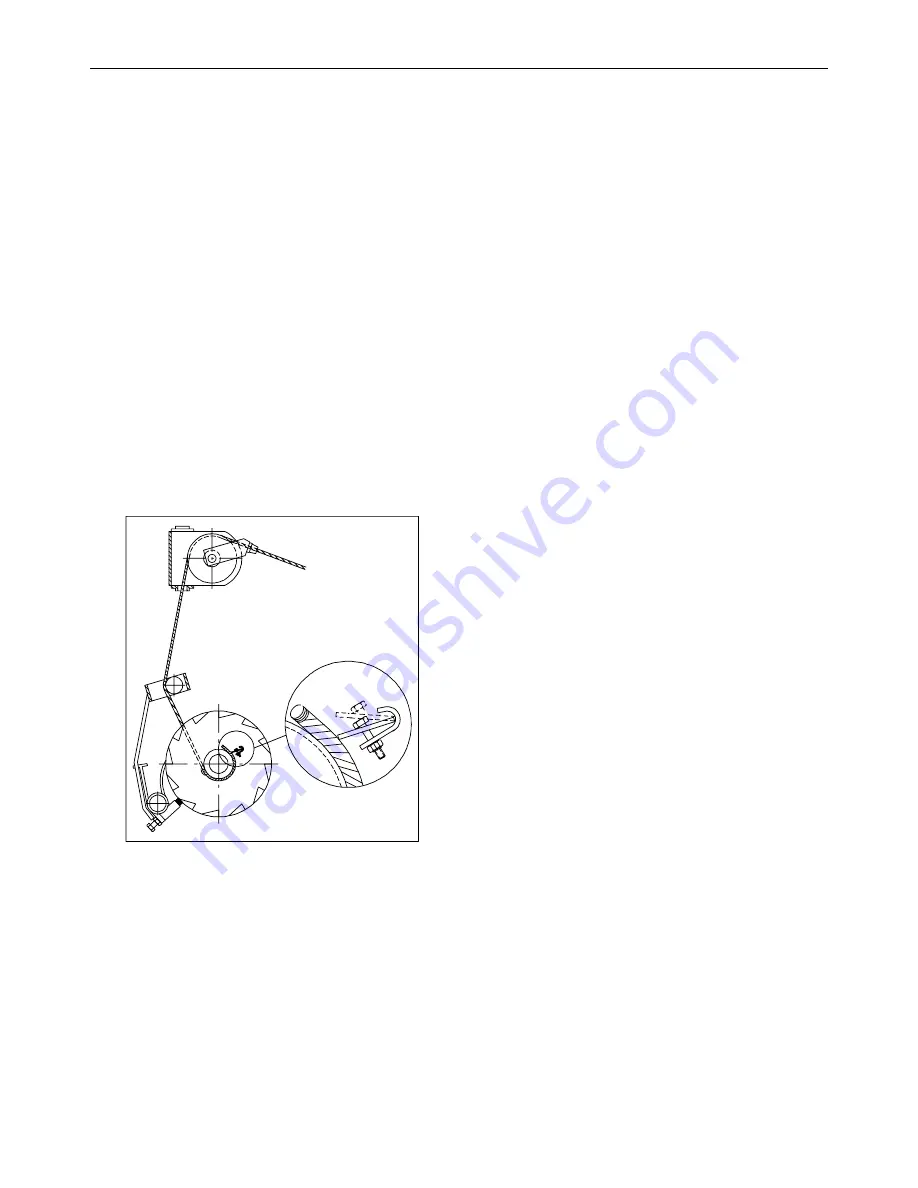
FASTENING THE CABLE TO THE DRUM

1.  Tape the cable end to prevent loosening of the  

core wires.

2.  Pass the cable through the hole in cable guard, over 

the upper snatch block and then inside the winch.

3.  Insert the cable from behind the roll of the drum  

brake.

4.  Pull the cable onto the drum from the left hand side 

(the same side as the clutch lever).

5.  Pass the cable end through the hole in the drum  

plate, pull about 15 cm (6”), and insert under the 

wedge of the cable lock device. See fig. 3.

6.  Tighten the cable lock screw.

7.  Winch the cable on the drum. BUT REMEMBER  

THAT THE CABLE HAS TO BE LOADED HEAVILY, 

WHEN WINCHING THE CABLE BACK ON THE DRUM.

Fig. 3. Fastening the cable

Do not use longer cable than needed. With 


correct length you achieve good pulling strength and 

proper winding of the cable.

PRE-OPERATION CHECKS

CABLE

Check that: 

•  the cable is faultless (breakage risk).

•  there are no twists or kinks (breakage risk) in the 

cable.

•  the cable has been properly fastened to the winch.

WINCH

Check that:

•  all the pins and lynch pins are in place.

•  all bolts and nuts have been tightened.

•  roller chain is tight.

•  the drum brake has been properly adjusted.

•  the clutch has been correctly adjusted.

•  lubrication is carried out correctly. See lubricating 

instructions.

MOUNTING TO THE TRACTOR

Check that:

•  the tractor’s top link point is locked. (with the help 

of a support, if necessary).

•  the pins are properly secured.

•  the sway bars or turnbuckles are suitably tight.

•  the PTO-shaft is suitably long, properly fastened 

and the shield chains attached.

•  the support leg of the winch is turned upward.

Содержание 290

Страница 1: ...i Finland Tel 358 0 17 83 241 Fax 358 0 17 8324 372 www farmiforest fi FARMI 290 OPERATION MAINTENANCE AND SPARE PARTS MANUAL SKIDDING WINCH 03182360 D EN 300112 ER READ THIS OPERATION AND MAINTENANCE MANUAL CAREFULLY BEFORE USING THE MACHINE FROM MACHINE ...

Страница 2: ...istration form within 30 days after the receipt of the product to get full product warranty and additional information on your product If it is not possible for you to register via internet please register as follows Complete the registration form on the last pages of this manual and return it to us within 30 days after the receipt of the product ...

Страница 3: ...ine in the optimal manner Although you have experience in using this kind of machinery read the operation and maintenance instruc tions carefully since they include information enabling efficient and safe operation Regular maintenance is the best way to guarantee the efficient and economical performance of the machine Each and every operator must read understand and follow all safety instructions ...

Страница 4: ...Machine denomination Skidding winch Machine type FARMI 290 Machine series number Herewith we declare that the machine brought into circulation conforms with the pertinent requirements of the Machinery Directive 2006 42 EC The following harmonized standards were used for the conceptional design of the machine EN ISO 12100 1 2 SFS EN ISO 13857 SFS EN ISO 4254 1 Iisalmi 30 1 2012 Place date Juha Hall...

Страница 5: ...ESSORIES 13 TECHNICAL SPECIFICATION 14 MOUNTING 15 PRE OPERATION CHECKS 16 CONTROLS 17 OPERATION 17 PRE OPERATION CHECKS 18 WINCHING 19 SKIDDING 19 DROPPING THE LOAD 20 TRANSPORTATION 20 MAINTENANCE 21 LUBRICATION 21 CLUTCH ADJUSTMENT 21 ADJUSTING THE ROLLER CHAIN 22 TIGHTNESS 22 ADJUSTING THE DRUM BRAKE 22 REMOVING THE WINCH MECHANISM 22 ASSEMBLY OF THE MECHANISM 23 TROUBLE SHOOTING 24 FRAME 26 M...

Страница 6: ...ntrained person s improper actions alterations made without the manufacturer s permission Written authorization must be requested from the manufacturer for any alterations to the machine STARTING Familiarize yourself thoroughly with the use operation and controls of the machine and its equipment before starting Familiarize yourself with the capacities and limi tations of the machine and its equipm...

Страница 7: ... or altered Never start up or use the machine without all the safe ty devices and protectors in place Also check the universal joint s safety equipment and joins Never insert any body part into the machine with the engine running If any faults arise that may jeopardize occupatio nal safety turn off the machine During operation the machine s operator is res ponsible for safety in the whole work are...

Страница 8: ...re that all joins are tight and that the lines are not damaged Check that all protective caps and filler caps are closed properly Check the hose sheathing for damage 4 Check that all hose connectors lengths and qualities comply with applicable requirements When replacing or repairing hoses use original parts or hoses and connectors recommended by the manufacturer Check particularly that the pressu...

Страница 9: ... a guide cable at least 2 meters away to the side of the machine Do not operate the winch from the tractor cabin unless a safety net has been installed When winching downhill the pulling must be done from the side using an additional idler When winching on a hill do not follow the load from below Side winching must not be done at angles of more than 30 degrees It is extremely dangerous to be in th...

Страница 10: ...ollowing plates and labels must be correctly attached to the machine Missing safety plates labels must be replaced immediately STICKERS AND PLATES 1 Machine plate JL290 41012050 2 Note See manual for operation and maintenance 41014750 ...

Страница 11: ...ting Watch out for a breaking cable Always use the protective screen 4 Nr 41014730 Note Before doing maintenance work turn off the motor remove the ignition key and disengage the P T O Accident danger Keep the safety equipment where it belongs Winding danger Do not wear too loose clothes and keep the hair bound inside the cap ...

Страница 12: ...o not winch at sideways angles exceeding 30 degrees Crushing danger Do not stand in front of the winch when working Stand on the side at a distance of at least 6 ft from the winch Crushing danger Do not winch downhill 6 Maximum rpm 42381474 7 FARMI sticker 30730501 ...

Страница 13: ...0 13 MAIN PARTS AND ACCESSORIES Snatch block Cable optional Upper diverting pulley Drive shaft Clutch engagement lever Latch rope Control rope Cable drum Drum locking latch Accessories are separately specified ...

Страница 14: ...inimum 30 kN 13 kN Cable capacity Ultimate strength of the cable recommendation 53 7 kNm mm2 80 m of ø 8 mm cable Winching speed 540 rpm 0 55 1 2 m s Weight without cable 150 kg Clutch Mechanical friction plate clutch with heat sink Power transmission Universal shaft from tractor Mounting To 3 point hitch Kat I Power needed min 10 kW 14 hp DIMENSIONS ...

Страница 15: ...ed through universal shaft from tractor ASSEMBLY OF THE PTO SHAFT If the PTO shaft is too long it may get pressed when the three point hitch is lifted up This may cause damage to the bearings of the winch or to the PTO of the trac tor The PTO shaft must not be too short in any position The PTO length is suitable if the pipes do not reach the bottom PTO is optional equipment 1 Mount the winch to th...

Страница 16: ...r cable than needed With correct length you achieve good pulling strength and proper winding of the cable PRE OPERATION CHECKS CABLE Check that the cable is faultless breakage risk there are no twists or kinks breakage risk in the cable the cable has been properly fastened to the winch WINCH Check that all the pins and lynch pins are in place all bolts and nuts have been tightened roller chain is ...

Страница 17: ...that the winching trail is clear and that the tractor s parking brake is on Do not run the tractor at a high idle when winching Maximum P T O speed is 540 rpm Ensu re that the logs can be drawn freely Be especially careful when working on slopes Avoid winching sideways at angles exceeding 30 degrees Use snatchblock which is fastened to the tree if nee ded See fig 7 2 The safest place for the opera...

Страница 18: ...the lower snatchblock is to lower the pulling point This enables larger loads to be skidded out For skidding out the load the cable is transferred to the lower snatchblock Several logs can be hooked up and winched in at one time by means of keyhole sliders on the cable The skidding chain should have a pin on the end which makes it easier to pass the chain underne ath the tree See fig 8 When using ...

Страница 19: ... ft from the winch Use the upper snatchblock when winching 3 Operatetheclutchfirmly Avoidslidingtheclutchto avoid warming of the clutch Stop winching by let ting go of the control rope for the leave The clutch will slip when the load is heavier than the selected pull This prevents damages to the cable or winch Avoid extra large loads The winding speed de pends on the number of revolutions of the t...

Страница 20: ...hetractortofirmground Winch in the load 2 Ifyoucannotmovethetractor releasetheloadand winch the tractor out When winching the tractor out always run the cable under the lower pulley Fig 14 Winching the tractor out DROPPING THE LOAD 1 Let down the 3 point hitch 2 Pulltheclutchropeuntilthebrakeratchetreleases then stop pulling the clutch rope The logs drop to the ground TRANSPORTATION The cable shou...

Страница 21: ...twithoil aftereve ry 50 working hours with spray type hardening chain grease Wipe off the excessive grease Fig 15 P T O shaft lubrication CLUTCH ADJUSTMENT 1 Loosen the nuts A and B at both ends of the drum axle Wrench opening 1 7 16 36 mm 2 Adjust the clutch by turning the axle C with 9 16 or 14 mm wrench The clutch tightens clockwise loosens counterclockwise Turn max 1 4 turn 3 After adjustment ...

Страница 22: ...ten the adjust ment bolt See fig 18 To decrease the braking ef fect loosen the adjustment bolt Fig 18 Drum brake adjustment REMOVING THE WINCH MECHANISM The whole winch mechanism can be removed in one piecefromtheframe Toremovethewinchmechanism from the winch e g in order to change the roller chain follow the instructions below 1 Park the winch on a level stable ground so that it leans a little ba...

Страница 23: ...oles drilled on the other side fig 20 Two studs on the back of the front plate will fit into these holes later on when the winch is assembled 3 Place one clutch engagement half without the handle so that the halves bottom out when the handle is at 8 o clock position and the two holes are at 12 o clock and 6 o clock fig 20 Be careful there is only one correct position Tape the halves together so th...

Страница 24: ...ning is incorrect Check the aligment of the chain Check possible damages Adjust the roller chain change if neces sary See chapter Adjusting the roller chain Rattling sound Roller chain too tight some part is broken or the aligning is incorrect Check the aligment of the chain Check possible damages Adjust the roller chain change if neces sary See chapter Adjusting the roller chain Insufficient pull...

Страница 25: ...FARMI 290 25 ...

Страница 26: ...FARMI 290 26 1 8 7 6 5 4 3 2 2 1 2 6 2 3 2 8 2 5 2 2 2 7 2 4 FRAME ...

Страница 27: ...ulley complete 1 2 3 54511159 Slotted sealed ball bearing 1 2 4 52231123 Circlip 62x2 0 DIN472 1 2 5 43180560 Finger guard 1 2 6 94620861 Pin 1 2 7 52813219 Split pin 6X40 DIN94 ZN 1 2 8 40582108 Bushing 2 3 42721050 Snatch block 1 4 54824099 Clutch rope 4 5 m 1 5 54824115 Latch rope 3 5 m 1 6 92820182 Pin 2 7 52842150 Ring cotter 10X45 2 8 40293797 Bushing 2 ...

Страница 28: ...FARMI 290 28 1 10 9 8 7 6 5 3 2 11 20 18 17 16 15 14 12 21 29 27 26 25 24 23 22 37 36 35 33 32 5 1 5 1 4 1 4 4 4 2 4 3 19 20 28 13 31 29 30 4 34 31 27 19 22 28 37 32 32 28 22 MACHINERY ...

Страница 29: ...0584 Roller chain 69 links 1 17 54820527 Chain link 1 18 94612082 Tension spring DU26 1 19 54542063 Ball thrust bearing 2 20 54511274 Slotted sealed ball bearing 2 21 52230067 Circlip 35X2 5 DIN471 1 22 52062106 Screw M16X30 DIN933 88ZN 6 23 52060225 Screw M10X25 DIN933 88ZN 4 24 52060209 Screw M10X16 DIN933 88ZN 2 25 52060118 Screw M8x16 DIN933 88ZN 1 26 52060142 Screw M8X40 DIN931 88ZN 1 27 5211...

Страница 30: ... 2 43181577 PROTECTIVE SCREEN Part Order no Description Remarks Qty 1 Protective screen 1 2 52110046 Nut M10 DIN934 8ZN 4 3 52060340 Screw M10X50 DIN933 88ZN 2 4 52200490 Washer M12 DIN 7349 ZN 4 5 43130137 Snatch block 1 ...

Страница 31: ...43402180 Fastener 1 3 52060100 Screw M8X12 DIN933 88ZN 2 4 52200235 Washer M8 DIN9021 58ZN 2 Part Order no Description Remarks Qty 1 43020502 Lower protective screen 1 2 52060225 Screw M10X25 DIN933 88ZN 2 3 52200045 Washer M10 DIN126 58ZN 2 4 52110046 Nut M10 DIN934 8ZN 2 5 43130368 Hook for universal shaft complete 1 LOWER PROTECTIVE SCREEN ...

Страница 32: ...FARMI 290 32 LL ASV TP14IH SV PLL W2200 HOF 4 ATP JK LK ACCESSORIES ...

Страница 33: ...713037 Belt for TP14 TP14 IH 30118120 Self releasing pulley max 3 5 t without belt LK2 TK10 54817077 Notched hook JK 208 54827019 Skidding chain L 2 0 m JK 248 54827043 Skidding chain L 2 4 m LL 2 54813159 Choker cable 8 12 mm LL 4 54813167 Choker cable 14 mm VAIJ D8 54824677 Cable D 8 mm F 44 kNm VAIJ D10 54824032 Cable D 10 mm F 63 kNm VAIJ D12 54824040 Cable D 12 mm F 90 7 kNm VAIJ D14 54824057...

Страница 34: ...FARMI 290 34 ...

Страница 35: ...ut the manufacturer s permission insufficient maintenance non original parts The warranty does not cover wearing parts Send faulty parts carriage paid to the manufacturer for inspection Repairs will be con ducted by Farmi Forest Oy or an authorized expert The warranty is valid only if the bottom part of this page is filled in and returned to the manufacturer within 30 days of receipt of the produc...

Страница 36: ...dress Dealer s tel Product and type Serial number Return to the manufacturer Date of delivery _____ _____ 20_____ Dealer Dealer s address Dealer s tel Customer Customer s address Customer s tel E mail Product and type Serial number PRODUCT REGISTRATION FORM ...

Страница 37: ......

Страница 38: ...Farmi Forest Corporation Ahmolantie 6 FIN 74510 Iisalmi Finland Puh 358 0 17 83 241 Fax 358 0 17 8324 372 www farmiforest fi ...

Отзывы: