background image

10

Assembly Instructions - continued
7.  Mounting blower on tractor:

a.  The pins supplied with the snowblower are for a category 2 quick hitch. The quick 
coupling hitch has two holes both at the top of the hitch and at each lift arm. When using a 
quick coupler, the pins must be in the inside set of holes. Use the outside set of holes with a 
standard three-point hitch. 

b.  Using tape or a bright colored marking pen, mark on the outer shields the position where 
the shaft is completely pushed together and the position where you have a 4"overlap. Watch 
these marks when moving the blower through all possible operating angles to see that the PTO 
shaft stays within this range. 

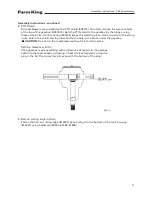
c.  With the engine on the tractor shut off, attach the PTO shaft. The tractor end has a standard 
6-spline end with a spring loaded locking collar. The snowblower end has a clamp-style yoke 
with a 3/8" key way. Slide the yoke onto the gearbox shaft with the 3/8" key supplied. Lock the 
yoke in place with the 1/2" x 3" hex bolt and lock nut fitted through the groove in the gearbox 
shaft. After tightening the bolt, insert and tighten the 3/8" socket set screw supplied. 
   CAUTION: Always check to see that both ends of the PTO shaft are securely attached every 
time the Snowblower is used. This should always be done with the tractor engine off. 

d.  Check that the PTO shaft does not bottom or separate with the blower in the extreme high 
and low positions. A longer optional PTO shaft is available if the standard shaft is too short. 
Check for free movement of all parts in various raised positions; particularly the PTO shaft. 

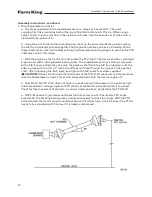
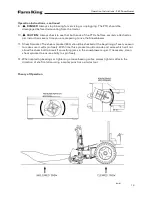
e.  NOTE: Excessive U-joint wear and shear pin failure may result if the tractor PTO angle 
exceeds 20. The drawing below gives an approximate way to check this angle. With the PTO 
half extended, the tractor output should not be over 32 inches high. Use 34 inches if the PTO is 
nearly fully extended and 30 inches if it is nearly compressed.

Assembly Instructions - 960 Snowblower

Содержание 960

Страница 1: ...Operator and Parts Manual 960 Snowblower 042012 FK315 ...

Страница 2: ......

Страница 3: ...n 12 Operating Instructions 12 Theory of Operation 13 Maintenance 14 BoltTorque 14 Hydraulic Fittings 14 PrevailingTorque Lock 15 Parts Drawings 16 Snowblower Drawings 16 Snowblower Parts List 18 PTO Drawing and Parts List 20 Gearbox Drawing and Parts List 21 Optional Bundles 22 Hydraulic Cylinder Hose Kit for Spout Swivel 22 Cylinder Assembly 22 Spout Deflector Cylinder Hose Kit 23 Cylinder Assem...

Страница 4: ...arbox with 60 chain The chute rotation is hydraulic cylinder and necessary hardware not included An optional hand crank kit is available for chute rotation Hydraulic spout deflector kits are available There is a shear bolt on the auger and on the PTO shaft to protect the machine from damage if a large object is picked up Any smaller objects in the snow will be thrown with it and could cause seriou...

Страница 5: ...The safety alert symbol means ATTENTION BECOME ALERT YOUR SAFETY IS INVOLVED CAUTION The caution symbol indicates a potentially hazardous situation that if not avoided may result in minor or moderate injury It may also be used to alert against unsafe practices WARNING The Warning Symbol indicates a potentially hazardous situation that if not avoided could result in death or serious injury and incl...

Страница 6: ...nowblower except from the operator s station on the power unit Inspect and clean the working area before operating Keep hands feet clothing and hair away from moving parts Ensure bystanders are clear of the area before operating Start up Safety Do not let inexperienced operators or children run this equipment Place all tractor and machine controls in neutral before starting Operate only with ROPS ...

Страница 7: ...p service area clean and dry Be sure electrical outlets and tools are properly grounded Use adequate light for the job Use only tools jacks and hoists of sufficient capacity for the job Replace and secure all shields removed during servicing before operating Use heavy leather gloves to handle sharp objects Check hydraulics regularly for leaks Use cardboard to look for leaks and use hand and eye pr...

Страница 8: ...the split backing paper and align over the specified area Carefully press in place Slowly peel back the remaining paper and smooth the remaining portion in place Small air pockets can be pierced with a pin and smoothed out Safety 960 Snowblower Replace safety signs immediately should they become damaged torn or illegible Obtain replacements from your authorized dealer using the part numbers shown ...

Страница 9: ...t Swivel a Mount the swivel arm 965923 onto the swivel pin welded to the back corner of the fan housing using a 1 ID flat washer 967140 and a 3 16 x 1 1 2 cotter pin 9812433 b Wrap cable 965964 around spout and clamp to the ends of the swivel using 1 4 cable clamps 961658 c With the spout turned forward and the swivel arm centered with the spout clamp the cable to the spout cable anchor using anot...

Страница 10: ...Slide the yoke onto the gearbox shaft with the 3 8 key supplied Lock the yoke in place with the 1 2 x 3 hex bolt and lock nut fitted through the groove in the gearbox shaft After tightening the bolt insert and tighten the 3 8 socket set screw supplied CAUTION Always check to see that both ends of the PTO shaft are securely attached every time the Snowblower is used This should always be done with ...

Страница 11: ...ng in the hole in the shield and the other end to the hole in the brace under the gearbox CAUTION Do not run the snowblower without this shield in place Refilling Gearbox with Oil If the gearbox requires refilling with oil because of repairs to the gearbox add oil to the level shown in drawing Check the level regularly using the plug in the lid The correct level is even with the bottom of the plug...

Страница 12: ...PTO shear bolt two 5 16 x 1 Grade 8 Auger shear bolt 5 16 x 1 1 4 Grade 5 Shear bolts should be fastened with a lock nut or two jam nuts These bolts must be kept tight to prevent wear of the bolt and bolt holes 5 Never run PTO shaft at over 600 rpm 6 Chain Tension Slack on the lower side of the chain should be 3 8 to 1 2 7 Lubrication a The spout clamps and rings should be periodically lubricated ...

Страница 13: ...g to use the Snowblower 11 Shear Sprocket The shear sprocket 65 should be checked at the beginning of every season to make sure it will spin freely With time this sprocket could corrode and seize which will not allow the shear bolt to break if something jams in the snowblower auger If necessary clean shear sprocket to ensure ability to spin freely 12 When replacing bearings or tightening a loose b...

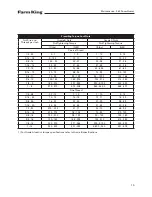
Страница 14: ...ll readings are for un plated or cadmium plated steel locknuts on un plated or cadmium plated surfaces 3 Use 80 of the specified torque value for plated and lubricated fasteners 4 Seating torque figures are based on tightening the nut until the bolt has reached 75 of the specified proof load Maintenance Hydraulic Fittings Dash Size Thread Size Jam Nut or Straight ORB FittingTorque SAE 37 JIC Swive...

Страница 15: ...95 95 129 90 122 5 122 166 3 4 10 125 165 169 224 155 210 210 285 7 8 9 185 250 251 339 225 312 5 305 423 1 8 275 375 373 508 360 462 5 488 627 FineThread 1 4 28 5 5 7 5 7 10 7 10 9 14 3 16 24 10 13 14 18 12 17 16 23 3 8 24 16 22 22 30 21 29 28 39 7 16 20 24 34 33 46 31 43 42 58 1 2 20 37 5 52 5 51 71 50 70 68 95 9 16 18 57 5 77 5 78 105 70 95 95 129 5 8 18 72 5 97 5 98 132 90 125 122 169 3 4 16 1...

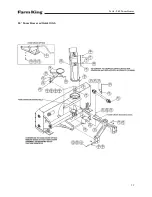
Страница 16: ...16 Parts 960 Snowblower 96 Snowblower w Quick Hitch ...

Страница 17: ...17 96 Snowblower w Quick Hitch Parts 960 Snowblower ...

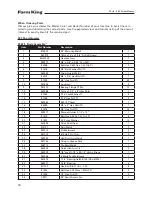
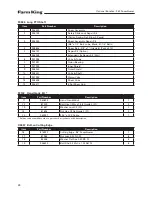
Страница 18: ...1844 Aug Assy 2 11 961675 Bearing Flange 72Ms 10 12 965968 14Ga x 7 1 2 x 8 Idler Shld 1 13 81569 5 16 Lock Washer Pl 4 14 81568 5 16 Hex Nut Pl 4 15 965962 60 13T Sprkt 1 16 84289 5 8 x 3 Hex Bolt Pl 1 17 81676 5 8 Hex Nut Pl 13 18 909277 Manual Holder 3 1 2 x 12 1 19 81619 Bolt Hex 0 500 x 1 00 Gr5 Pl 8 20 81637 0 50 Lock Washer 10 21 901828 Drive Shaft Assy 1 22 910191 Skid Weldt 2 23 900712 Pi...

Страница 19: ... 968807 3 8 x 3 8 x 1 1 2 PTO Shft Key 1 54 967140 1 x 10Ga Narrow Rim Wash Pl 1 55 988999 3 8 Ø x 3 8 Socket Set Screw Br 1 56 965964 Ø 1 4 x 70 Cble 1 57 910426 Safety Chain All 1 58 960135 PTO Shld Sprg 661 1 59 81627 1 2 x 3 Hex Bolt Pl 1 60 812364 Nut Lock Steel 0 500Nc Grb Pl 1 61 F0585 PTO Shaft 1 62 9812404 3 8 Hex Nut Grade 2 Pl 8 63 9812356 3 8 x 1 1 4 Hex Bolt Grade 5 Br 8 64 965912 40T...

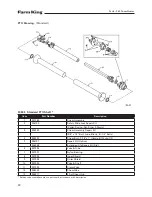
Страница 20: ...ssembly Repair Kit 3 8 x 1 2 Bolt Lube Blank 31 1 4 Balls 4 903297 Shear Bolt 5 16 x 1 Grade 8 Pack of 10 5 936197 Repair Kit Option 906548 Extended Life Repair Kit Std 6 907994 Yoke Tube 7 907991 Nylon Bearing 8 907993 Inner Shield 9 907992 Outer Shield 10 907990 Yoke Shaft 11 907995 ClampYoke 14 908002 ShearYoke 15 936411 6 Spl Shear Hub Sold as subassemblies unless a part number is shown with d...

Страница 21: ...haft 7 BU50507 Cross Shaft 8 BU50422 1 Oil Seal 3 used 9 BU50415 Retainer Ring 4 used 10 11 12 BU50210X Shim Set 13 BU50458 Gearbox Gasket 14 Hex Bolt 5 16 NC x 5 8 GR5 pl 15 BU50429 Key 16 BU50329 Bevel Gear 1 1 2 Bore 17 BU50457 Gearbox Cover 18 BU500089 3 Pipe Plug 19 BU500167 1 Relief Valve 20 BU50428 Staking Lock Nut 21 BU50331 Bevel Gear 1 3 8 Bore 22 BU575906 Bearing Cone 2 used 23 BU575907...

Страница 22: ...X3906 Seal Kit F9116 Hydraulic Cylinder Hose Kit for Spout Swivel Item Part Number Description 1 24803M 4 OD Hydraulic Cylinder ORB 9 3 8 Port To Port 2 115043 1 2 x 78 Hose 1 2 MNPT X 3 4 MORB 3 103753 Cyl Clev Pin 1 x 4 Rb Fm 4 12779 Hair Pin Clip 9 Optional Bundles 960 Snowblower ...

Страница 23: ...on X3913 Seal Kit F9117 Spout Deflector Cylinder Hose Kit Item Part Number Description 1 24930M 1 3 4 ID x 5 Stroke Cylinder 2 116984 3 8 x 120 Hose C W Fittings 3 960913 Clevis Pin 1 2 x 1 13 16 Pl 4 9812430 Cotter Pin 1 8 x 1 00 Pl Optional Bundles 960 Snowblower ...

Страница 24: ... 10 908001 Yoke Shaft 11 907995 Clamp Yoke 14 936428 Shear Yoke 15 936411 6 Spl Shear Hub F9102 Hand Crank Kit Item Part Number Description 71 965803 Hand Crank Weldt 1 72 87553 Bolt Hex 1 2Nc x 1 3 4 Grade 5 Pl 2 73 81637 Washer Lock 1 2 Pl 2 74 81636 Nut Hex 1 2Nc Grade 2 Pl 2 75 965927 3 16 x 100 Cable 1 Sold as subassemblies unless a part number is shown with description X3897 Bolt on Cutting ...

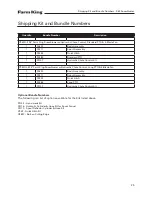
Страница 25: ...1 F9107 Hydraulic Chute Control Kit Y960QL 4 96 Farm King Snowblower w Hydraulic Chute Control Long PTO 4 Blade Fan 1 F0625 Body Assembly 1 F9211 Spout Assembly 1 F9203 Quick Hitch 1 F0586 Long PTO 1 F9107 Hydraulic Chute Control Kit Optional Bundle Numbers The following is a list of options available for the Kits listed above F9102 Hand crank Kit F9116 Hydraulic Cylinder Hose Kit for Spout Swivel...

Страница 26: ...culars and other written material published is for the sole purpose of identifying goods and shall conform to such descriptions Any sample or model is for illustrative purposes only and does not create an Express Warranty that the goods conform to sample or model shown The purchaser is solely responsible for determining suitability of goods sold This warranty is expressly in lieu of all other warr...

Страница 27: ......

Страница 28: ...W Fargo North Dakota USA 58102 Ph 701 282 7014 Fax 701 282 5865 E mail info buhler com www farm king com Equipment shown is subject to change without notice 2010 BuhlerTrading Inc Printed in USA TSX BUI a division of Buhler Industries Inc ...

Отзывы: