background image

5

Safety - 740, 840 & 840G Snowblower

Safety 

Safety Instructions

Remember, YOU are the key to safety. Good safety practices not only protect you, but also the 
people around you. Make these practices a working part of your safety program. Be certain that 
everyone operating this equipment is familiar with the recommended operating and maintenance 
procedures and follows all the safety precautions. Most accidents can be prevented. Do not risk 
injury or death by ignoring good safety practices.

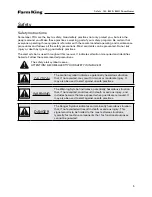
The alert symbol is used throughout this manual. It indicates attention is required and identifies 
hazards. Follow the recommended precautions.

The safety alert symbol means… 
ATTENTION! BECOME ALERT! YOUR SAFETY IS INVOLVED! 

CAUTION

The caution symbol indicates a potentially hazardous situation 
that, if not avoided, may result in minor or moderate injury. It 
may also be used to alert against unsafe practices.

WARNING

The Warning Symbol indicates a potentially hazardous situation 
that, if not avoided, could result in death or serious injury, and 
includes hazards that are exposed when guards are removed. It 
may also be used to alert against unsafe practices.

DANGER

The Danger Symbol indicates an imminently hazardous situation 
that, if not avoided will result in death or serious injury. This 
signal word is to be limited to the most extreme situations, 
typically for machine components that, for functional purposes, 
cannot be guarded.

Содержание 740

Страница 1: ...Snowblower Models 740 840 840G Operator and Parts Manual 092010 FK313 ...

Страница 2: ......

Страница 3: ...Drawings 18 Snowblower Drawings 18 Snowblower Parts List 21 840G Snowblower Gearbox Drawing and Parts List 24 Snowblower PTO Drawing 26 Snowblower PTO Parts List 27 1 75 x 5 Cylinder Assembly Drawing Parts List Optional 29 3 5 x 8 Cylinder Assembly Drawing Parts List Optional 30 Shipping Kit and Bundle Numbers 31 Warranty 32 Manufacturer s statement for technical reasons Buhler Industries Inc rese...

Страница 4: ...ptional on theY740 andY840 models Also available is an optional Hydraulic Spout Control There is a shear bolt on the auger and on the PTO shaft to protect the machine from damage if a large object is picked up Any smaller objects in the snow will be thrown with it and could cause serious injury Do not allow anyone to stand behind the tractor or in the area of the discharged snow Keep this manual h...

Страница 5: ...commended precautions The safety alert symbol means ATTENTION BECOME ALERT YOUR SAFETY IS INVOLVED Caution The caution symbol indicates a potentially hazardous situation that if not avoided may result in minor or moderate injury It may also be used to alert against unsafe practices Warning The Warning Symbol indicates a potentially hazardous situation that if not avoided could result in death or s...

Страница 6: ...cept from the operator s station on the power unit Inspect and clean the working area before operating Keep hands feet clothing and hair away from moving parts Ensure bystanders are clear of the area before operating Start Up Safety Do not let inexperienced operators or children run this equipment Place all tractor and machine controls in neutral before starting Operate only with ROPS and seatbelt...

Страница 7: ...to stop before servicing adjusting repairing or unplugging Support the equipment with blocks or safety stands before working beneath it Follow good shop practices including keep service area clean and dry be sure electrical outlets and tools are properly grounded use adequate light for the job Use only tools jacks and hoists of sufficient capacity for the job Replace and secure all shields removed...

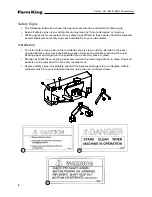
Страница 8: ...tallation To install safety signs ensure the installation area is clean and dry Decide on the exact position before you remove the backing paper Remove the smallest portion of the split backing paper and align over the specified area Carefully press in place Slowly peel back the remaining paper and smooth the remaining portion in place Small air pockets can be pierced with a pin and smoothed out R...

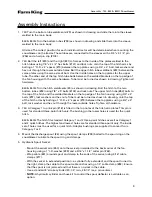
Страница 9: ...e fan housing using 3 4 x 4 bolts 97 lock washers and hex nuts Tube must be turned as shown in drawing Join the top of the hitch arms by bolting a 1 O D x 2 spacer 19 between the top plates using a 3 4 x 4 bolt lock washer and hex nut through the lower outside holes Tighten all hardware 3 740 A Category 1 top link pin 18 is fitted in the top holes of the hitch arm plates This pin is used for stand...

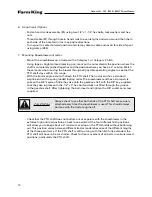
Страница 10: ...d with a spring loaded locking collar The snowblower end has a clamp style yoke with a 3 8 keyway Slide the yoke onto the gearbox shaft with the 3 8 key supplied Lock the yoke in place with the 1 2 x 3 hex bolt and lock nut fitted through the groove in the gearbox shaft After tightening the bolt insert and tighten the 3 8 socket set screw supplied Caution Always check to see that both ends of the ...

Страница 11: ... the cotter pins to hold them in place Hook the ends of the spring 71 into these cotter pins to hold the shield down To mount the shield 74 on the 840G snowblower remove the two rear bolts at the top of the gearbox 63 Bolt the PTO shield to the gearbox plate using these same bolts Insert a 3 16 cotter pin in the hole in the shield and fold to lock in place Hook one end of the spring 71 into this c...

Страница 12: ...hear bolts to protect the tractor and snowblower in case a large object enters the blower PTO shear bolt Two 5 16 x 1 Grade 5 Auger shear bolt 1 4 x 1 Grade 5 Shear bolts should be fastened with a lock nut or two jam nuts These bolts must be kept tight to prevent wear of the bolt and bolt holes 6 Never run PTO shaft over 600 rpm 7 ChainTension Slack on the lower side of the chain should be 3 8 to ...

Страница 13: ... bearings or tightening a loose bearing collar always tighten collar in the direction of shaft rotation using a center punch or a similar tool 11 Shear Sprocket The shear sprocket 52 should be checked at the beginning of every season to make sure it will spin freely With time the sprocket plate could corrode and seize which will not allow the shear bolt to break if something jams in the snowblower...

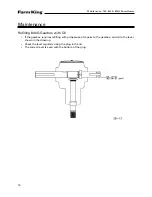
Страница 14: ...filling 840G Gearbox with Oil If the gearbox requires refilling with oil because of repairs to the gearbox add oil to the level shown in the drawing Check the level regularly using the plug in the lid The correct level is even with the bottom of the plug ...

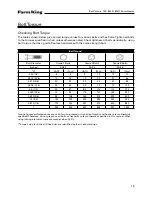
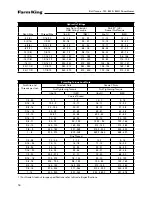
Страница 15: ... ft N m lb ft N m 0 25 1 4 6 8 9 12 12 17 0 313 5 16 10 13 19 25 27 36 0 375 3 8 20 27 33 45 45 63 0 438 7 16 30 42 53 72 75 100 0 5 1 2 45 61 80 110 115 155 0 563 9 16 70 95 115 155 165 220 0 625 5 8 95 128 160 215 220 305 75 3 4 165 225 290 390 400 540 0 875 7 8 170 230 420 570 650 880 1 225 345 630 850 970 1320 Torque figures indicated above are valid for non greased or non oiled threads and he...

Страница 16: ...de C Nuts NutTighteningTorque NutTighteningTorque lbs ft NM lbs ft NM CoarseThread 1 4 20 7 5 7 9 10 7 9 14 3 16 18 12 5 9 12 17 16 11 15 22 3 8 16 20 14 5 20 27 28 20 27 38 7 16 14 32 23 31 43 43 31 42 58 1 2 13 50 37 50 68 62 5 45 61 85 9 16 12 70 50 68 95 95 70 95 129 5 8 11 95 70 95 129 122 5 90 122 166 3 4 10 165 125 169 224 210 155 210 285 7 8 9 250 185 251 339 312 5 225 305 423 1 8 375 275 ...

Страница 17: ......

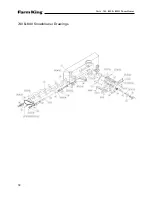
Страница 18: ...18 Parts 740 840 840G Snowblower 740 840 Snowblower Drawings ...

Страница 19: ...19 Parts 740 840 840G Snowblower ...

Страница 20: ...20 Parts 740 840 840G Snowblower 840G Snowblower Drawings ...

Страница 21: ...t pl 14 1 2 Lock Washer pl 15 1 2 x 3 Hex Bolt pl 16 965821 3 8 x 1 3 4 Key 18 965807 Top Link Pin Category 1 19 965808 Top Link Pin Bushing Category 1 2 20 A Frame LH Category 1 21 A Frame RH Category 1 22 965911 7 16 Linch Pin 23 1 2 x 1 1 2 Hex Bolt pl 24 3 8 x 3 4 Hex Bolt pl 25 3 8 Lock Washer pl 26 3 8 Hex Nut pl 27 1 2 B S Flat Washer pl 28 812026 5 16 x 1 Hex Bolt pl 30 902377 Fan Key 3 8 ...

Страница 22: ...827 Roller Chain 50 x 98 Link w Conn 54 965844 15Tooth Idler Sprocket 50 55 3 8 x 1 1 4 Hex Bolt pl 56 965917 1 3 8 Bearing With Collar 57 961675 Bearing Retainer Set 58 5 8 x 3 Hex Bolt pl 59 965416 Spout Clamp 63 BU50506 Gearbox w o Oil 840G 64 7 8 Lock Nut 66 1 2 x 1 Hex Bolt pl 67 5 16 x 3 4 Hex Bolt pl 68 5 16 Lock Washer pl 69 5 16 Hex Nut pl 70 965968 Idler Shield 71 960135 PTO Shield Sprin...

Страница 23: ...0 Hitch InnerTube 20 5 8 Lg Cat 1 2 94 907315 Pin 7 8 x 7 3 4 Cat 1 2 95 907316 Pin Sleeve 1 1 8 x 2 7 8 Lg Cat 1 2 96 905821 Pin Rod 3 4 x 4 1 4 Lg 97 3 4 x 4 Hex Bolt pl 98 3 4 Lock Washer pl 99 3 4 Hex Nut pl 100 967361 Pin 7 8 x 4 Lg 101 7 8 x 2 1 2 Lg Hex Bolt 102 7 8 x 5 Hex Bolt 103 12779 9 Hair Pin Clip 104 5 8 Flat Washer pl 105 909277 Manual Holder F0572 Hydraulic Chute Control Kit 17 96...

Страница 24: ...ox Gasket 6 BU50508 Cross Shaft 7 BU50502 Pinion Shaft 8 BU50329 Bevel Gear 1 1 2 Bore 9 BU50331 Bevel Gear 1 3 8 Bore 10 BU50428 Staking Lock Nut 11 BU50444 Staking Lock Nut 12 BU50422 1 Oil Seal 3 Used 13 BU50415 Retainer Ring 4 Used 14 BU575902 Bearing Cup 2 Used 15 BU575901 Bearing Cone 2 Used 16 BU50429 Key 17 BU50210X Shim Set 18 BU575907 Bearing Cup 2 Used 19 BU575906 Bearing Cone 2 Used 20...

Страница 25: ......

Страница 26: ...26 Parts 740 840 840G Snowblower Snowblower PTO Drawing ...

Страница 27: ...Repair Kit Collar Spring Ret Ring 2 Pawls 3 936249 Shear Assembly Repair Kit 3 8 x 1 2 Bolt Lube Blank 31 1 4 Balls 4 903296 Shear Bolt 5 16 x 1 Grade 5 Pack of 10 5 5 16 Lock Nut 6 936025 Repair Kit Option 906504 Extended Life Repair Kit Std 7 936270 Yoke Tube 8 936319 Bearing Snap Ring Kit 9 936272 Inner Shield 10 936273 Outer Shield 11 936274 Yoke Shaft 12 936269 ClampYoke 13 1 2 x 3 Hex Bolt p...

Страница 28: ...Lube Blank 31 1 4 Balls 4 903296 Shear Bolt 5 16 x 1 Grade 5 Pack of 10 5 812362 5 16 Lock Nut 6 936025 Repair Kit Option 906504 Extended Life Repair Kit Std 7 936281 Yoke Tube 8 936319 Bearing Snap Ring Kit 9 936282 Inner Shield 10 936283 Outer Shield 11 936284 Yoke Shaft 12 936269 ClampYoke 13 81627 1 2 x 3 Hex Bolt pl 14 812364 1 2 Lock Nut pl F9102 Hand Crank Kit 5 Hand Crank 7 965927 3 16 Cab...

Страница 29: ... Number Description 24930 Cylinder Complete 1 Tube Weldment 2 Shaft Weldment 1 0 Dia 3 X2669 Seal Kit F9117 Spout Deflector Cylinder Hose Kit 1 116984 Hose 3 8 x 120 c w Fittings 2 Cylinder 1 75 Dia x 5 0 9 16 Orb 3 960913 Clevis Pin 0 500 x 1 813 Pl 4 9812430 Cotter Pin 0 125 x 1 00 Pl ...

Страница 30: ...umber Description 24803 Cylinder Complete 1 Tube Weldment 2 Piston Rod 1 5 Dia 3 X2098 Seal Kit F9116 Hydraulic Cylinder Hose Kit for Spout Swivel 1 103753 Cylinder Clevis Pin 1 x 4 Rb Fm 2 115043 Hose 1 2 x 78 1 2 mnpt x 3 4 morb 3 12779 Hair Pin Clip 9 4 Cylinder 3 5 Dia x 8 0 Orb Port ...

Страница 31: ...lade fan 1 F0455 Body Assembly 1 F0463 Hitch Y840G 4 840G Snowblower w Hydraulic Chute Control 4 blade fan 1 F0457 Body Assembly 1 F0463 Hitch Optional Bundle Numbers The following is a list of options available for the Kits listed above 1 F844 36 Optional Long PTO Shaft Complete 1 F842 Standard PTO Shaft Complete 1 F9102 Hand Crank Kit 1 F0572 Hydraulic Chute Control Kit 1 F9116 Hydraulic Cylinde...

Страница 32: ...re replacement as part of normal maintenance Also Buckets and Bucket Tines carry no warranty Bent Spears carry no warranty Snowblower Fan Shafts carry no warranty Mower Blades carry no warranty Portable Auger Parts Have Two 2 Year Warranty Loader Parts Have Two 2 Year Warranty The purchaser is solely responsible for determining suitability of goods sold This warranty is expressly in lieu of all ot...

Страница 33: ... Warranty Claim Forms with all requested information properly completed Warranty Claims must be submitted within a thirty 30 day period from date of failure repair Warranty Labor Any labor subject to warranty must be authorized by Buhler Industries Inc The labor rate for replacing defective parts where applicable will be credited at 100 of the dealer s posted shop rate Defective parts will receive...

Страница 34: ... or enlarge this limited warranty or its exclusions limitations and reservations Corrections of defects and improper workmanship in the manner and for the applicable time periods provided for herein shall constitute fulfillment of all responsibilities of Buhler Industries Inc to the purchaser and Buhler Industries Inc shall not be liable in negligence contract or on any other basis with respect to...

Страница 35: ......
Страница 36: ...stries Inc 1330 43rd Street NW Fargo ND USA 58102 Ph 701 282 7014 Fax 701 282 5865 Toll Free 888 524 1004 E mail info buhler com www farm king com Equipment shown is subject to change without notice 2010 BuhlerTrading Inc Printed in USA TSX BUI ...

Отзывы: