background image

- 39 -

Mi 2438

Elenco note
Da qui si può scorrere (con i tasti su e giù) tutte le note salvate.
Attraverso il tasto "Opzioni" è possibile eliminare la nota,
impostarla come sfondo in Home Page o convertirla in memo
(Nota>>Memo). Se non ci sono note la pagina risulta bianca.

Elenco memo
La gestione delle memo è identica e parallela a quella delle note,
in più, sulla barra di stato, viene mostrata data e ora in cui
scatterà l’avviso. In tal caso, l’icona memo apparirà in Home
Page; toccandola viene mostrato il contenuto e si può arrestare
il segnale di avviso (segna come completato), posticiparlo o
eliminarlo. Quando data ed ora vengono rimossi, il memo diventa
una nota. Se non ci sono memo la pagina risulta bianca.

Notes
From this page it is possible to scroll all the stored notes (with
the up and down buttons). Pressing the "Options" button it is
possible to erase the note, set it as background image for home
page or set it as a reminder (Note >>Memo). Page will be empty
if any note is present.

Memo (reminders)
Reminders are managed as notes, besides on the status bar
it is shown time and date at which the reminder is set. Icon is
displayed on the home page when setting time is reached; by
touching the reminder its content is shown and it would be
possible to stop the audio signal (thicking the reminder as
completed),to postpone or to delete it. If time and date are
removed from a reminder it becomes a simple note. Page will
be empty if any reminder is present.

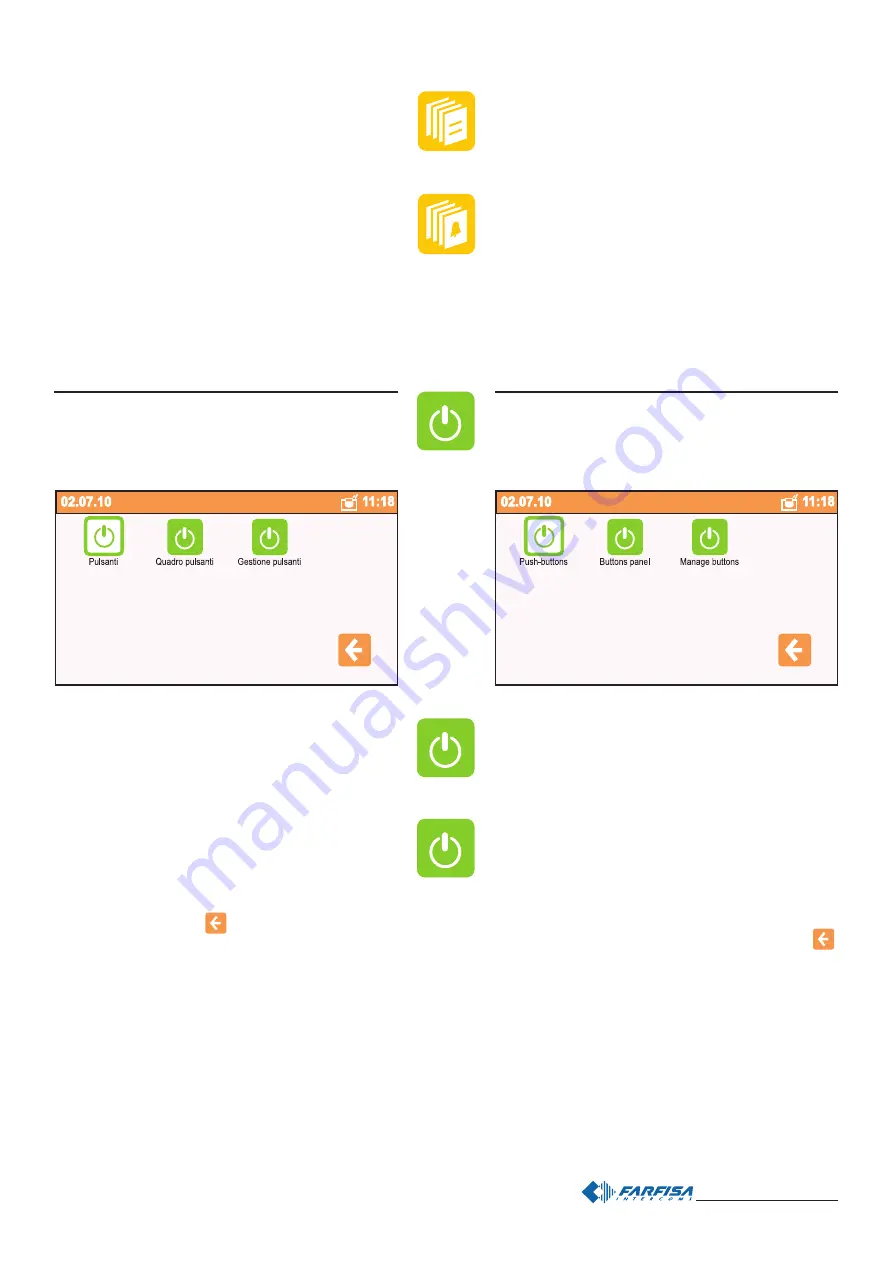
Pulsanti

Da questo menu è possibile accedere ai pulsanti attivati durante
fase di programmazione. Con questi pulsanti si possono accen-
dere le luci delle scale, luci giardino, cancelli automatici, ecc.

Quadro pulsanti
Premendolo si accede ai pulsanti che abilitano le funzioni di
servizio (se presenti nell'impianto videocitofonico).

Gestione pulsanti
Premendolo si accede all'elenco dei pulsanti con possibilità di
modificarne ogni singolo nome. Scorrere l'elenco toccando i
tasti freccia su e giù. Per cambiare nome al pulsante premere
"dettagli", "indirizzo/nome" e poi "modifica". Tramite la tastiera
che apparirà sullo schermo,  comporre il nuovo nome e poi

premere "salva". Premere 

 per tornare indietro.

Attenzione: se oltre alla funzione "modifica" appaiono anche
"nuovo" e "cancella" significa che, durante la fase di program-
mazione, non è stata attivata la protezione di sistema. E'
vivamente consigliato abilitare questa protezione per evitare che
inavvertitamente vengano modificate o cancellate funzioni che
possono pregiudicare il funzionamento dell’intero sistema.
Queste impostazioni possono essere cambiate solo da perso-
nale esperto (vedi capitolo "programmazioni").

Push-buttons

From this menu it is possible to access the push-button panel
showing all the push-buttons which have been previously
programmed. With the buttons it is possible to operate lights,
garden lights, automatic gates, etc..

Button panel
From this menu it is possible to access the push-buttons panel
from which specific functions can be enabled (if previously
programmed in the system).

Manage buttons
From this menu it is possible to access push-button list with
the possibility to modify them. Scroll the list by pressing up and
down arrows. To change the name of a button press in
sequence "details", "address/name" and then "modify"; using
the keypad which will appear on the screen, it would be
possible to enter the new name of the button and store it by

pressing "save". To go back to the previous page press 

.

Warning: if the “new” and “delete” functions are displayed in
addition to “modify”, it means that the system protection
function was not activated during programming. It is strongly
recommended to activate the protection function in order to
avoid changing or deleting functions unintentionally and cause
the malfunctioning of the entire system. These settings can be
only changed by expert users (see chapter "programming").

Содержание myLogic CD2131PL

Страница 1: ... erronei ed irragionevoli Nonlasciareallaportatadeibambinilepartidell imballaggio sac chettidiplastica polistiroloespanso ecc Nonaprirel apparecchioquandoèacceso L esecuzione dell impianto deve essere effettuato da personale specializzatoedinconformitàconleleggivigenti Incasodiguasto funzionamentoirregolareomodificaall impianto avvalersidipersonalespecializzato L apparecchioèconformealledirettiveC...

Страница 2: ... screen for DUO digital system Technical characteristics Power supply directly from the line Operatingcurrent 0 2A Screen 4 2 LCD touch screen Televisionstandard PAL Horizontalfrequency 15625Hz Verticalfrequency 50Hz Bandwidth 5MHz Relay 1 Maximum load contacts relay 12Vac 12 24Vdc 1A Operatingtemperature 0 50 C Maximumadmissiblehumidity 90 RH Installazione Installation POSTO INTERNO INTERNAL STAT...

Страница 3: ...ifissaggiodel videocitofono Remove the frontal plastic frame to approach the four fixing points of the video intercom 6 Fissareilvideocitofonoallascatoladaincassoutilizzandole4viti forniteacorredodelprodotto Fix the video intercom to the back box using the four screws supplied with the product 7 Rimetterelacalottaalvideocitofono Re insert the frontal plastic frame to the video intercom 2 Toglierel...

Страница 4: ...a supplementare cavocoassiale M massa video schermo coassiale EC comando positivo telecamera supplementare EM comandonegativotelecamerasupplementare VD2120CPL Camera with integrated audio module Technical data Powersupply 13Vac 1 Absorption with connection to encoder CD2131PL 0 8A Video signal standard PAL Minimum lighting 2 5 Lux LED s 6 white Sensor CCD 1 3 colour Number of pixel 291 000 Lens 3 ...

Страница 5: ...vimentazioneallatosuperioretenendoibordi frontali a filo e a piombo dell intonaco finito 1 2 Muraturaepassaggiodeicavi Flush mounting and cables placing Posizione delle aperture passacavo Openings for cables Installazione Installation Collegareimodulitrami te il cavetto fornito a corredo dell art CD2131PL Connect the modules with the cable supplied with art CD2131PL Position the camera unit in suc...

Страница 6: ...Hz Power 22VA Outputvoltage 13Vac 1 Maximumcurrent 1A Outputprotection PTC Approved by according to the Safety Standard EN60065 Housing 3 module ADIN Operatingtemperature 0 40 C Maximumadmissiblehumidity 90 RH Fits on DIN bar or with 2 expansion plugs LINE POWER SUPPLY Technicaldata Mainsvoltage 110V 240Vac Frequency 50 60 Hz Power 60VA Outputprotection PTC Approved by according to the Safety Stan...

Страница 7: ...rincipale è quello con il codice 0 e si accenderà automaticamente alla chiamata da esterno mentreilvideocitofonoconilcodice 1 puòvisionareecomunicareconl esternopremendo To make a one way installation with 2 videointercoms you must add an additional ML2062C videointercom and another ML2083 back box to the videokit move the jumper J12 of the videointercom VC1 from position 3 4 to 1 2 leave it on 3 ...

Страница 8: ...15Ω Ω Ω Ω Ω termination 15Ω Ω Ω Ω Ω 3 4 chiusura 100Ω Ω Ω Ω Ω di fabbrica termination 100Ω Ω Ω Ω Ω default Collegamento di una soneria supplementare Connection of one additional ringer 12Vac 12 24Vdc 1A Applicando tra i morsetti C e NO una soneria autoalimentata è possibile rilanciare in un altro ambiente le chiamate ricevute dal vide ocitofono A riposo i contatti C e NO del relè sono aperti chius...

Страница 9: ...riposoèpossibilevisionarel ingresso premendoilpulsante qualorasidesidericomunicareconl esterno premereilpulsante VIDEOINTERCOM OPERATION Check that the connections of the installation are correct Operate the installation by connecting the power supplies to the mains Upon first switch ON or after a long period of time without power supply approx 2 days after a short data loading operation the myLog...

Страница 10: ...zione gliindirizzideidispositivimemorizzatinelvideocitofono devonocoincidereconquelliprogrammatinegliingressivideocitofonici vedere le programmazioni del posto esterno da pag 20 a 26 TheML2062videointercommustbesuitablyprogrammedtodefine the operation mode Most programming operations are simple and need to be changed in case of new domestic requirements For this reason theyaredescribedintheuserman...

Страница 11: ...deocitofonico ingresso indirizzodell ingressovideocitofonico 231 accensionetelecamere inizio e fine conversa zione serratura apriporta paginaprecedente menuopannellodicontrollo Main function buttons navigation button and touch screen confirm and go to next page gobacktopreviouspage scrollpagedown scroll page up changedata Menu or control panel Presstheiconsonthispagetoaccesstheprogrammingoperation...

Страница 12: ...me l Indirizzoed il Numero di stanza del dispositivo premere i tasti modifica per cambiarenomeedindirizzi premere modifica per cambiare le impostazioni presenti premere OK per confer mare i dati visualizzati e memorizzarli barra di stato Procedure used to lock unlock programming operations The following procedure must be carried out to block or unblock the protectedprogrammingoperations menu setti...

Страница 13: ...ursoresulnumerodainserire o correggere premere per passare ai caratteri di punteggia tura ripremere per ritornare ai caratteri alfabetici premere per passare ai caratteri numerici ripremere per ritornare ai caratteri alfabetici Enteringmodes Two different modes can be used to enter characters or numbers overwriting blacktextagainstredbackground thenewcharacter will overwrite the previous one inser...

Страница 14: ...rammedwiththesameapartmentaddress i e 15 andchange the room number enter 0 for the main device and then 1 2 7 for the secondary devices Intercom SMS Inordertocommunicateorsendmessagesbetweenthe usersinthebuildingorbetweenmyLogicvideointercoms of your apartment you must enter the user names and mostofalltheuserandroomaddressesintheagenda For insertion follow the procedure below Menu Intercom SMS Di...

Страница 15: ...uadroPulsanti Link a Pulsante permette di visualizzare sulla Home Page un pulsante Nuovonota memo InviaMessaggio Silenzioso Chiamate Foto RimuoviMemoryCard Immagini Tochangethenameandaddressesofthevideointercomentrances that are already save you must follow the procedure below menu videointercom monitorlist selecttheboxofthe entrance to be changed options modify press modify in thenamebox usetheke...

Страница 16: ...el capitolo Programmazione indirizzo nome utente numerostanza Perinserireulteriori indirizzialternativi seguirelastessaprocedura precedente Per eliminare un indirizzo alternativo selezionarlo toccando brevemente la casella di testo dove è riportato il nome e premere Elimina Premere oC per tornare alla pagina precedente Besidescanbeselectedthefunctionsthatcanbedisplayedduring theconnectionwiththeen...

Страница 17: ...todiseguito premere modifica alladestradellacasellatestocheriportailnome dellafunzione scegliere SI perrilanciarelasoneriaefarsuonare ancheglialtrivideocitofonidell appartamento scegliere NO per nonrilanciarlaaglialtrivideocitofoni Premere per confermare e tornare alla pagina precedente Premere pertornarealmenu Avanzate Others Thismenucontainsadvancedprogrammingoperations thatrefertospecificoperat...

Страница 18: ...lloschermo Utilizzarelostiloindotazioneper toccare3volteilpuntinocheappariràsugliangolidelloschermo La precisionedeltoccoconsentediaverelamigliorecalibrazionedello schermo Attenzione durantelaproceduradicalibrazionetoccareloschermo soloequandorichiesto Pertoccareipuntievidenziatinonappoggiare lamanosuldisplay Commandline thisfunctionallowstochangebasicparameters ofthemyLogicvideointercom Programmi...

Страница 19: ...15 Ilivellifonicisonoregolatiinfabbrica modificareleregolazioniposte sulretrodell apparecchiosolamenteincasodieffettivanecessità The audio levels are set in the factory settings on the back of the device must be changed only if really necessary ML2062C VIDEOINTERCOM Setting the sound levels If audio is excessively intermittent duringtheconversationorthespeaker tends to distort it during the call i...

Страница 20: ...uttori di MS1 e MS2 su OFF e riportare il ponticello J1 dalla posizione 1 2 alla 2 3 posizionedeimicrointerruttoriMS1 MS2edelponticello J1 per uscire dalla fase di programmazione The CD2131PL digitizer module included in the videokit is programmed with the same calling code as the internal station 100 and therefore needs no programming The encoder module must be programmed as illustrated below onl...

Страница 21: ...morset ti EC EM ved program mazione 1E tabella 1 ordinary management of terminals EC EM see programming1E table1 tempo di azionamento della serratura supple mentare 3 secondi supplementarydoorlock activation time 3 sec MS1 MS2 A A Codici per la disabilitazione della telecamera alla chiamata di 2 gruppi di utenti vedere a pagina 22 Codesusedtodeactivatethecamerauponcallof2usergroups see page 22 MS1...

Страница 22: ... 22 Mi2438 Esempio di programmazione del codificatore digitale CD2131PL Example of programming for digital encoder CD2131PL ...

Страница 23: ...3 Mi2438 Tabella 3 Table 3 Corrispondenza tra i codici assegnati ai pulsanti e la posizione dei microinterruttori di MS1 e MS2 Cross reference table between codes and microswitches position of MS1 and MS2 ...

Страница 24: ... 24 Mi2438 ...

Страница 25: ...eseguita programmazione invio chiamata apriporta in conversazione prolungamento tempo di conversazione End of conversation wrong programming Indicates an error during the programming phase or that the conversation time is near to expire Tonetable Busy Indicates that the user is busy or not existing or that the line is busy Dissuasion Indicates that the push buttons were wrongly programmed Programm...

Страница 26: ... 26 Mi2438 ...

Страница 27: ...to Videointercom button It is used to monitor the door station of the system or the last calling door station in case of multiple entrances enable voice communication after receiving a call or monitoring a door station end the communication with the door station The conversation ends also automatically at the end of the conversationtime Pulsante menu Permettediaccederealpannellodicontrollo Menu bu...

Страница 28: ...llegate all Home Page raggiungibili comunque anche dal Pan nellodiControllo Toccandoalcentrodelloschermosiacce dedirettamentealPannellodiControllo HomePageNavigation By moving the touch screen pen or the finger in the four directions you can access the applications connected with theHomePage whichcanbealsoreached from the Control Panel Touchthecentreofthescreentoaccess the Control Panel directly R...

Страница 29: ...ht to left Intercom Directory Fromhereyoucanaccessthelist of internal stations Dal basso verso l alto Blocco note Daquisiaccededirettamenteal l applicazioneBlocconote Fromdownup NotePad Fromhereyoucandirectlyaccess theNotePadapplication Dall altoversoilbasso funzione nonabilitata From up down function not activated ApplicationsconnectedtotheHomePage Toaccesstheapplicationsmovethepenor finger on th...

Страница 30: ...ezionedellechiamatelefoto vengonoscattateautomaticamenteomanualmente L iconabiancaindicaqualedelledueopzionièattiva Videocitofonia Daquestomenuèpossibileaccedereallefunzionitipichedella videocitofoniacomevisualizzarel immagineprovenientedalla telecamera dell ingresso collegarsi all audio degli stessi e accedereall archiviodellechiamateperse effettuateericevute Il menu Foto è molto utile per avere ...

Страница 31: ...nction can also be activated by pressing the videointercom button By touching the centre of the screen you can activate the full screen display mode Also the call from the door station besides activating the ringer automaticallydisplayestheimageofthecallingentrance onthescreen Thecommandsoftheleft handsidewillappear for a few seconds see below Press the button to talk with the external door statio...

Страница 32: ...oounditopervariare leregolazioni PremereOKperconfermarle Chiudi Siinterrompeilcollegamentoesitornaallaschermataprece dente Manual Youcantakeaphotooftheframedimage Youcansaveinthe system approximately 60 images the next shootings will deletetheoldestimages Touch on the right hand side of the screen to display the followingcommands Dooropening To open the door of the connected entrance it can also b...

Страница 33: ...ndo l icona manuale l utente durante la chiamata può scattareunafotopremendol iconaconlamacchinafotografica L iconasusfondobiancoindicaqualedelledueopzionièattiva Monitor list Gallery Tochangethenameoftheentrance i e from MainEntrance to Oxford street you must select the entrance by touching the name box and press options press modify and then press modify and using the keypad displayed on the scr...

Страница 34: ...dattarelevostreimmaginipersonalinelformato myLogicimage mli etramitelamemorycardinserirlenella galleria Lamemorycardpuòessereusataanchecomeveicolo peresportareimmaginidamyLogic comelefotodellechiamate videocitofoniche o le note Tali immagini possono essere visualizzate su un PC utilizzando il software di conversione gratuito Immagini Toccandol iconaimmagininelPannellodiControllosiaccede direttamen...

Страница 35: ...prima Qualora l elenco fosse composto da più di quattro utenze si potràscorrerelalistaconitasti su e giù postisulladestradello schermo Senoncisonoutentinellarubricalapaginarisultavuota Intercom SMS Menudedicatedtointernalcommunication Itisusedtomakecalls betweenthedifferentroomsandeliminatethedistancebetween floors for example apartment and attic or areas that are physicallyseparated forexample be...

Страница 36: ...ermocompariràperalcuni secondilascritta Inviomessaggiofallito Intalcasoilmessag gio viene salvato nelle Bozze e sarà necessario inviarlo nuovamente Messaggi SMS Calling It is used to make a call by directly entering the numeric address of the station SMSsending It is used to send a text message to an internal station Touch Send Message and text a message max 100 characters Press to confirm Chooset...

Страница 37: ...emetteràun segnalediavviso Intalcaso l iconamemoappariràinHome Page toccandolavienemostratoilcontenutoesipuòarrestare il segnale di avviso segna come completato posticiparlo o eliminarlo ReceivedSMS Itisusedtodisplay answeroreliminatethetextmessagesthat werereceived Touch Reply to open the window used to send a reply message Thepageisemptyiftherearenoreceivedmessages Touch Delete todeletetheselect...

Страница 38: ...e notes or draw using the following tools Opens a new post it note Exits without saving Activates the writing tool Activates the eraser tool Increase the thickness of the writing tool Changes the colour of the writing tool Impostaunanuovamemo Altoccoappareladatael ora modificabiletoccan do le cifre e poi regolando con più e meno Una voltaconfermato ok l iconamemodiventarossa Rimuove data ed ora da...

Страница 39: ...ipulsanticonpossibilitàdi modificarne ogni singolo nome Scorrere l elenco toccando i tastifrecciasuegiù Percambiarenomealpulsantepremere dettagli indirizzo nome epoi modifica Tramitelatastiera che apparirà sullo schermo comporre il nuovo nome e poi premere salva Premere pertornareindietro Attenzione seoltreallafunzione modifica appaionoanche nuovo e cancella significache durantelafasediprogram maz...

Страница 40: ...eildispositivomyLogicedimodificare l indirizzoeilnumerodistanza Èconsigliatoperquestedue ultimefunzionilamodificadapartedell installatore Impostazionirapide Veloce sequenza di configurazione che include tutte le impostazionifondamentali Lingua Data Ora Indirizzo Nome Settings ThismenuisusedtopersonalisemyLogic Settingsinclude audio with volumes ringers and ringer time screen with Home Page screen ...

Страница 41: ...anddownbuttonsorthe bar directly to change the setting Ringingtones Here you can choose the ringer for Call from external door station Call from internal from other apartments Intercom call from other stations in the same apartment Door bell call Touch the modify button on the right next to the description to select from a list of ringers Avanzate Questomenu ilcuiaccessoèprotetto permetteunaseried...

Страница 42: ...litàaudiodesideratatoccandounadelle dueicone L iconabiancaindicaqualedelledueopzionièattiva Ringsduration Here you can choose the ringing time for Call from external door station Call from internal from other apartments Intercom call from other stations in the same apartment Door bell call Touch the modify button on the right next to the description toaccessthetimebar Usetheupanddownbuttonsortheba...

Страница 43: ...myLogic Premendoqualsiasitastosicancellal appuntolasciato Elenconote sonovisualizzateinsequenzaordinatalenote e i memo Schermo Nobackgroundimage TouchtheicontorestorethedefaultscreenimageintheHome Page WhentheiconisagainstawhitebackgroundtheHome Page screen image is the default image Selectbackgroundimage Touch the icon to directly display all the images that can be used as screen for the Home Pag...

Страница 44: ...bottom Forexample inordertoaddthedirectcalltotheneighbouron the Home Page bottom key go to Control Panel Intercom SMS and Directory and hold the handset button next to the namepressedfor10seconds Youcanchoose AddtoHome Page Down For information about the other advanced settings please contact the installer or to Aci Farfisa technical support and refer to the Programming chapter to page 10 Advanced...

Отзывы: