background image

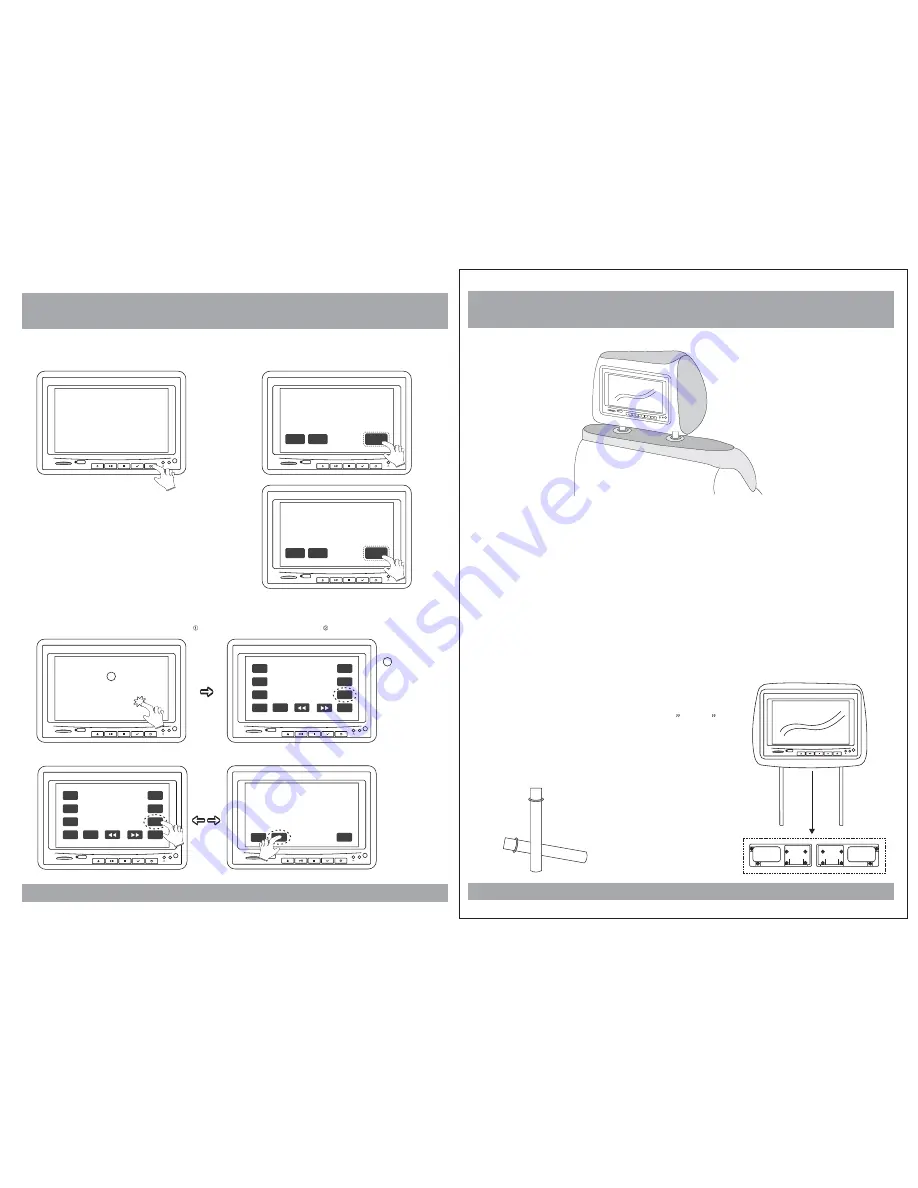
How To Control The Monitor

6

AV2

SD

USB

1. Power On/Off

<Unit>

To power on the unit, press POWER button on the monitor;
or press POWER button on the remote control.

AV2

SD

USB

To power the off unit, press MPWR or PWR on the monitor;
or press POWER button on the remote control.

2. Mode Change

MENU

MODE

MPWR

AV2

SD

USB

AV2

SD

USB

PLAY

MENU

STOP

PREV

NEXT

PWR

VOL-

MODE

VOL +

(1) Press any place on the monitor screen with your finger softly

,and you will see the MODE button on the monitor

.

(2) Press the MODE button to change an Input Mode.(AV1-AV2-DVD)

AV2

SD

USB

PLAY

MENU

STOP

PREV

NEXT

PWR

VOL-

MODE

VOL +

AV2

SD

USB

MODE

MENU

MPWR

1

2

Installation

35

Product installed

AV2

1. Remove the existing headrest from the seat.

2. Adjust the posts of the new headrest to fit the holes in the seat where the

headrest will be installed. The post can be moved together or apart
grasp one post in each hand, move the posts in opposing directions
(like they were walking) while pushing them toward each other or away
from each other.

3. Insert the cable in the proper hole. Insert the posts into the holes in the

seat and carefully work the headrest into position. Make sure the cable
is not pinched.

4. Run the cable down the seat and out to the location of the video source

unit (such as a DVD player).

5. See the picture on the right and you can adjust

the distance between the tubes to required
space(pole width adjustments 4

~ 8.2

.

)

How to use the Adapter tubes

Since the spacing of the mounting holes
can vary on different veicles we supply
two adapter tubes. Use these tubes when
the headrest mounting holes in your seat
are too large for the posts of the headrest
monitor.

AV2

SD

USB

SD

USB

AV2

SD

USB

MENU

MODE

MPWR

Содержание HRD-9BG

Страница 1: ...OWNER S MANUAL AV2 SD USB Two Preloaded 8 8 Wide Touch Screen Universal Replacement Headrest Monitors Package HRD 9BK HRD 9BG HRD 9GR HRD 9GRDK ...

Страница 2: ......

Страница 3: ...ccordance with the instruction manual may cause harmful interference to radio communications Operation of this equipment in a residential area is likely to cause harmful interference in which case the user will be required to correct the interference at his own expense 11 6 L X8 7 W X4 7 H inches 1 EA A V Output DVD Setup Setup Menu General Setup TV Aspect Ratio Angle Viewing OSD Language Screen S...

Страница 4: ...a towel Do not operate the equipment until all liquids have either evaporated or you have had the monitor inspected at a service center by a qualified technician Severe harm or danger can result Use only a damp cloth to clean the screen and use only purified water on the cloth wring out all excess water prior to wiping the screen Do not use any cleaners or chemicals to clean the screen In most cas...

Страница 5: ...ann t find the files name in list when playing please reset units or turn off on over again 9 If the unit cann t be change mode when playing some special files which the unit didn t support please reset units or turn off on over again 5 Caution Disc Information DVD features DVD discs provide high resolution images with high quality sound This DVD player can play not only DVD discs of various versi...

Страница 6: ...rest to fit the holes in the seat where the headrest will be installed The post can be moved together or apart grasp one post in each hand move the posts in opposing directions like they were walking while pushing them toward each other or away from each other 3 Insert the cable in the proper hole Insert the posts into the holes in the seat and carefully work the headrest into position Make sure t...

Страница 7: ...ill be disappeared automatically Note AV2 SD USB 3 Description of Remoto Control Menu for DVD Player PLAY Play DVD STOP Stop DVD play PREV Move to the previous chapter or track NEXT Move to the next chapter or track PLAY STOP PREV NEXT PWR VOL MODE VOL VOL Volume Down VOL Volume Up MODE PWR DVD Player Power On Off MENU MENU Brightness Contrast Tint Color Sharpnss Reset Use these buttons to select ...

Страница 8: ...s 9 10 SD USB Functions 33 1 When USB or SD is inputed the monitor will be displayed as shown below But when you input USB that the function can not change into SD state only the SD is moving And you can select the desired menu by 2 pressing the MODE button on the remote control of monitor Use the arrow and ENTER buttons to select and set desired settings 00 00 000 003 00 00 kbps S REMOTE IR SENSO...

Страница 9: ...is mode Remote Control Turns the DVD Player Monitor on or off IPOD not function in this unit DVD AV1 AV2 AV SELECT P N This button permits you to choose among Multi PAL and NTSC Use to move to the desired menu DISPLAY Press to show elapsed or remaining time of a chapter or a title NUMERIC button Use when making a selection on the menu screen MODE DVD SD USB POWER 1 2 MUTE Press this button to swit...

Страница 10: ...ese buttons to select either fast forward or fast reverse playback Use this button to select the beginning and end of a track which you wish to have repeat in playback Use to incease or decrease volume level Use this button to select one of the audio soundtracks programmed on a DVD disc It is alse used to select the audio output mode for the DVD playback Press this button to confirm the item you h...

Страница 11: ...nt chapter to the previous chapter DVD VCD AUDIO MP3 Press this button to move to the previous track Next Press this button to advance the player from the current chapter to the next chapter DVD VCD AUDIO MP3 Press this button to move from the current track to the next track Repeat A B You can set the player to repeat a segment over and over until you cancel it To do this you mark the beginning of...

Страница 12: ...16X FR 32X PLAY 8X rewind search 16X rewind search 32X rewind search Play OSD CONDITION FR 2X FR 4X FR 8X 2X rewind search 4X rewind search FR 16X FR 32X PLAY 8X rewind search 16X rewind search 32X rewind search Play Fast Forward Searching Pressing FF button changes the play mode as follow repeatedly DVD OSD CONDITION FF 2X FF 4X FF 8X 2X forward search 4X search forward Pressing FF button changes...

Страница 13: ...the MENU button to make another adjustment or leave the MENU system DVD Functions Subtitle SUB T This button is used to select the language for the on screen display system This title menu may vary depending on the particular DVD DVD OSD 1 2 Title Slow 28 Used to display the title menu of the loaded DVD disc This function is only present on discs which support it DVD DVD VCD CONDITION 1 4 1 8 2X s...

Страница 14: ...emain Display time Left display time No sign Chapter Remain Display Off Display the Chapter Remaining No sign Display Off Total Elapsed Total Remain Display the total remaining DVD Select a track by pressing the corresponding number button AUDIO You can select a track in the folder by pressing the corresponding number button DVD OSD CONDITION Select Track __ Select track no OSD CONDITION __ __ Sel...

Страница 15: ...e left and right edges won t be seen Normal LB 4 3 Choose this setting if you want to see the movie in its original aspect ratio The movie might appear with black bars at the top and bottom of the screen Wide 16 9 WIDE SCREEN Choose this setting if your DVD Player is connected to a widescreen TV This opition is available only if the disc has a 16 9 display aspect ratio 2 Angle Viewing Some DVD dis...

Страница 16: ...ultly ejecting a disc An invalid button press MP3 OSD CONDITION 2 Channel 5 1 Channel 1 2 Ac3 2CH English 2 2 Ac3 5 1CH English OSD CONDITION Stereo Mono Left Stereo Mono Left Mono Right Mix Mono Mono Right Mix Mono Whenever this button is pressed the mode switches from pause to play or play to pause DVD Setup Audio Setup 4 Screen Saver The screen saver is useful to prevent your display from becom...

Страница 17: ...nel Delay Equalizer 3D Processing Speaker Setup Spdif Setup Dolby Digital Setup Channel Delay Equalizer 3D Processing 2 Equalizer Settings Bass Boost Bass Boost Super Bass Super Bass Treble Boost Treble Boost Off Off Off Select Equalizer Type Select Equalizer Type Equalizer Page Equalizer Page Rock Pop Live Dance Techno Classic Soft EQ Type EQ Type None None DVD Setup Password Setup 1 Password Mod...

Страница 18: ...tons to select Disc Menu 5 Disc Menu The Parental Control settings limit the player to only play content at or below a certain movie rating The ratings systems in different countries vary In the USA the Motion Picture Association of America MPAA rates movies as G PG PG 13 etc In this menu item you can set what is the highest level of rating you wish to allow the unit to play 1 Press the SETUP butt...

Страница 19: ...enu of VCD discs 1 Press the SETUP button during stop mode 2 Press the buttons to move to Preference 3 Press the buttons to move to PBC 4 Press the ENTER button 5 Press the buttons to select TV TypeOn Off 3 Audio Use the audio language menu to select the subtitle language that you prefer If the disc you are playing has that language available it will display subtitles in that language 1 Press the ...

Страница 20: ...00 Hue Video Quality Setup Video Quality Setup Color MID Saturation Luma Delay Luma Delay 00 1 T 1 T Gamma None Hue 00 Hue Hue 0 In some systems you might experience a loss in the strength of the dark sections of the displayed picture This can be helped by changing the Gamma setting which boosts the dark level but leaves the other levels unchanged DVD Setup Saturation Select screen saturation leve...

Отзывы: