background image

Installazione

 / Installation.

30

ART.

 1865

Bordo vasca / Bath-side group / Bain-douche sur gorge / Wannenrandbatterie / 

Baterìa horizontal bañera

Содержание Cafe 1804F

Страница 1: ...ART 1804F 1804WF Istruzioni Instructions Instructions De Montage Bedienungsanleitung Instrucciones CAFE ART 1808F ART 1806WF ART 1852F ART 1855F ART 1854F ART 1815 1818 ART 1826 ART 1865 ...

Страница 2: ...te Indice Index Index Übersicht Índice Montaggio flessibili Flexible mounting 4 1804F Gruppo lavabo Washbasin Lavabo 1 trous Waschtischarmatur Lavabo 6 1808F Miscelatore bidet Bidet Mixer Mitigeur bidet Einhand Bidet Mischer Monomando Bidet 6 1804WF Gruppo lavabo Washbasin Lavabo 1 trous Waschtischarmatur Lavabo 8 1806F Gruppo lavabo Washbasin Lavabo 1 trous Waschtischarmatur Lavabo 10 1852F Grupp...

Страница 3: ...ments Anpassungen Ajustes 28 Sostituzione cartuccia Cartridge replacement Replacement de la cartouche Auswechseln der Kartusche Sustitucion del cartucho 29 Sostituzione deviatore Bolt replacement Replacement de la tête Oberteilsersetzung Sustitucion rosca de extrusion 30 Sostituzione aeratore Substitute aerator Replacement de l aérateur Den Lüfter auswechseln Sustituir el aireador 31 1865 Bordo va...

Страница 4: ...end radius DN6 25 mm DN8 30 mm DN10 35 mm DN13 45 mm Avvitare i raccordi con tenuta O R a mano Coppia massima di serraggio 3 Nm Hand tighten O ring seal connectors Max torque 3 Nm Dopo il montaggio evitare sollecitazioni laterali anche minime con qualsiasi utensile Es durante il fissaggio del tirante o astina Do not expose the hose to lateral stress nor overtight by any tool Ex during the installa...

Страница 5: ...olungata assenza Sostituire il flessibile in caso di piccole perdite Do not connect the electric grounding to the flexible hose nor to any other water piping Turn off the plumbing in case of long absence Replace the hose in case of leakage and anyway Non installare il flessibile in torsione o in tensione Tighten the hose without any twist or tension Il contatto prolungato con sostanze pur blandame...

Страница 6: ...Installazione Installation 06 ART 1804F Gruppo lavabo Washbasin Lavabo 1 trous Waschtischarmatur Lavabo ART 1808F Miscelatore Bidet Bidet mixer Mitigeur bidet Einhand Bidet Mischer Monomando bidè ...

Страница 7: ...CAFE 07 35mm 1 2 A B 3 4 5 11 mm A B C A B C 13 mm A C 6 7 8 C A B B C E A B D ...

Страница 8: ...Installazione Installation 08 ART 1804WF Gruppo lavabo Washbasin Lavabo 1 trous Waschtischarmatur Lavabo ...

Страница 9: ...CAFE 09 35mm 1 2 A B 3 4 11 mm B C A 13 mm A C 5 B ...

Страница 10: ...Installazione Installation 10 G 3 8 422 163 131 2 6 42 313 325 24 54 350 MAX 45 35 ART 1806WF Gruppo lavabo Washbasin Lavabo 1 trous Waschtischarmatur Lavabo ...

Страница 11: ...11 CAFE 35mm 1 2 A B 3 4 5 A B C 13 mm B 6 7 D A 13 mm A C B 8 ...

Страница 12: ...Installazione Installation 12 ART 1852F Miscelatore lavello Sink mixer Mitigeur évier Einhand Kuchen Mischer Monomando fregadera ...

Страница 13: ...13 CAFE 35mm 1 2 A B 3 4 5 C A B A E B 6 B A C D E 11 mm F C D 7 13 mm ...

Страница 14: ...Installazione Installation 14 ART 1859F Miscelatore lavello Sink mixer Mitigeur évier Einhand Kuchen Mischer Monomando fregadera ...

Страница 15: ...15 CAFE 35mm 1 2 3 C A A C B B 11 mm 11 mm 4 ...

Страница 16: ... Installation 16 ART 1855F Miscelatore lavello Sink mixer Mitigeur évier Einhand Kuchen Mischer Monomando fregadera ART 1854F Miscelatore lavello Sink mixer Mitigeur évier Einhand Kuchen Mischer Monomando fregadera ...

Страница 17: ...17 CAFE 1 2 A B 3 4 C A A B B C 13 mm 11 mm 35mm 5 ...

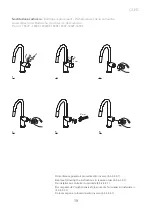
Страница 18: ...Installazione Installation 18 Regolazioni Adjustments Ajustements Anpassungen Ajustes 1 ...

Страница 19: ...4F 1804WF 1808F 1806F 1854F 1855F 4 5 2 mm A Rimontare seguendo il procedimento inverso 6 5 4 3 2 1 Replace following the instructions in reverse order 6 5 4 3 2 1 Re installer au contraire du procédé 6 5 4 3 2 1 Die umgekehrte Vorgehensweise folgen um die Teil wieder zu installieren 6 5 4 3 2 1 Colocar según el procedimiento inverso 6 5 4 3 2 1 B 27 mm 6 ...

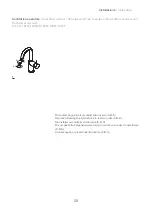
Страница 20: ...el aireador Per art 1804F 1804WF 1806F 1854F 1855F Rimontare seguendo il procedimento inverso C B A Replace following the instructions in reverse order C B A Re installer au contraire du procédé C B A Die umgekehrte Vorgehensweise folgen um die Teil wie der zu installieren C B A Colocar según el procedimiento inverso C B A 1 A B C ...

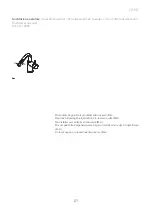
Страница 21: ...stituir el aireador Per art 1808F Rimontare seguendo il procedimento inverso B A Replace following the instructions in reverse order B A Re installer au contraire du procédé B A Die umgekehrte Vorgehensweise folgen um die Teil wie der zu installieren B A Colocar según el procedimiento inverso B A 1 A B ...

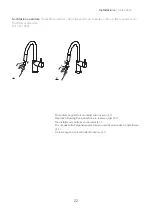
Страница 22: ...escseln Sustituir el aireador Per art 1852F Rimontare seguendo il procedimento inverso 2 1 Replace following the instructions in reverse order 2 1 Re installer au contraire du procédé 2 1 Die umgekehrte Vorgehensweise folgen um die Teil wie der zu installieren 2 1 Colocar según el procedimiento inverso 2 1 1 2 A B ...

Страница 23: ...23 CAFE ...

Страница 24: ... Vasca esterno Bath tub mixer Bain douche externe Aufputz Wannen Baño ducha ART 1818 Vasca esterno Bath tub mixer Bain douche externe Aufputz Wannen Baño ducha ART 1826 Doccia esterno Exposed shower mixer Douche externe Aufputz Brause Ducha ...

Страница 25: ...25 CAFE 1 2 A B 3 4 5 7 B A 6 8 A B A B C A B C D 9 ...

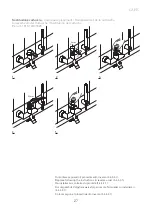
Страница 26: ...Installazione Installation 26 Regolazioni Adjustments Ajustements Anpassungen Ajustes 1 2 ...

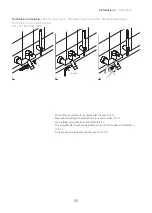
Страница 27: ...art 1815 1818 1826 Rimontare seguendo il procedimento inverso 5 4 3 2 1 Replace following the instructions in reverse order 5 4 3 2 1 Re installer au contraire du procédé 5 4 3 2 1 Die umgekehrte Vorgehensweise folgen um die Teil wieder zu installieren 5 4 3 2 1 Colocar según el procedimiento inverso 5 4 3 2 1 4 3 2 1 30 mm 2 mm A B 5 C ...

Страница 28: ... order 3 2 1 Re installer au contraire du procédé 3 2 1 Die umgekehrte Vorgehensweise folgen um die Teil wieder zu installieren 3 2 1 Colocar según el procedimiento inverso 3 2 1 Sostituzione deviatore Bolt replacement Remplacement de la tête Oberteilsersetzung Sostitucion rosca de extrusion Per art 1815 1818 1826 B C A B A 13 mm ...

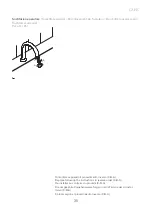
Страница 29: ...er C B A Re installer au contraire du procédé C B A Die umgekehrte Vorgehensweisw folgn um die Teil wieder zu installieren C B A Colocar según el procedimiento inverso C B A Sostituzione aeratore Substitute aerator Remplacement de l aèrateur Den Lüfter auswescseln Sustituir el aireador Per art 1815 1818 C B A ...

Страница 30: ...Installazione Installation 30 ART 1865 Bordo vasca Bath side group Bain douche sur gorge Wannenrandbatterie Baterìa horizontal bañera ...

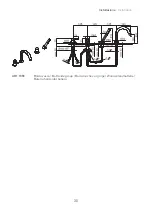
Страница 31: ...31 CAFE 1 2 4 3 5 6 7 8 11 mm B C 30 mm B B A A D A C A D C D A B C D 2 mm B C D 30 mm A B C ...

Страница 32: ...Installazione Installation 32 9 3 4 3 4 ...

Страница 33: ...33 CAFE Regolazioni Adjustments Ajustements Anpassungen Ajustes 1 2 ...

Страница 34: ...del cartucho Per art 1865 1 2 3 4 Rimontare seguendo il procedimento inverso 5 4 3 2 1 Replace following the instructions in reverse order 5 4 3 2 1 Re installer au contraire du procédé 5 4 3 2 1 Die umgekehrte Vorgehensweise folgen um die Teil wieder zu installieren 5 4 3 2 1 Colocar según el procedimiento inverso 5 4 3 2 1 2 mm B 30 mm 5 A ...

Страница 35: ...r el aireador Per art 1865 Rimontare seguendo il procedimento inverso C B A Replace following the instructions in reverse order C B A Re installer au contraire du procédé C B A Die umgekehrte Vorgehensweise folgen um die Teil wie der zu instal lieren C B A Colocar según el procedimiento inverso C B A 1 A B C ...

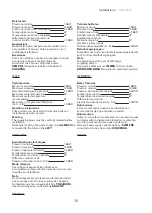
Страница 36: ...ure maximum optimale 65 Diffèrence maximum de Pression d arrivèe chaud froid 1 5 BAR Mode d emploi Ces mitigeurs peuvent être utilisés avec accumulateurs d eau chaude à pression ou avec des chauffe eau instantanés Note Il est indispensable que les raccords d alimentation soient purgés avant la mise en place de l appareil Se rappeler que l eau chaude doit être TOUJOURS liée au petit tuyau ou au fle...

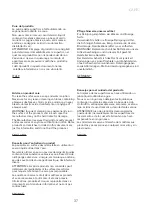
Страница 37: ...ances abrasives ou à base d acide nid éponges abrasives vinaigre ammoniaque acétone eau de Javel acides à usage domestique désinfectants divers ATTENTION L empli de produits non conseillés peut détériorer irrémediablement la surface des articles pour lequels le fabricant ne sera pas responsable La société se réserve le droit de modifier ses produits et ses accessoires à tout moment et sans préavis...

Страница 38: ...Installazione Installation 38 ...

Страница 39: ...39 CAFE ...

Страница 40: ...1142000040000000 Rev 1 Fratelli Fantini SpA via Buonarroti 4 Pella NO Italia T 39 0322 918411 r a F 39 0322 969530 fantini fantini it www fantini it ...

Отзывы: