


EN - 35/38
1. Changing the RAID mode will cause data lost.
2. Please refer to the instructions when switching the RAID mode, otherwise the execution might fail.
3. Interface of USB or eSATA can not be used at the same time.
4. When using RAID function, HDDs with the same brand, model and capacity is recommended.
5. When using RAID function, more than one HDD partition is not recommended.
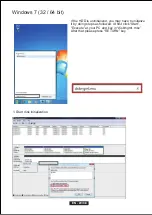
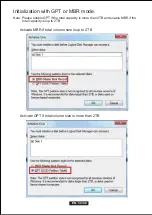
6. Windows Vista/7 users can enable GPT when initializing HDD with a total capacity of more than 2TB.
7. Older OS may not recognize the device if you use a different operation system than Windows Vista.
For more detailed information about GTP, please visit:
http://www.microsoft.com/whdc/device/storage/GPT_FAQ.mspx
8. If you enable MBR by mistake, in order to clean the partition table, you have to switch
another RAID mode and do the RAID mode switch all over again referring to Setup. Then go
back to the RAID mode you want, repeat the previous actions and enable GPT when initializing HDD.
9. For Macintosh users: the total capacity of more than 2TB could be recognized only for the
operation system is 10.4.11 Tiger or later.
10. Do not connect the device to the SATA on board port of the motherboard. Either use SATA to eSATA
PCI-Express or SATA to eSATA PCI add-on card, otherwise the PC may not recognize the device.
11. In RAID 1, HDD1 and HDD2 must be installed, otherwise the PC can not recognize the device.
12. Rebuild time is based on the capacity, e.g. it takes about 1 hour for 200GB.
13. When the USB / eSATA cable is plugged out, the device goes to sleeping mode
automatically.
14. To take the HDD out from the device, slightly press down the handle of the tray and pull it out.
REFERENCES
Содержание QB-35US3R+AES
Страница 1: ...Model QB 35US3R AES 4 BAY RAID ENCLOSURE English ...
Страница 3: ...DE 01 38 DIAGRAM of FANTEC QB 35US3R AES FRONT PANEL OVERVIEW EN 01 38 ...
Страница 10: ...EN 08 38 2 Choose a designated path and click Save 3 Click OK Note AES Key Message if the key not plugged in ...
Страница 14: ...EN 12 38 3 Click OK 2 Choose a designated path and click Save Note AES Key Message if the key not plugged in ...
Страница 18: ...EN 16 38 RAID mode confirmation button ...
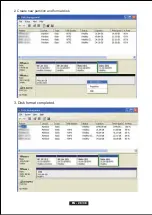
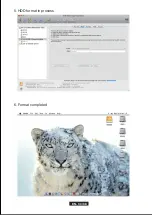
Страница 28: ...EN 26 38 3 Disk format completed 2 Create new partition and format disk ...
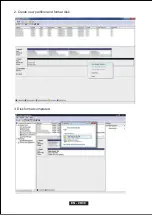
Страница 30: ...EN 28 38 2 Create new partition and format disk 3 Disk format completed ...
Страница 33: ...DE 31 38 2 Create new partition and format disk 3 HDD format completed EN 31 38 ...
Страница 34: ...EN 32 38 Macintosh O S 10 X 1 Click Disk Utility icon 2 HDD initialize ...
Страница 35: ...EN 33 38 4 Click Erase 3 Click Erase ...
Страница 36: ...5 HDD format in process 6 Format completed EN 34 38 ...


