background image


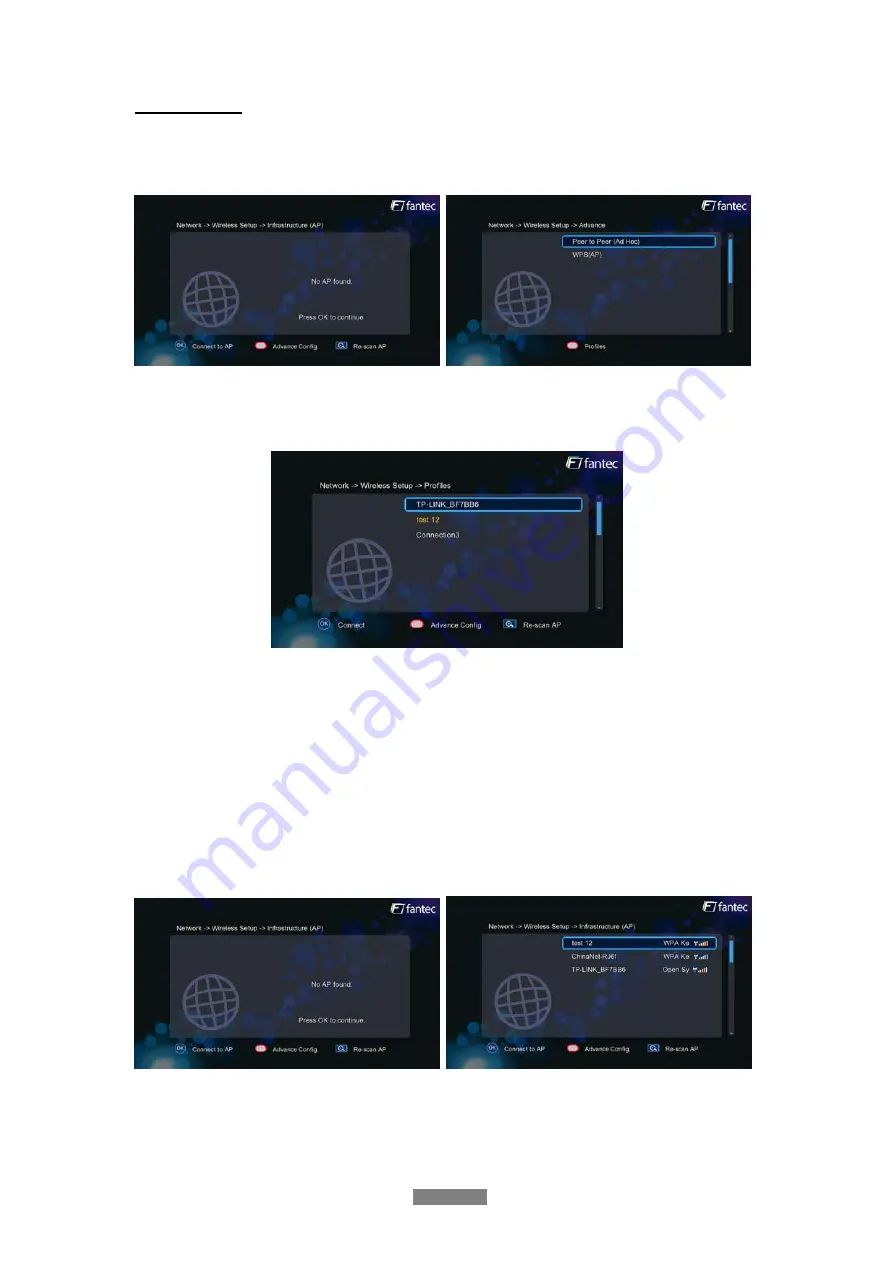
Wireless Setup 

There are 3 mode for you to select, 

Infrastructure (AP)

 and 

Peer to Peer (Ad Hoc)

 and 

WPS (AP)

 mode. Follow the prompting message on the screen and press 

Red

 button to 

choose

 Peer to Peer (Ad Hoc)

 or 

WPS (AP)

 mode. 


This player can store up to three wireless network connections. Press 

OK

 to connect, press 

Back

 to cancel, and press 

Zoom

 to modify the parameters of the connection, press 

Red 

button to choose

 Peer to Peer (Ad Hoc) 

or 

WPS (AP)


Infrastructure (AP) 

Infrastructure mode is used to connect computers with wireless network adapters, also 

known as wireless clients, to an existing wired network with the help from wireless router 

or access point. Please follow following steps to configure your wireless network.   


Step 1: Scanning AP

Access Point

in your network


Follow the prompting message on the screen and press the 

Zoom

 button to select 

Infrastructure (AP)

 mode and update the access points list, and all SSID will be displayed on 

the screen. 


Step 2: Enter WEP

 /

 WPA key. 

Press 

OK

 to input encryption keys via the virtual keyboard. Press the navigational buttons to 

select, 

OK

 to input, 

FF

 to move cursor left, 

FR

 to move cursor right, 

Zoom

 to switch between 

 ENGLISH 


21 / 59


Содержание P3700 Web

Страница 1: ...ENGLISH ...

Страница 2: ... 3 1 Setup Menu 16 3 2 Movie Library 26 3 3 Photo Library 28 3 4 Music Library 30 3 5 File Manager 32 3 6 Playlist Management 36 3 7 Copy und Delete Function 37 3 8 Internet Media 39 3 9 SAMBA Server and Client 43 3 10 FTP Server 44 3 11 Virtual Remote Control 46 4 Upgrading the Firmware 48 5 Appendixes 49 6 Frequently Asked Questions 51 7 Copyrights and Trademarks 53 8 Warranty 53 9 GPL Statement...

Страница 3: ...back H 264 resolution up to 720p 1080i 1080p Supports major audio formats 1080p HD video decoding Fast forward rewind View subtitle Subtitle control color offset size Unicode UTF8 BIG5 Traditional Chinese Western Turkish Central European Greek Cyrillic SE European Russian Hebrew Arabic Japanese Thai Music Playback Music format MP3 OGG WMA WAV AAC FLAC PCM LPCM MS ADPCM LC AAC HE AAC COOK RA Lossle...

Страница 4: ...se multimedia files in most easy ways File Copy Supports copying moving files among USB devices Local HDD and Network USB 3 0 USB 2 0 Support USB 3 0 DEVICE port for computer connection compatible to USB 2 0 1 1 USB HOST port x 5 for USB storage devices for connection of an USB DVD drive an USB Y cable is recommended 1 x SD SDHC MMC MS MS pro Card Reader Note All the information contained in this ...

Страница 5: ...n placing the adapter cable make sure it can not get damaged or be subject to pressure To reduce the risk of electric shock unplug the adapter first before cleaning it Never connect the adapter to the player in a humid or dusty area Do not replace the adapter or cable s wire or connector 1 3 3 Radio Interference If not properly shielded almost all electronic devices will get radio interference Und...

Страница 6: ...ed in the event of data corruption or loss Our company takes no responsibility for loss of data stored on the hard disk 1 3 7 Others When using this player please do not let the player come into contact with water or other liquid if water is accidentally spilled on the player please use a dry cloth to absorb the spillage Electronic products are vulnerable when using please avoid shaking or hitting...

Страница 7: ...plug in the AC adaptor to the power outlet 1 4 2 Connecting to a PC 1 Make sure the player is powered on 2 Plug in the squarish connector of the USB cable to this player s USB DEVICE port 3 Plug in the rectangular connector of the USB cable to computer In this way you can manage content on the built in HDD of the player on your local PC ENGLISH 7 59 ...

Страница 8: ...1 Follow the picture to insert the memory card to the card slot properly 2 Insert the card by following the arrow pointer in the picture In this way you can browse contents on the memory card 1 4 5 Connecting to a TV 1 4 5 1 A V OUT 1 Follow the picture and plug in the 3 color connector to the player s A V OUT jack 2 Follow the picture and plug in the 3 color connector to the TV s A V IN jack In t...

Страница 9: ...ART socket 1 4 5 3 Y Pb Pr Component OUT 1 Follow the picture and plug in the 3 color connector to the player s Y Pb Pr jack 2 Follow the picture and plug in the 3 color connector to the TV s Y Pb Pr jack Audio Connection while using Y Pb Pr Video out First method use the audio output from the A V OUT jack Second method use the audio output from the S PDIF Coaxial or Optical jack ENGLISH 9 59 ...

Страница 10: ...tal Amplifier 1 Follow the picture and plug in the Toslink connector of your optical fiber to the player s S PDIF optical jack 2 Follow the picture and plug in the other connector on your optical fiber to the digital audio device digital amplifier or decoder Note Optical fiber cable is not supplied In this way you can enjoy powerful Dolby Digital Dolby Digital Plus Dolby TrueHD DTS or MPEG sound D...

Страница 11: ...he other crystal plug on the cable to a RJ45 LAN port on your router switch or hub devices 1 4 8 Connecting to a wireless network 1 Make sure the player is powered on 2 Plug the Wireless LAN USB Adapter i e Wi Fi USB Dongle to the USB HOST port of the player Note The Wi Fi Dongle is an optional accessory sold separately Please refer to 3 1 4 Changing Network Settings for more details about wireles...

Страница 12: ...1 USB 3 0 Device port 2 USB 2 0 HOST port 3 Memory Card slot Rear Panel 1 Y Pb Pr OUT jack USB HOST port 2 SCART TV socket 3 USB 2 0 HOST port 4 USB 2 0 HOST port 5 DC IN jack 7 S PDIF Optical jack 9 HDMI jack 6 S PDIF Coaxial jack 8 RJ45 LAN socket 10 A V OUT jack ENGLISH 12 59 ...

Страница 13: ...t the hard disk Step 1 Select OK on the Warning page press OK to confirm Note This page can be also accessed via Setup System Format menu Step 2 Enter the default password 0000 Press the numerical buttons to input and the OK button to confirm Step 3 Select Format press OK and then hard disk format will start The formatting procedure will be finished within a few minutes And then you can use the ha...

Страница 14: ...utton and its function 1 Power 2 Numeric buttons 3 Shuffle 4 VOL 5 Mute 6 Menu 7 Home 8 Navigational buttons 9 OK 10 Stop 11 Play Pause 12 FR 13 FF 14 Red 15 Green 16 Setup 17 TV SYS 18 GOTO 19 Slow 20 Browser 21 Edit 22 Copy 23 A B 24 Angle 25 Zoom 26 Audio 27 Subtitle 28 Yellow 29 Blue 30 Prev 31 Next 32 Info 33 Back 34 VOL 35 Repeat 36 Eject ENGLISH 14 59 ...

Страница 15: ... 1080P 18 GOTO Press to jump to a specific point on a title Specify the point using Title Chapter and Time 19 Slow Press to play back in slow motion Press the PLAY button to resume regular playback 20 Browser Press to enter file manager 21 Edit Press to enter file editing menu in file manager Press to enter file selecting menu in media library 22 Copy Press to enter file selecting menu 23 A B Pres...

Страница 16: ...vigational buttons to select a menu Press OK to confirm Press Back to cancel and display the previous menu screen 3 1 1 Changing System Settings Use this menu to configure system settings Menu Language Select to choose the OSD On Screen Display language English Spanish French German Italian Korean Dutch Russian Polish Chinese Czech Slovenian Romanian Portuguese Hebrew Magyar Slovakian Greek Japane...

Страница 17: ... OK button to confirm DVD Auto Play Select to turn on off USB DVD auto play If you connect the USB DVD drive an USB Y cable is recommended Screen Saver Select to turn on off screen saver DLNA DMR Digital Media Renderer can play content received from a digital media controller DMC which will find content from a digital media server DMS Device Name Select to key in your desired device name to be see...

Страница 18: ...comfort is turned on the audio output volume will be decreased to make you more comfortable HDMI Output Choose among LPCM LPCM Multi Ch and Pass through SPDIF Output Choose among LPCM and Pass through Note In Pass through mode Dolby TrueHD Dolby Digital Plus Dolby Digital DTS sound can be by passed to the Digital amplifier 3 1 3 Changing Video Settings Use this menu to configure video settings ENG...

Страница 19: ...tem Select to adjust TV Type and video output resolution This setting depends on your regional location Include NTSC PAL 480P 576P 720P 50HZ 720P 60HZ 1080I 50HZ 1080I 60HZ 1080P 50HZ 1080P 60HZ NTSC United States Canada Japan Mexico the Philippines South Korea and Taiwan PAL Europe Greenland parts of Africa and South America the Mideast China India Australia and Indonesia Digital Noise Reduction ...

Страница 20: ... the video output size according to the size of TV screen And press Zoom button to Fit the screen size you have set during video playback 3 1 4 Change Network Settings Use this menu to configure your network Wired Lan Setup DHCP IP AUTO Select to obtain IP address automatically FIX IP MANUAL Select to manually input the IP Address Subnet Mask Default Gateway and DNS Server IP Address ENGLISH 20 59...

Страница 21: ...ed to connect computers with wireless network adapters also known as wireless clients to an existing wired network with the help from wireless router or access point Please follow following steps to configure your wireless network Step 1 Scanning AP Access Point in your network Follow the prompting message on the screen and press the Zoom button to select Infrastructure AP mode and update the acce...

Страница 22: ...ake for a while please be patient to wait If the test is ok the network information Profile Name IP address Subnet Mask Gateway etc will be displayed on the screen Peer to Peer Ad Hoc Peer to Peer mode which is also called Ad Hoc mode or computer to computer mode is used to connect wireless clients directly together without the need for a wireless router or access point Step 1 Specify your SSID na...

Страница 23: ... on the router or select the button mode in the configuration menu of the router then select the PBC mode the connection process will take for a while please be patient to wait PIN Input the pin code when configure your router then select the PIN mode the connection process will take for a while please be patient to wait PPPOE Setup Input the ADSL accountant and password in this menu system will o...

Страница 24: ...his unique feature of this product NAS Mode Select to turn NAS function On Off Please refer to 3 9 SAMBA Server for more details on NAS function of this product FTP Select to turn on off FTP services and to configure your desired login User Name and Password Please refer to 3 10 FTP Server for more details on this unique feature of this product Host Name Select to key in your desired host name to ...

Страница 25: ...OST port of the player Step 2 Press OK to confirm Pin Protection To prevent deleting files and formatting HDD by asking for a password The default password is 0000 Press the numerical buttons to input and the OK button to confirm Folder Access Protection Select the folder protection to prevent access to selected folders The default password is 0000 Press the numerical buttons to input and the ente...

Страница 26: ...arch option in the option menu and you can search for a media file by filter to locate the specific media file View Mode Choose a view mode among Thumbnails List and Preview from option menu or go to a specified folder Filter Mode Choose to filter by All Movies Show DVDs or Flash Animation from option menu Show DVDs Choose to display DVD IFO BD MV and ISO files directly in media library During pla...

Страница 27: ...Subtitle Select a subtitle and change the color size offset text encoding of subtitle Repeat Set the repeat option Zoom Zoom in the image Info View the media information 3 2 3 Movie Playback Options During movie playback press Menu button to display or hide the option menu at the bottom of the screen Next to audio track subtitle repeat mode you also can get following functions though the option me...

Страница 28: ...h the option menu Quick Search Choose the Search option in the option menu and you can search for a photo file by filter to locate the specific photo file View Mode Choose a view mode among Thumbnails List and Preview from option menu Filter Mode Choose to filter by Photo Directory Date view All Photos or Albums from option menu Sorting Mode Choose to sort by Name Recently Added or Recently Played...

Страница 29: ...can get following functions though the Option menu during photo playback Slideshow Control Select to choose the Interval Slide Timing and Transition effect Slide Transition of the slideshow Repeat Mode Choose a repeat mode among Repeat off Repeat all and Shuffle Loop from option menu Select Music Select to turn on off Background music during slideshow playback Select music to specify the backgroun...

Страница 30: ... photo by filter to locate the specific music View Mode Choose a view mode among Thumbnails List and Preview from option menu or go to a specified folder Filter options Choose Albums to search for music files by album Choose Artists to search for music files by artist Choose Genres to search for music files by genre Choose Years to search for music files by modified year Choose Playlists to search...

Страница 31: ... Increase Decrease the volume Repeat Set the repeat option Shuffle Select the shuffle mode 3 4 3 Music Playback Options During music playback press Menu button to display or hide the option menu at the bottom of the screen You can get following functions though the Option menu during music playback Repeat Mode Choose a repeat mode among Repeat off Repeat one Repeat all and Shuffle Loop from option...

Страница 32: ...tion menu you can get following functions though the option menu View Mode Choose a review mode among Thumbnails List and Preview from option menu Filter options Choose Movies to display all the supported video files in current directory Choose Photos to display all the supported image files in the current directory Choose Music to display all the supported audio files in the current directory 3 5...

Страница 33: ...h definition video files resolution up to 720p 1080i 1080p via WLAN the video might be buffering It is normal due to the limit of network speed or signal strength 3 5 2 1 Browsing though workgroup You can choose the workgroup which your PC belongs to from the workgroup list find your PC name and press the OK button to confirm Then you can select and play the shared media files that you want to bro...

Страница 34: ...ervers on the network to browse and stream media files from them 3 5 3 1 Installing UPnP Media Server on your PC There re a lot of free and commercial UPnP Media Server software such as Windows Media Connect Windows Media Player 11 XBMC Media Center Linux Mac Windows MediaTomb Linux etc Please install one of them on your computer In the following chapters we will take Windows Media Player 11 on Mi...

Страница 35: ...ry Click Allow to authorize your player 3 5 3 3 Streaming Media on your Player Connect your player to the home network LAN or WLAN Visit Browser UPnP menu on the player select the UPnP server and press OK Then you can browse the media library shared by Windows Media Player 11 ENGLISH 35 59 ...

Страница 36: ...or delete files to the File List by the Play Pause button In order to switch between different folders please select the upper folder icon To save the playlist please press the Edit button and name the playlist 3 6 2 Playback music playlist Enter the music library press Menu button and choose Playlists to show your music playlists 3 6 3 Create album playlist To create an album playlist please ente...

Страница 37: ...er To start the copy function please enter the HDD via File Manger The press Edit button on the remote control and select Multiple Select option In the file explorer you can navigate by Up Down Left Right Next Prev button and add or delete files to the File List by the Play Pause button In order to switch between different folders please select the upper folder icon To start the copy procedure ple...

Страница 38: ...ger The press Edit button on the remote control and select Multiple Select option In the file explorer you can navigate by Up Down Left Right Next Prev button and add or delete files to the File List by the Play Pause button In order to switch between different folders please select the upper folder icon To start the Delete procedure please press the Edit button and select Delete Note If you want ...

Страница 39: ...ductions of SHOUTcast radio BT download and video podcast function 3 8 1 SHOUTcast Radio Select SHOUTcast Radio icon to get all free internet radio stations press OK to select and play radio station press Back to come back Note When you enter the Digital Radio menu at the first time it will take several seconds to download data from the Internet please be patient to wait For more about SHOUTcast p...

Страница 40: ...enter into download menu and BT setup menu Add a torrent Store your torrent files on an USB drive and then connect it to the device Locate your torrent files in file manager menu then press OK button to add the torrent files and start the download procedure Download Menu After add the BT torrent files the download progress can be displayed under Internet Media menu The following buttons can be use...

Страница 41: ...wnload automatically Set the seeding hours Set to delete the finished torrent files automatically or not Set the maximum number of simultaneous download tasks Note Please visit chapter 3 11 3 BitTorrent management to get more information about web based BT menu 3 8 3 Video Podcast Select Video podcast on internet media menu here are world news fun technology sports downloading manager subscribe ma...

Страница 42: ... the Stop button Subscribe manager You can view all video podcast that you have subscribed In order to unsubscribe a podcast please enter the Subscribe Manager and delete the podcast by pressing the Menu button Downloading manager You can see the status of video download progress For additional option please press the Menu button To start playback of downloaded files please press the Right button ...

Страница 43: ... turn on SAMBA NAS MODE function in the setup menu in advance refer to 3 1 4 Changing Network Settings for more details and then type in IP Address or Host name in the Run window click Run in the start menu or in the address bar of Microsoft Internet Explorer If the IP address of the product is 192 168 0 9 please type in 192 168 0 9 and click OK or press the Enter button on the keyboard Under Wind...

Страница 44: ...mmon internet connections the WAN IP address of the internet connection is changing every 24 hours For this reason the use of a dynamic DNS is recommended This allows you to access your device by an individually defined name and replaces the recurrent update of the WAN IP address of your router In order to get a DynDNS account sign up for a free DDNS domain for one of the sites that offer this fre...

Страница 45: ...sword The Password which was set under FTP Network setup FTP Address Your DDNS host name User ID The User Name which was set under FTP Network setup Password The Password which was set under FTP Network setup After login is successful you will be able to upload download files via FTP Server ENGLISH 45 59 ...

Страница 46: ...d the port 1024 192 168 0 9 1024 3 11 2 Upload Download files You can view the status of your internal hard disk or the attached USB storage device from anywhere over the network internet For up and downloading files please use Microsoft Internet Explorer Upload Click on Device and then a select a drive e g HDD Then select the folder where the file should be uploaded Next click the Browse button a...

Страница 47: ... a dynamic DNS is recommended This allows you to access your device by an individually defined name and replaces the recurrent update of the WAN IP address of your router In order to get a DynDNS account sign up for a free DDNS domain for one of the sites that offer this free service such as www dyndns com More information can be found in various tutorials on the topic Setting up dyndns Finally en...

Страница 48: ...y install img to the root directory of a USB key Plug the USB key to the USB HOST port on the player Press and hold the POWER button on the front panel and connect the player with power supply Wait for more than 30 seconds and then loose your finger on the POWER button Then the upgrade process will start automatically The LED indicator on the front panel will be enlightened and flashing during ins...

Страница 49: ...V XviD DivX 3 4 5 DVD menu playback H 264 resolution up to 720p 1080i 1080p AUDIO FORMATS SUPPORTED z MP3 OGG WMA WAV AAC FLAC 32 320 kbps z Stereo Dolby Digital AC3 5 1 pass through downmix to stereo Dolby Digital Plus 7 1 pass through Dolby TrueHD 7 1 pass through downmix to stereo DTS Digital Surround 5 1 pass through downmix to stereo AAC 7 1 pass through downmix to stereo PICTURE FORMATS SUPP...

Страница 50: ...S IDX SUB SUB z Subtitle control color offset size z Unicode UTF8 BIG5 Traditional Chinese Western Turkish Central European Greek Cyrillic SE European Russian Hebrew Arabic Japanese Thai NETWORK FEATURE z 10 100 1000Mbps Auto Negotiation Ethernet z 802 11b g n WiFI up to 300Mbps supported by optional WiFi USB Adapter Note The specifications and design of this product are subject to change without ...

Страница 51: ... the player Question 3 I used my player to transfer files back and forth between different computers Will defragmenting the player hard disk do any harm to it Answer Defragmenting the player hard disk may be useful after having transferred many files to and from the player It is never harmful to use the defragment on the player Make sure no other programs are running while using the Windows defrag...

Страница 52: ...er to network and obtain an IP address first 2 Please enable NetBIOS of TCP IP on computer 3 Please check your PC s firewall settings 4 Please enable your PC s Guest account 5 Please share the folders which you wish to browse on your PC and make sure that Everyone or Guest has the right to access Question 10 I configured everything correctly but still cannot get the wireless network or UPnP functi...

Страница 53: ... local law and may not be illegally copied or used without permission from the copyright owner Trademarks Microsoft and Windows are registered trademarks of Microsoft Corporation All other trademarks are property of their respective holders Manufactured under license under U S Patent s 5 451 942 5 956 674 5 974 380 5 978 762 6 487 535 other U S and worldwide patents issued pending DTS and the Symb...

Страница 54: ...upport Center we will provide you with a CD ROM of the source code that is used charging only the actual expensed involved However please be noted that we can not provide guarantee with the source code and there is also no technical support for the source code from us GNU GENERAL PUBLIC LICENSE Version 2 June 1991 Copyright C 1989 1991 Free Software Foundation Inc 51 Franklin Street Fifth Floor Bo...

Страница 55: ...iginal so that any problems introduced by others will not reflect on the original authors reputations Finally any free program is threatened constantly by software patents We wish to avoid the danger that redistributors of a free program will individually obtain patent licenses in effect making the program proprietary To prevent this we have made it clear that any patent must be licensed for every...

Страница 56: ... print or display an announcement including an appropriate copyright notice and a notice that there is no warranty or else saying that you provide a warranty and that users may redistribute the program under these conditions and telling the user how to view a copy of this License Exception if the Program itself is interactive but does not normally print such an announcement your work based on the ...

Страница 57: ...ything that is normally distributed in either source or binary form with the major components compiler kernel and so on of the operating system on which the executable runs unless that component itself accompanies the executable If distribution of executable or object code is made by offering access to copy from a designated place then offering equivalent access to copy the source code from the sa...

Страница 58: ...tware distribution system which is implemented by public license practices Many people have made generous contributions to the wide range of software distributed through that system in reliance on consistent application of that system it is up to the author donor to decide if he or she is willing to distribute software through any other system and a licensee cannot impose that choice This section ...

Страница 59: ...Y OF ANY KIND EITHER EXPRESSED OR IMPLIED INCLUDING BUT NOT LIMITED TO THE IMPLIED WARRANTIES OF MERCHANTABILITY AND FITNESS FOR A PARTICULAR PURPOSE THE ENTIRE RISK AS TO THE QUALITY AND PERFORMANCE OF THE PROGRAM IS WITH YOU SHOULD THE PROGRAM PROVE DEFECTIVE YOU ASSUME THE COST OF ALL NECESSARY SERVICING REPAIR OR CORRECTION 12 IN NO EVENT UNLESS REQUIRED BY APPLICABLE LAW OR AGREED TO IN WRITI...

Отзывы: