background image

9

FANTEC NVMe31-FastLock 

EN

INSTALLING THE SSD MEMORY CARD:

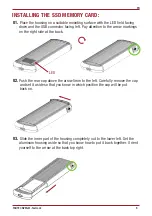
01.


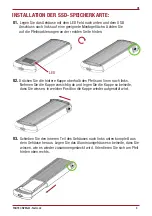
Place the housing on a suitable mounting surface with the LED field facing  

      down and the USB connector facing left. Pay attention to the arrow markings    

      on the right side at the back. 

02.


Push the rear cap above the arrow 5mm to the left. Carefully remove the cap    

       and set it aside so that you know in which position the cap will be put 

    back on. 

03.


Slide the inner part of the housing completely out to the lower left. Set the   

      aluminum housing aside so that you know how to put it back together. Orient  

      yourself to the arrow at the back top right.

LED

Содержание NVMe31-FastLock

Страница 1: ...DE MONTAGEANLEITUNG ASSEMBLY INSTRUCTIONS DE EN SSD Speicherkartengehäuse Montageanleitung FANTEC NVMe31 FastLock ...

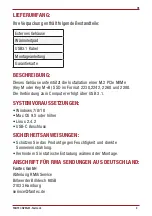
Страница 2: ...D im Format 2230 2242 2260 und 2280 Die Verbindung zum Computer erfolgt über USB 3 1 SYSTEMVORAUSSETZUNGEN Windows 7 8 10 Mac OS 9 X oder höher Linux 2 4 2 USB C Anschluss SICHERHEITSANWEISUNGEN Schützen Sie das Produkt gegen Feuchtigkeit und direkte Sonneneinstrahlung Verhindern Sie statische Entladung während der Montage ANSCHRIFT FÜR RMA SENDUNGEN AUS DEUTSCHLAND Fantec GmbH Abteilung RMA Servi...

Страница 3: ... Drücken Sie die hintere Kappe oberhalb des Pfeils um 5mm nach links Nehmen Sie die Kappe vorsichtig ab und legen Sie die Kappe so beiseite dass Sie wissen in welcher Position die Kappe wieder aufgesetzt wird 03 Schieben Sie den inneren Teil des Gehäuses nach links unten komplett aus dem Gehäuse heraus Legen Sie das Aluminiumgehäuse so beiseite dass Sie wissen wie es wieder zusammengesteckt wird O...

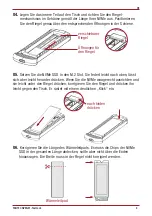
Страница 4: ...sst sich aber leicht herunter drücken Wenn Sie die NVMe waagerecht ausrichten und sie leicht unter den Riegel drücken korrigieren Sie den Riegel und drücken ihn leicht gegen den Tisch Er rastet mit einem deutlichen Klick ein 06 Korrigieren Sie die Länge des Wärmeleitpads Es muss die Chips der NVMe SSD in der gesamten Länge abdecken sollte aber nicht über die Enden hinausragen Die Breite muss in de...

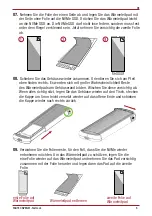
Страница 5: ...Wahrscheinlichkeit Reste des Wärmeleitpads am Gehäuserand bilden Wischen Sie diese vorsichtig ab Wenn alles richtig sitzt legen Sie das Gehäuse wieder auf den Tisch stecken die Kappe um 5mm leicht versetzt wieder auf das offene Ende und schieben die Kappe wieder nach rechts zurück 09 Verwahren Sie die Folienreste für den Fall dass Sie die NVMe wieder entnehmen möchten Um das Wärmeleitpad zu schütz...

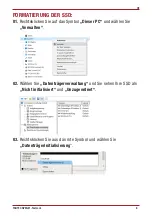
Страница 6: ...1 Rechtsklicken Sie auf das Symbol Dieser PC und wählen Sie Verwalten 02 Wählen Sie Datenträgerverwaltung und Sie sehen Ihre SSD als Nicht initialisiert und Unzugeordnet 03 Rechtsklicken Sie aus das rote Symbol und wählen Sie Datenträgerinitialisierung ...

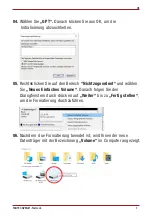
Страница 7: ...klicken Sie auf den Bereich Nichtzugeordnet und wählen Sie Neues Einfaches Volume Danach folgen Sie den Dialogfenstern durch drücken auf Weiter bis zu Fertig stellen um die Formatierung durchzuführen 06 Nachdem due Formatierung beendet ist wird Ihnen der neue Datenträger mit der Bezeichnung Volume im Computer angezeigt ...

Страница 8: ...stallation of an M 2 PCIe NVMe Key M or Key M B SSD in the 2230 2242 2260 and 2280 format The connection to the computer is via USB 3 1 SYSTEM REQUIREMENTS Windows 7 8 10 Mac OS 9 X or above Linux 2 4 2 USB C port SAFETY INSTRUCTIONS Protect the product against moisture and direct sunlight Prevent static discharge during assembly RMA SERVICE For RMA service outside Germany please contact your deal...

Страница 9: ...ow markings on the right side at the back 02 Push the rear cap above the arrow 5mm to the left Carefully remove the cap and set it aside so that you know in which position the cap will be put back on 03 Slide the inner part of the housing completely out to the lower left Set the aluminum housing aside so that you know how to put it back together Orient yourself to the arrow at the back top right L...

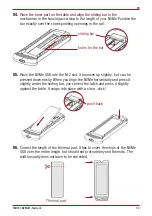
Страница 10: ...unces up slightly but can be pressed down easily When you align the NVMe horizontally and press it slightly under the sliding bar you correct the latch and press it slightly against the table It snaps into place with a clear click 06 Correct the length of the thermal pad It has to cover the chips of the NVMe SSD over the entire length but should not protrude beyond the ends The width usually does ...

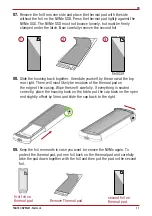
Страница 11: ...rear right There will most likely be residues of the thermal pad on the edge of the casing Wipe these off carefully If everything is seated correctly place the housing back on the table put the cap back on the open end slightly offset by 5mm and slide the cap back to the right 09 Keep the foil remnants in case you want to remove the NVMe again To protect the thermal pad put one foil back on the th...

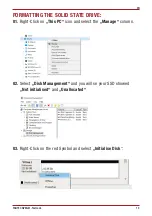
Страница 12: ...TING THE SOLID STATE DRIVE 01 Right Click on This PC icon and select the Manage column 02 Select Disk Management and you will se your SSD showed Not initialised and Unallocated 03 Right Click on the red Symbol and select Initialise Disk ...

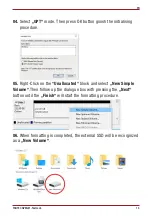
Страница 13: ...alising procedure 05 Right Click on the Unallocated block and select New Simple Volume Then follow up the dialogue box with pressing the Next button until the Finish will start the formatting procedure 06 When formatting is completed the external SSD will be recorgnized as a New Volume ...

Отзывы: