fantasticfurniture.com.au
Version 1.0
Lunar
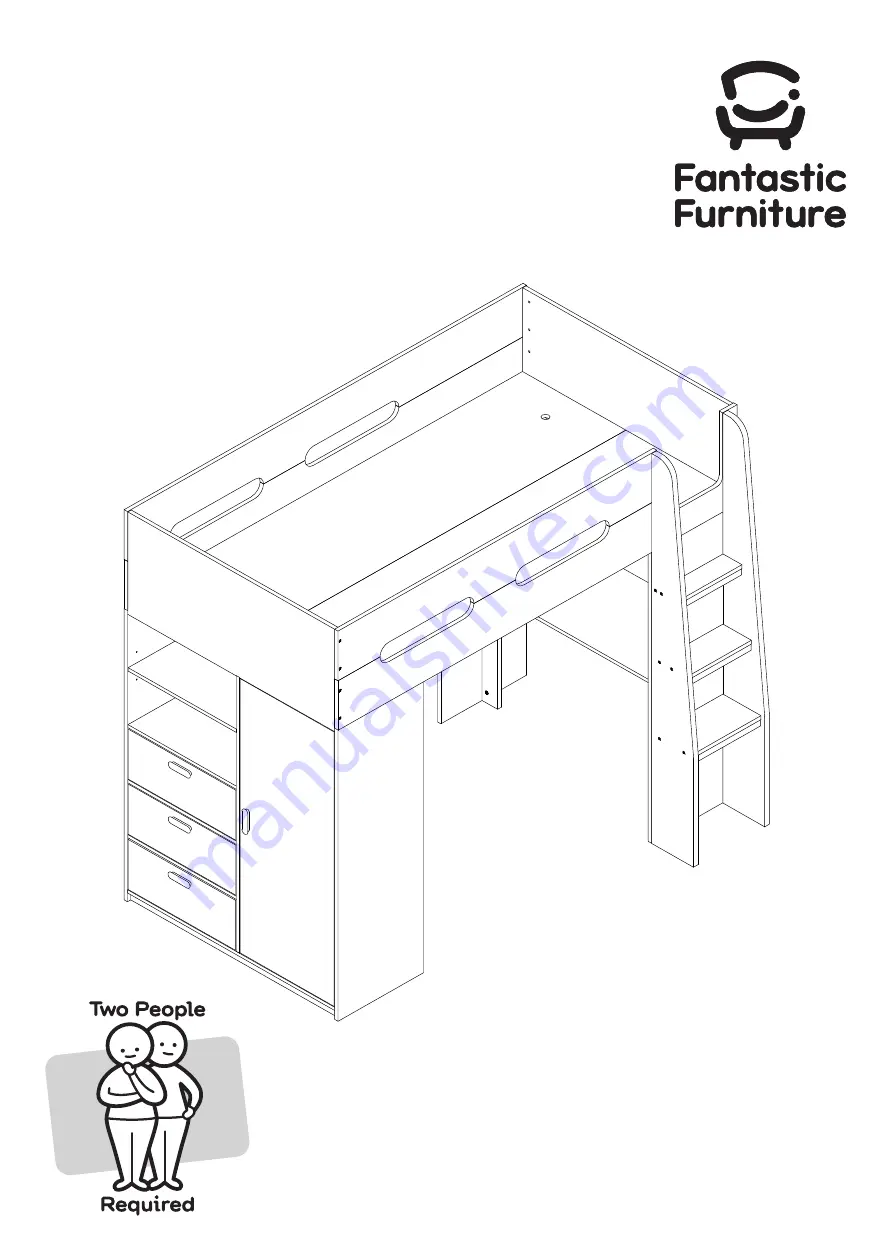
King Single Loft Bunk
Страница 1: ...fantasticfurniture com au Version 1 0 Lunar King Single Loft Bunk...
Страница 2: ...be checked periodically to ensure that the guardrail ladder and other components are secure and in the correct position and all connectors are tight We recommend that children under the age of nine 9...
Страница 3: ...hardware or getting components back to front Always use a so t surface such as carpet or cardboard when assembling your product to avoid scratching or damaging the surface of the product Assembly che...
Страница 4: ...Bar P6 Bed Support Bar P5 Bed Support Bar Bottom Panel Bed Support Bar P4 Box 1 Rear Side Rail P1 Front Side Rail P2 2 x Headboard Footboard Panels P3 Box 2 Desk Side Panel L P7 Desk Side Panel R P8...
Страница 5: ...el Robe Back Support Panel Drawer Right Panel Drawer Support Panel P32 Drawer Front Panel Drawer Left Panel Drawer Back Panel Drawer Bottom Panel Box 1 Ladder Left Panel P33 Ladder Right Panel P34 3 x...
Страница 6: ...crews H3 H4 H5 H7 H8 H9 H10 18 x Feet Glides H12 75 x Cam Bolts 36 x Screws 33 x Nuts 4 x Shelf Supports H11 4 x Handles 8 x Screws H14 1 Door Stop H16 3 x CL Runner Track H6a 3 x DL Runner H6b 3 x CR...
Страница 7: ...Phillips Head Screwdriver P10 P9 H3 H1 H2 H3 H3 H3 H3 H3 Page 7 Insert 6 x Dowels H3 into the Desk Top Panel P9 and Desk Support Panel P10 Insert 3 x Cam Bolts H2 into the Desk Top Panel P9 by tighten...
Страница 8: ...urn the cam nut so it tightens over the bolt 3 x Cam Bolts H3 H3 H3 H3 H3 H3 H2 H1 H1 H1 H2 H2 P12 P11 Insert 10 x Dowels H3 into Desk Panel P11 and Desk Support Panel P12 Insert 3 x Cam Bolts H2 into...
Страница 9: ...2 H2 H2 H2 H2 H2 H2 H2 H2 H2 H2 H2 18 x Cam Bolts P7 P8 H1 18 x Cam Nuts Insert 18 x Cam Bolts H2 into the Left and Right Desk Side Panels P7 P8 by tightening with the Phillips Head Screwdriver Insert...
Страница 10: ...Glides H12 H12 P12 P7 P8 H12 H12 H12 H12 H12 Attach 6 x Feet Glides H12 to the underside of the Desk Side Panels P7 P8 and the Desk Support Panel P12 gently using a Hammer or Soft Headed Mallet The De...
Страница 11: ...htening with a Phillips Head Screwdriver Attach the Hanging Rail Support H21 to the Right Robe Side Panel P14 with 1 x Screw H18 by tightening with a Phillips Head Screwdriver Insert 5 x Cam Bolts H2...
Страница 12: ...en mouth of the cam nut You then turn the cam nut so it tightens over the bolt Insert 10 x Dowels H3 into Robe Fixed Panel P19 2 x Robe Front Support Panels P20 and the Robe Back Support Panel P21 Ins...
Страница 13: ...es and tightening the Cam Nuts with a Phillips Head Screwdriver Slot in the Robe Back Panel P22 into the grooves of panels P13 P15 P21 Insert 4 x Dowels H3 into the Middle Robe Panel P15 P15 P19 P21 P...
Страница 14: ...Panel P17 by aligning the holes Insert 6 x Dowels H3 into the Robe Side Panel P13 Attach the Robe Top Panel P16 to Robe Side Panel P13 and Robe Middle Panel P15 by aligning the holes and tightening t...
Страница 15: ...Rotate the Cam Nuts so the arrows face the incoming Bolts Attach the Robe Fixed Shelf P23 and Robe Back Panel P24 to the Middle Robe Panel P15 by tightening the Cam Nuts with the Phillips Head Screwd...
Страница 16: ...17 P18 P23 P24 by aligning the holes and tightening the Cam Nuts with the Phillips Head Screwdriver You will need Step 20 4 x Screws H5 Phillips Head Screwdriver P14 H5 H5 P24 P18 P16 P18 P17 H12 H12...
Страница 17: ...the Robe Door P25 using 6 x Screws H19 and tightening with the Phillips Head Screwdriver Attach the Handle H13 to the Robe Door P25 using 2 x Screws H14 tightening with the Phillips Head Screwdriver Y...
Страница 18: ...g Cam Bolts Attach the Drawer Front Panel P27 to the Drawer Side Panels P29 P28 and Drawer Support Panel P32 by tightening Cam Nuts with the Phillips Head Screwdriver Repeat for the remaining drawers...
Страница 19: ...anel P32 with 6 x Screws H17 tightening with the Phillips Head Screwdriver Ensure that the Drawer Base Panel P31 slots in the groove of the Drawer Back Panel P30 Repeat process for remaining drawers Y...
Страница 20: ...H6b H6d 3 x DR Runner 18 x Screws H18 P29 P28 H6b H6d H18 H18 Attach 1 x Left Drawer Runner H6b to the Left Drawer Side Panel P28 and 1 x Right Drawer Runner H6d to the Right Drawer Side Panel P29 usi...
Страница 21: ...hillips Head Screwdriver H2 6 x Cam Bolts H1 6 x Cam Nuts x 2 Insert 12 x Dowels into 2 x Headboard Footboard Panels P3 and the 2 x Bottom Panels P4 Insert 6 x Cam Bolts into Panels 2 x P3 by tighteni...
Страница 22: ...h the Allen Key H4 Only tighten to 70 percent 6 x Screws H8 1 x Allen Key H4 6 x Screws H8 1 x Allen Key H4 P4 P16 H4 H8 H8 H8 H8 H8 P4 P9 P4 P9 H8 H8 H8 H8 H8 H8 H4 You will need You will need Attach...
Страница 23: ...illips Head Screwdriver fantasticfurniture com au Phillips Head Screwdriver Tighten the Nuts with the Phillips Head Screwdriver in the Rear Side Rail P1 as shown Tighten the Nuts with the Phillips Hea...
Страница 24: ...te the Nuts so the openings point towards the incoming Screws Attach Panel P2 to the Headboard Footboard Panels P3 with 8 x Screws H7 tightening with the Allen Key H4 P3 P2 2100mm Step 35 8 x Screws H...
Страница 25: ...en Key H4 Phillips Head Screwdriver You will need Attach the 5 x Bed Support Bars P5 to the Rear Side Rail P1 and Front Side Rail P2 with 20 x Screws H9 by tightening with the Allen Key H4 Attach 4 x...
Страница 26: ...he Hanging Rail H22 on to the Hanging Rail Supports H21 Attach the Robe Door P25 to the Right Robe Side Panel P14 Align the hinges to the pre drilled holes and secure the hinges with 6 x Screws H19 ti...
Страница 27: ...or the Ladder Middle Step P37 and Ladder Bottom Step P38 Then repeat process to attach the Steps to the Right Ladder Panel P34 fantasticfurniture com au You will need Step 40 You will need Step 41 12...
Страница 28: ...nsert 8 x Dowels into the Ladder Side Panels P33 P34 Secure the Ladder to the Loft Bunk with 11 x Screws H5 tightening with Phillips Head Screwdriver as shown Insert 5 x Nuts H10 into the Ladder Side...
Страница 29: ...H23 5 x Cover Sticker H11 P13 P26 P13 H11 H23 H23 H23 H23 H23 Insert 4 x Shelf Supports H11 into the Left Robe Side Panel P13 and Middle Robe Panel P15 Place the Shelf P26 on the Shelf Supports H11 as...
Страница 30: ...Screwdriver Screwdriver 30 Insert 8 x Dowels H3 into the 2 x Support Panels P39 as shown Attach 2 x Support Panels P39 onto the Desk Top Panel P9 and Robe Top Panel P16 with 2 x Screws H5 tightening...
Страница 31: ...Page fantasticfurniture com au P6 P6 Step 45 31 Place the 2 x Bed Base Panels P6 on top of the Bed Support Bars P5...
Страница 32: ...Job Complete In the interest of our environment please dispose of all packaging thoughtfully Page 32 fantasticfurniture com au...