fantastic furniture Farrah Скачать руководство пользователя страница 5

(P1)

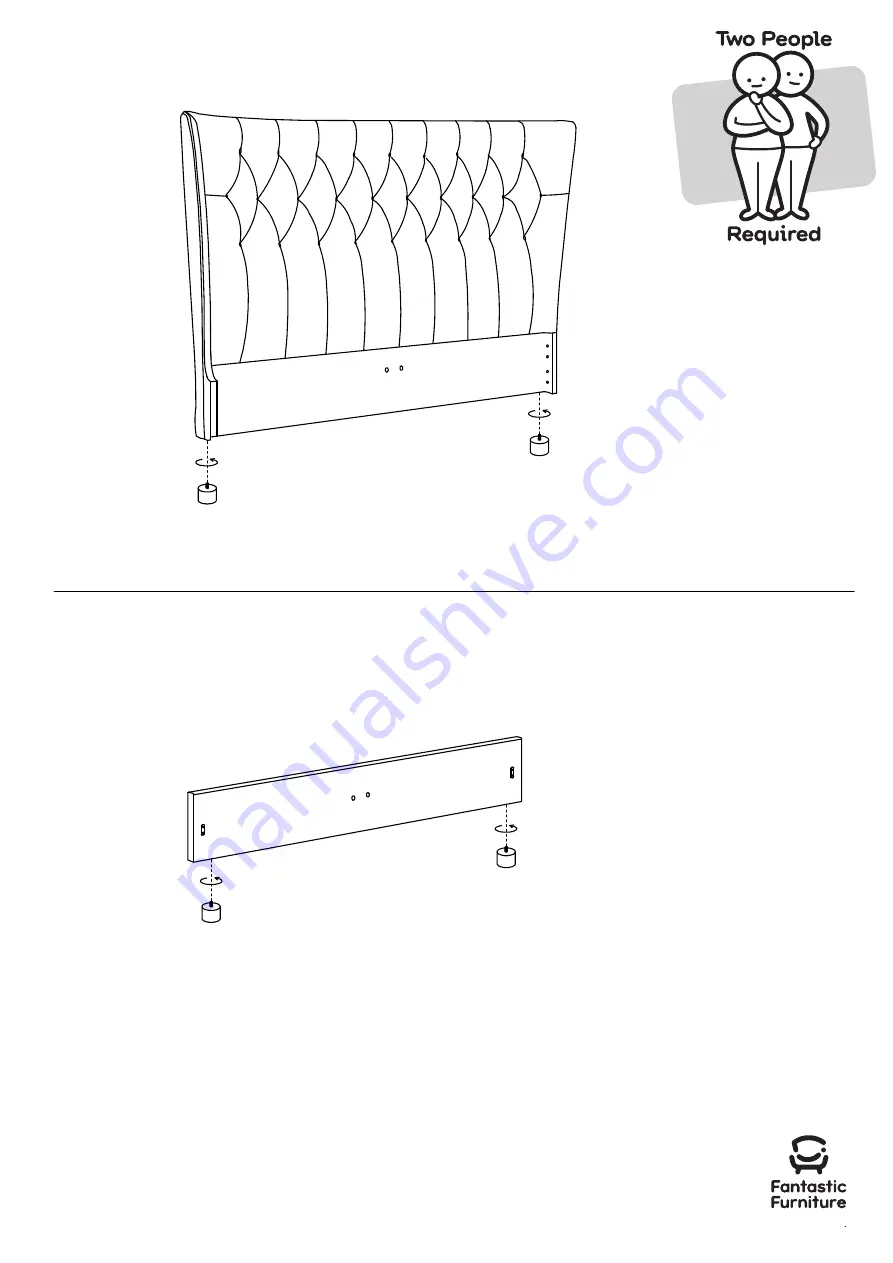
Attach 2 x headboard legs (P5) to the bottom of the headboard (P1) and

fantasticfurniture.com.au

Page 5

Step 1

Step 2

(P5)

Attach 2 x footboard legs (P5) to the bottom of the footboard (P2) and

(P2)

(P5)

rotate clockwise to secure.

rotate clockwise to secure.

Содержание Farrah

Страница 1: ...Version 1 0 Farrah fantasticfurniture com au King Bed Super ...

Страница 2: ...buy Share how it looks at home on Instagram for your chance to win a 250 Fantastic Furniture Gift Card fantasticfurniture fantasticfurniture com au Looks like you ve found your Fantastic We re thrilled you ve chosen Fantastic Furniture to help create a home you ll love ...

Страница 3: ...structions Never use any glue until you are certain that the parts belong together Bulky items such as wardrobes and bunk beds should be assembled in the room they will be used as they may not fit through a door once assembled Always use a soft surface such as carpet or cardboard when assembling your product to avoid scratching or damaging the surface of the product The most common mistakes made d...

Страница 4: ...tboard Legs P5 Centre Rail P6 Bracket P7 Support Leg P8 Hardware Pack Parts list Box 1 Box 2 Box 3 Slats P9 Headboard P1 Side Rail R P3 Headboard P1 Bracket P7 Support Legs P8 Centre Rail P6 Side Rail L P4 Slats P9 Headboard and Footboard Legs P5 Headboard and Footboard Legs P5 Bracket P7 H1 4 x 18mm Big Head Bolts H2 14 x Small Bolts H3 2 x Big Bolts H4 42 x Small Screws H6 H5 1 x Allen Key 8 x W...

Страница 5: ...d legs P5 to the bottom of the headboard P1 and fantasticfurniture com au Page 5 Step 1 Step 2 P5 Attach 2 x footboard legs P5 to the bottom of the footboard P2 and P2 P5 rotate clockwise to secure rotate clockwise to secure ...

Страница 6: ... key H6 as shown Attach 2 x side rails P3 P4 to the headboard P1 and footboard P2 by slotting the bracket on the side rails P3 P4 over the bolts as shown 4 x 18mm Bolts H1 P1 P2 P3 P4 Headboard Footboard P1 8mm 8mm H2 H6 H1 H6 Install 4 x 18mm bolts H1 into the brackets of the footboard P2 and tighten two thirds of the way with the allen key H6 as shown Do not fully tighten the bolts yet P3 P4 ...

Страница 7: ...wn using 2 x small bolts H2 2 x washers H5 tightening using the Allen key H6 and 2 x washers H5 tightening with the Allen key H6 Step 5 H2 H5 H6 You will need Allen Key H6 4 x Washers H5 H2 P1 P2 P3 P4 P6 P8 Turn the feet on the support legs P8 anti clockwise so they are touching the floor Insert the centre rail P6 between the headboard P1 and footboard P2 as shown Do not fully tighten the bolts y...

Страница 8: ...vided Ensure the inner space is square and even as shown above Attach the slats P9 to the assembled frame using 42 x small screws H4 and the Phillips head screwdriver Ensure the slats are centred before screwing them to H4 P9 H6 P1 P2 P4 P3 You may now tighten all bolts on the headboard P1 footboard P2 and side rails P3 P4 the bed frame ...

Страница 9: ...Step 7 Job complete In the interest of our environment please dispose of all packaging thoughtfully fantasticfurniture com au Page 9 ...

Отзывы: