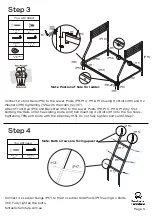
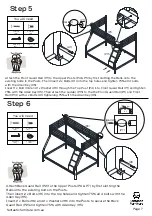
fantastic furniture Cosmic Triple Bunk Bed Скачать руководство пользователя страница 6

Step 3

Step 4 

(P16)

(P13)

(P10)

(P9)

(P11)

(P12)

(P14)

(P16)

Connect 2 x End Rails (P16) to the Lower Posts (P9, P10, P11 & P12) using 8 x Bolts (H8)

 and 8 x 

Washers (H9)

 tightening

 75%

 with the Allen Key (H7). 

Attach Front Rail (P13) and Back Rail (P14) to the Lower Posts (P9, P10, P11 & P12) by first 

slotting the Rails onto the existing bolts, and then inserting 4 x Bolts (H1) into the top holes, 

tightening 

75% 

all 8 bolts with the Allen Key (H5). Do not fully tighten bolts until Step 7.

Note

Postion of hole for ladder.

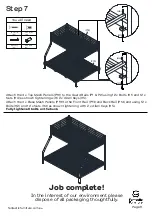
Note: Both arrows are facing upward.

P17

P15

P15

P17

P17

H3

H8

H9

H7

H5

H9

H8

H1

H8

H1

H1

H1

P17

Connect 3 x Ladder Rungs (P17) to the 2 x Ladder Side Posts (P15) using 6


x Bolts 

(H3).

 Fully tighten the bolts. 

fantasticfurniture.com.au

Page 6

You will need 

8


x Bolts

(H8)

     4


x Bolt

s


      (H1)  

      (H7)  

Allen Key

      (H5)  

Allen Key

You will need

     6 x Bolts 

      (H3)  

      (H5)  

Allen Key

     8 x 

Washers


      (H9)  

Содержание Cosmic Triple Bunk Bed

Страница 1: ...Version 1 1 Cosmic Bunk Triple fantasticfurniture com au...

Страница 2: ...unk bed No more than one occupant should use the upper bunk at any time unless otherwise stated Bunk beds should be placed a minimum of 2 metres away from any ceiling fans to prevent any injury to the...

Страница 3: ...e a soft surface such as carpet or cardboard when assembling your product to avoid scratching or damaging the surface of the product Bulky items such as wardrobes and bunk beds should be assembled in...

Страница 4: ...Rail P14 Upper Post P5 Lower Post P12 2 x Ladder Posts P15 Back Guard Rail P2 3 x Top Mesh Panels P18 2 x End Panels P3 Upper Post P6 Page 4 What you need to assemble the product fantasticfurniture c...

Страница 5: ...Panel P3 using 4 x Bolts H1 and 4 x Washers H9 tightening 75 with the Allen Key H5 for the Right End Connect the Lower Post P10 and Mid Post P8 to the Upper Post using 4 x Bolts H1 tightening 75 with...

Страница 6: ...nserting 4 x Bolts H1 into the top holes tightening 75 all 8 bolts with the Allen Key H5 Do not fully tighten bolts until Step 7 Note Postion of hole for ladder Note Both arrows are facing upward P17...

Страница 7: ...adder P15 to the the Front Guard Rail P1 and Front Rail P13 with 4 x Bolts H1 tightening 75 with the Allen Key H5 H1 Attach Back Guard Rail P2 to the Upper Posts P6 P7 by first slotting the Rails onto...

Страница 8: ...P19 to the Front Rail P13 and Back Rail P14 and using 12 x Bolts H2 and 12 x Nuts H4 as shown tightening with 2 x Allen Keys H5 Fully tighten all bolts on the bunk Job complete In the interest of our...

Отзывы: