15
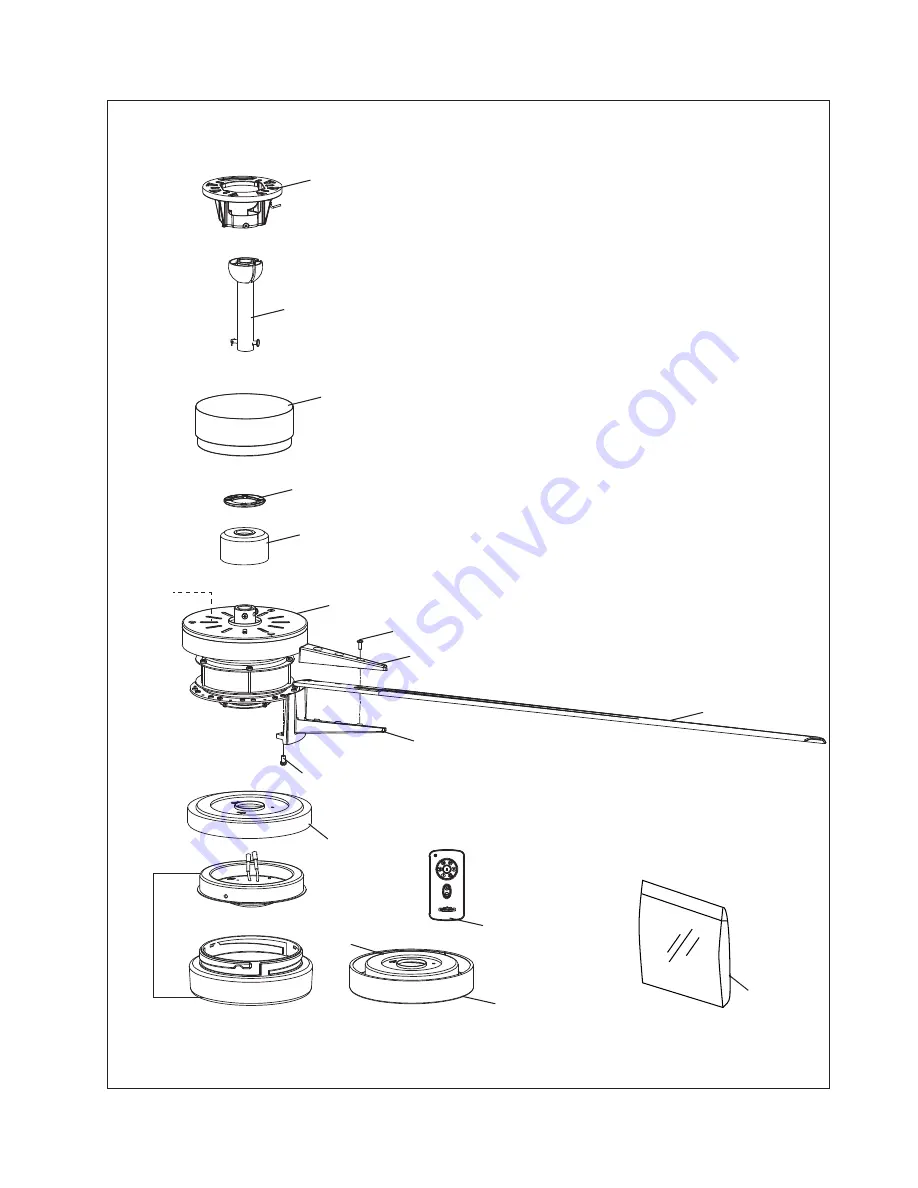
Model FPD8148**AU Exploded-View
NOTE: The illustration shown is not to scale or its actual con
¿
guration may vary.
Product/parts are subject to change without notice.
Figure 1
1
2
3
4
5
6
7
8
16
14
9
12
10
11
The Odyn
™
13
Страница 1: ...Model No FPD8148 AU OWNER S MANUAL READ AND SAVE THESE INSTRUCTIONS Ceiling Fan Net Weight 14 6 kg The Odyn...
Страница 2: ...duct and or accessories designated specifically for use with this product Using parts and or accessories not designated for use with this product will void your warranty and could result in personal i...
Страница 3: ...LHQFH FKHFN RII HDFK VWHS V HDFK VWHS LV FRPSOHWHG SODFH D FKHFN PDUN 7KLV ZLOO HQVXUH WKDW DOO VWHSV KDYH EHHQ FRPSOHWHG DQG ZLOO EH KHOSIXO LQ QGLQJ RXU SODFH VKRXOG RX EH LQWHUUXSWHG LULQJ DQG FRQQ...
Страница 4: ...fan Here are a few tips to ensure efficient product performance Choosing the Appropriate Mounting Location Ceiling fans should be installed or mounted in the middle of the room and at least 2 1 m abo...
Страница 5: ...aligning the holes in the downrod support with holes in the downrod Secure clevis pin with hairpin clip Tighten the two set screws with nuts in the downrod support Figure 4 WARNING It is critical that...
Страница 6: ...ball on the downrod as follows Route the three 2m length wires and safety cable through the hanger ball Position the pin through the two holes in the downrod and align the hanger ball so the pin is ca...
Страница 7: ...r attach safety cable to ceiling joist or wood structural member The lag bolt will pass through the flat washer safety cable loop and into the building structure Figure 3 NOTE Ceiling support cable mu...
Страница 8: ...earth wire to the terminal block as shown in Figure 2 2 Securely connect the blue fan motor wire and the black supply neutral to the N terminal of the connec tor block as shown in Figure 2 3 Securely...
Страница 9: ...when installing balancing the blades or cleaning the fan Do not insert foreign objects in between the rotating blades WARNING To reduce the risk of electric shock disconnect the electrical supply cir...
Страница 10: ...ght kit Assemble the steel cap assembly to the adapter steel cap by twisting in a clockwise direction Figure 2B Light Plate Assembly Figure 4 To reduce the risk of electric shock disconnect the electr...
Страница 11: ...s complete The fan is now ready for normal use 2 To make the fan operational install 23A 12V battery included into the hand held remote transmitter If not used for long periods of time remove the batt...
Страница 12: ...ws I minimum speed II low speed III medium low speed IV medium speed V medium high speed VI high speed Figure 4 Fan speed Turns the fan off Controls fan direction forward and reverse Figure 4 Maintena...
Страница 13: ...3 FAN WOBBLES EXCESSIVELY 1 Tighten both setscrews securely in downrod support 2 Tighten the setscrew in the downrod hanger ball assembly 3 Check to be sure screws which attach the fan blade holders...
Страница 14: ...l No FPD8148 AU Reference Description Part 1 A R1 1 2 3 1 3 4 33 1 0otor Coupling Cover 5 3 1 0 1 8 Blade Cover Set DQ 0RWRU VVHPEO 6 AP814809 Blade Set 7 3 1 3 1 AP814814 220 3 AP26 1 Blade Holder Se...
Страница 15: ...48 AU Exploded View NOTE The illustration shown is not to scale or its actual con guration may vary Product parts are subject to change without notice Figure 1 1 2 3 4 5 6 7 8 16 14 9 12 10 11 The Ody...
Страница 16: ...ctrician s details Do not uninstall or attempt to return the product to the supplier or MyFan unless advised to by MyFan You must be the original purchaser of the product and it must be installed in i...
Страница 17: ...Copyright 2015 Fanimation 2015 10 V 01 Distributed in Australia by MyFan Pty Ltd www myfan com au...