Copyright 2021 Fanimation
2021/04 V.01
Visite nuestro sitio Web en www.fanimation.com
10983 Bennett Parkway Zionsville, IN 46077Llame sin cargo al (888) 567-2055FAX (866) 482-5215Desde fuera de los EE.UU., llame al (317) 733-4113
Страница 1: ...ent at 1 888 567 2055 8 a m 5 p m EST Monday Friday FP6284 Net Weight 15 36 lbs 6 98 kg FP6285B Net Weight 17 26 lbs 7 83 kg Date Code Purchase Date ATTACH YOUR RECEIPT HERE AND REGISTER YOUR FAN AT F...
Страница 2: ...nstructions Read your owner s manual and safety information before installing your new fan Review the accompanying assembly diagrams 1 Before servicing or cleaning unit switch power off at service pan...
Страница 3: ...or Assembly 1 Motor Coupling Cover Assembly 1 Canopy Screw Cover Assembly 1 This manual is designed to make it as easy as possible for you to assemble install operate and maintain your ceiling fan Too...
Страница 4: ...in the clockwise direction This produces a gentle updraft which forces warm air near the ceiling down into the occupied space Remember to adjust your thermostat when using your ceiling fan additional...
Страница 5: ...h brace Figure 3 Paired with a deep box this hanger is meant to span between two joists and takes the place of wooden blocking To avoid fire or shock follow all wiring instructions carefully Any elect...
Страница 6: ...the downrod Figure 3 4 Slide downrod into the downrod support on top of the motor Install the clevis pin by aligning the holes in the downrod support with holes in the downrod Secure clevis pin with h...
Страница 7: ...the downrod and align the hanger ball so the pin is captured in the groove in the top of the hanger ball Pull the hanger ball up tight against the pin Securely tighten the set screw in the hanger ball...
Страница 8: ...tlet box not included using the outlet box screws and washers supplied with the outlet box Figure 3 WARNING The outlet box must be securely anchored Hanger bracket must seat rmly against outlet box If...
Страница 9: ...re and blue wire to the black supply wire using wire connector Figure 2A 2 After connections have been made taking care not to pinch the wires and put the white and green leads to one side and the bla...
Страница 10: ...e tight including ground and that no bare wire is visible at the wire connectors except for the ground wire Do not operate fan until the blades are in place Noise and motor damage could result Option...
Страница 11: ...assembly by removing the screws Figure 1 Do not connect fan blades until the fan is completely installed Installing the fan with blades assembled may result in damage to the fan blades CAUTION Figure...
Страница 12: ...ARDWARE USED Figure 3 1 4 20 Screws How to Assemble Your Switch Cup Assembly Light Kit Assembly Switch Cup Assembly Light Kit Assembly Adapter Switch Housing Figure 1A Figure 1B FP6284 FP6285B Figure...
Страница 13: ...ssembly Switch Cup Assembly 4A FP6284 Assemble the switch cup assembly to the switch housing adapter using the previously removed screws and securely tighten all screws Figure 4A 4B FP6285B Assemble t...
Страница 14: ...l 2nd Pull 3rd Pull 4th Pull High Off Low Medium Fan Pull Chain Operating Sequence 4 FP6285B ONLY Check the operation of the light by gently pulling on the light kit pull chain Figure 4 1st Pull 2nd P...
Страница 15: ...r housing 3 Screws securing fan blade holders to motor flywheel are loose 4 Wire connectors inside housing rattling 5 Screws holding blades to blade holders are loose 3 FAN WOBBLES EXCESSIVELY 1 Tight...
Страница 16: ...and should be avoided to prevent damage to finish Periodic light dusting of the blades is recommended A feather duster will work best Avoid using water cleansers or harsh rags which can warp and ruin...
Страница 17: ...er Head Screws 3 16 24 16 Fiber Washer 16 Loose Hardware Bag Blade Mounting Hardware Bag Blade Holder Mounting Hardware Bag Pan Head Screw 1 4 20 with Lock Washer 11 Fan Pull Chain Description Before...
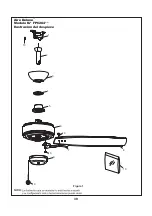
Страница 18: ...4 Exploded View Illustration NOTE The illustration shown is not to scale or its actual con guration may vary Product parts are subject to change without notice Figure 1 Aire Deluxe 10 1 2 3 4 5 6 9 10...
Страница 19: ...4 Loose Hardware Bag Blade Mounting Hardware Bag Washer Head Screws 3 16 24 16 Fiber Washer 16 Blade Holder Mounting Hardware Bag Pan Head Screw 1 4 20 with Lock Washer 11 Fan Pull Chain Light Kit Pu...
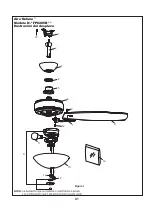
Страница 20: ...ded View Illustration Aire Deluxe 20 NOTE The illustration shown is not to scale or its actual con guration may vary Product parts are subject to change without notice Figure 1 1 2 3 4 5 12 12 12 6 12...
Страница 21: ...2021 04 V 01 Copyright 2021 Fanimation 10983 Bennett Parkway Zionsville IN 46077 Phone 888 567 2055 Outside U S 317 733 4113 FAX 866 482 5215 FANIMATION COM...
Страница 22: ...o Departamento de Servicio al Cliente al 1 888 567 2055 8 a m 5 pm hora del Este de lunes viernes C digo de fecha Fecha de compra ADJUNTE SU RECIBO AQU Y REGISTRE SU VENTILADOR EN FANIMATION COM LEA Y...
Страница 23: ...ar a cabo el mantenimiento o la limpieza de la unidad desconecte la electricidad en el panel de servicio y bloquee los 2 medios de desconexi n del mismo para evitar que se active accidentalmente Si no...
Страница 24: ...arias para el ensamblaje No incluido Destornillador Phillips Escalera de tijera Destornillador de Pelacables Conectores de cables 4 Acoplador de la cadena del tirador del ventilador 1 FP6284 FP6285B A...
Страница 25: ...gurar un rendimiento eficiente del producto Apague el ventilador cuando no se encuentre en la habitaci n Los ventiladores son para refrescar a la gente no a las habitaciones Si la habitaci n est vac a...
Страница 26: ...pagar el interruptor de pared no es suficiente Para evitar posibles descargas el ctricas aseg rese de que la electricidad est desconectada en la caja de fusibles principal antes de realizar la instala...
Страница 27: ...es de color negro azul y blanco a trav s de la varilla Figura 3 4 Coloque el soporte de la varilla y alinee los orificios de la clavija de horquilla en ambas piezas Instale la clavija de horquilla y a...
Страница 28: ...a extremo del cable Figura 7 PRECAUCI N Se deben revisar todos los tornillos de fijaci n y volver a ajustarlos cuando sea necesario antes de realizar la instalaci n Figura 5 Capuch n de techo Cubierta...
Страница 29: ...era para colgar Caja de salida Ensamble de la bola para colgar varilla Abrazadera para colgar Arandela Plana La caja de salida debe estar bien asegurada La abrazadera para colgar debe estar bien asent...
Страница 30: ...ventilador de techo Conectores de cable Aditamentos utilizados X 3 Figura 1 Figura 2A Figura 3A Conductor verde del suministro puesta a tierra Conductor verde del suministro puesta a tierra Conductor...
Страница 31: ...tores con conectores de cables de forma segura Conecte el conductor blanco del motor del ventilador al conductor blanco neutro mediante el conector de forma segura Conecte el conductor negro del motor...
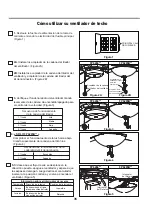
Страница 32: ...a vista Aseg rese de que la parte inferior del aspa se encuentre bien apoyada sobre el soporte Con un destornillador Phillips fije los tornillos de cabeza de 3 16 24 con arandela de fibra para asegura...
Страница 33: ...ear las aspas o limpiar el ventilador No coloque objetos extra os entre las aspas del ventilador en funcionamiento ADVERTENCIA 3 soportes de las aspas y vuelva a ajustarlas si fuese necesario 20 desde...
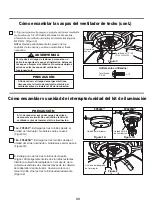
Страница 34: ...idad del kit de iluminaci n Figura 3B C mo ensamblar su unidad de interruptor unidad del kit de iluminaci n cont Unidad de Interruptor Unidad de Interruptor Unidad del Kit de Iluminaci n Unidad del Ki...
Страница 35: ...cadena de encendido apagado para el control de la velocidad Figura 3 1 tirada 2 tirada 3 tirada 4 tirada Alta Apagado Baja Media Secuencia de funcionamiento de la cadena del tirador Comprobar el funci...
Страница 36: ...dad del barral de la semiesfera est flojo 3 Los tornillos que aseguran los soportes de las aspas al buje del motor est n flojos 4 Los soportes de aspas no est n colocados correctamente 5 El soporte de...
Страница 37: ...cepillo suave o un pa o sin pelusas para evitar rayar el acabado No se requieren agentes abrasivos de limpieza los mismos deben evitarse para prevenir da os en el acabado PRECAUCI N No utilice solven...
Страница 38: ...esorios para el montaje de aspas que contiene 3 16 24 Tornillo de cabeza arandela 16 Arandela de fibra 16 Bolsa de accesorios para el montaje de los soportes de aspas que contiene Tornillos con arande...
Страница 39: ...10 1 2 3 4 5 6 9 10 10 10 10 7 8 39 Figura 1 Aire Deluxe Modelo N FP6284 Ilustraci n del despiece NOTA...
Страница 40: ...luminaci n Bolsa de accesorios que contiene Bolsa de accesorios para el montaje de aspas que contiene 3 16 24 Tornillo de cabeza arandela 16 Arandela de fibra 16 Bolsa de accesorios para el montaje de...
Страница 41: ...Aire Deluxe Modelo N FP6285B Ilustraci n del despiece NOTA 41 Figura 1 1 2 3 4 5 12 12 6 12 12 7 8 11 10 9 12 12...
Страница 42: ...21 Fanimation 2021 04 V 01 Visite nuestro sitio Web en www fanimation com 10983 Bennett Parkway Zionsville IN 46077 Llame sin cargo al 888 567 2055 FAX 866 482 5215 Desde fuera de los EE UU llame al 3...