background image

- 4 -

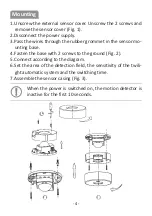
1. Unscrew the external sensor cover. Unscrew the 2 screws and 

remove the sensor cover (Fig. 1).

2. Disconnect the power supply.

3. Pass the wires through the rubber grommet in the sensor mo-

unting base.

4. Fasten the base with 2 screws to the ground (Fig. 2).

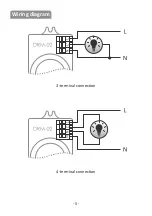
5. Connect according to the diagram.

6. Set the area of the detection field, the sensitivity of the twili-

ght automatic system and the switching time.

7. Assemble the sensor casing (Fig. 3).

When the power is switched on, the motion detector is 

inactive for the first 10 seconds.

Mounting

Содержание DRM-02

Страница 1: ...during the day When motion is detected after dusk the lighting will be switched on and will remain on as long as motion is detected When the movement stops the light rema ins switched on for a specifi...

Страница 2: ...temperature The detection range the brightness level that activates the sensor and the time of operation back up are set using the knobs described later in this manual The sensor is designed for indoo...

Страница 3: ...e towards the sun Detection area SENS The detection radius of the sensor can be adjusted from 1 m to 10 m parameters given for a sensor mounted at a height of 2 5 m Turning the knob clockwise max incr...

Страница 4: ...mmet in the sensor mo unting base 4 Fasten the base with 2 screws to the ground Fig 2 5 Connect according to the diagram 6 Set the area of the detection field the sensitivity of the twili ght automati...

Страница 5: ...5 3 terminal connection 4 terminal connection Wiring diagram...

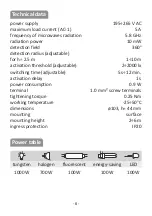
Страница 6: ...ivation threshold adjustable 2 2000 lx switching time adjustable 5 s 12 min activation delay 1 s power consumption 0 9 W terminal 1 0 mm screw terminals tightening torque 0 25 Nm working temperature 2...

Страница 7: ...that the device is in conformity with the essential requirements of The Directive 2014 53 EU of the European Parliament and of the Council of 16 April 2014 on the harmonisation of the laws of the Mem...

Страница 8: ......

Отзывы: