


2.6. Install Your Receipt Printer (Optional)
The POP-950 has optional thermal receipt printer module that is pre-installed into the POS
system. To install the paper roll into the printer:
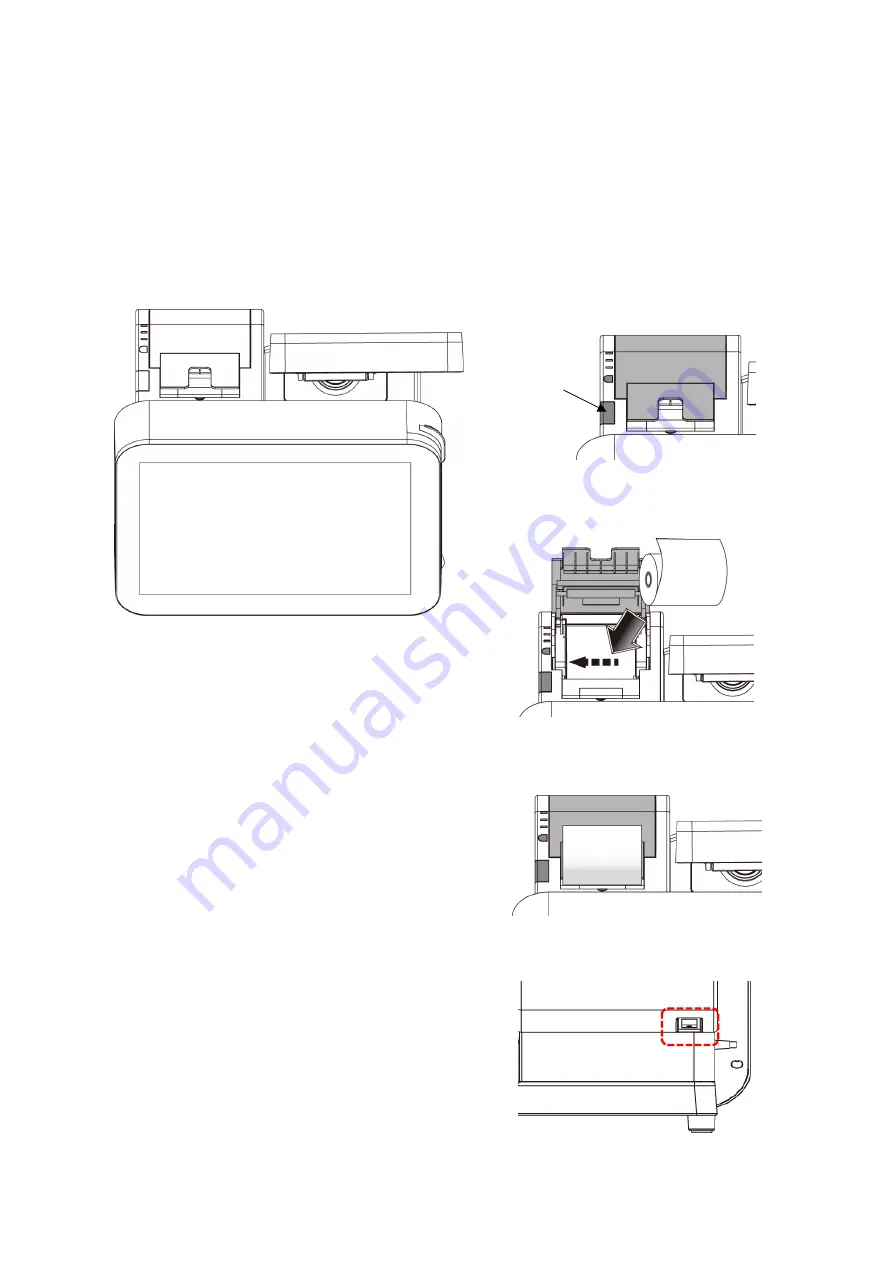
2.6.1. Install/Replace the Paper Roll
The Receipt Printer (upper left)
Note:
Place the paper and reserve proper length to
pass through the printer slot.
Warning:
Do not pull out the paper with force through
the slot.
If the paper does not feed easily check whether
you are using the paper slot and there are no
obstructions in the paper path.
a. Press the button to open the printer
cover.
Printer Cover
Button
b. Place the receipt paper roll into the slot.
Align the paper roll to the left of the slot.
c. Close the cover by pressing the cover.
Make sure the cover is closed properly.
d. Turn on the power switch of the printer
(in the rear of the POS system)
Содержание POS-6000-B
Страница 1: ...Zircon Series All in One POS System User Manual POP 950 B Ver 2 2 Copyright Fametech Inc TYSSO 2016 ...
Страница 7: ...vi ...
Страница 12: ...Dimensions Left View Front View Right View VFD Pole max height Right View VFD Pole min height 5 ...
Страница 28: ...i Click Next to continue j The driver of Virtual Serial Port is successfully installed Click Finish to exit ...
Страница 38: ...Examine the parameters of selected COM port that fit to the settings of the printer Click OK to exit ...
Страница 46: ...3 2 2 F81866 Super IO Configuration Watch dog Timer The item is used to enable or disable watch dog ...
Страница 54: ...3 2 3 Hardware Monitor ...
Страница 56: ...3 2 4 Intel R Smart Connect Technology ISCT Support The item is used to enable or disable the ISCT Support ...
Страница 57: ...3 2 5 S5 RTC Wake settings Wake system from S5 The item is used to enable or disable the wake system from S5 ...
Страница 58: ...3 2 6 Serial Port Console Redirection Console Redirection Configuration options Enable Disable ...
Страница 60: ...3 2 7 1 Socket 0 CPU information ...
Страница 68: ...3 2 12 Network Stack Configuration Network Stack The item is used to enable or disable Network Stack ...
Страница 72: ...3 3 Chipset ...
Страница 73: ...3 3 1 North Bridge Max TOLUD Dynamic 2GB 2 25GB 2 5GB 2 75GB 3GB ...
Страница 79: ...3 3 2 1 Azalia HD Audio Audio Controller The item is used to enable or disable Audio Controller ...
Страница 82: ...3 4 Security Administrator Password Set the Administrator Password User Password Set the User Password ...
Страница 88: ...e Click Install to continue f Click Finish to complete setup ...
Страница 90: ...e Read File Information Click Next to continue f Click Next to continue ...
Страница 93: ...e Click Finish to complete the installation ...
Страница 97: ...d Follow the instructions to finish the installation ...
Страница 99: ...f Click Next to continue g Accept the License Agreement and click Next to continue ...
Страница 100: ...h Click Next to continue i Click Finish to complete setup and restart the computer ...
Страница 103: ...f Double click the file Setup EXE to start the installation g Click Next to start the installation ...
Страница 116: ...e Select Install driver only and click Next to continue f Click Install to begin Installation ...
Страница 142: ...20161225 ...