background image

11

4.  Cooking Table

ArtNo.050-0007

Oven shelf positions

Oven Shelf Positions

Top

Centre

Base

The oven control settings and cooking times given in the table below are intended to be used 

AS A GUIDE ONLY

. Individual tastes may require the temperature to be altered to provide a 

preferred result.

Food is cooked at lower temperature in a fan oven than in a conventional oven. When using 
recipes, reduce the fan oven temperature by 10 °C and the cooking time by 5-10 minutes. The 
temperature in the fan oven does not vary with height in the oven so you can use any shelf.

Food
Meat

  Beef (no bone)

 Lamb

 Pork

Poultry

 Chicken

 Turkey

 Duck

Casserole
Yorkshire pudding
Fish

 Fillet
 Whole
 Steak

Cake

  Very rich fruit - Christmas,  
  wedding, etc.
  Fruit 180 mm tin
  Fruit 230 mm tin
  Madeira 180 mm
  Queen cakes
 Scones
  Victoria sandwich
    180 mm tin
    210 mm tin

Desserts

  Shortcrust tarts
  Fruit pies
 Tartlets
  Puff pastry
 Meringues
  Baked egg custard
  Baked sponge pudding
  Milk pudding

Bread

Approximate cooking time

30-35 minutes per 500g +30-35 minutes.
20-25 minutes per 500g +20-25 minutes.
30-35 minutes per 500g +30-35 minutes.
25-30 minutes per 500g +25-30 minutes.
35-40 minutes per 500g +35-40 minutes.
25-30 minutes per 500g +25-30 minutes.

20-25 minutes per 500g +20-25 minutes.
15-20 minutes per 500g +15-20 minutes.
20 minutes per 500g +20 minutes.
15 minutes per 500g +15 minutes.
25-30 minutes per 500g.
20 minutes per 500g.
2-4 hours according to recipe.
Large tins 30-35 minutes; individual 10-20 minutes.

15-20 minutes.
15-20 minutes per 500g.
Steaks according to thickness.

45-50 minutes per 500g of mixture.

2-2½ hours.
Up to 3½ hours.
80-90 minutes.
15-25 minutes.
10-15 minutes.

20-30 minutes.
30-40 minutes.

20-30 minutes on a preheated tray.
35-45 minutes.
10-20 minutes according to size.
20-40 minutes according to size.
2-3 hours.
45-60 minutes.
40-45 minutes.
2 to 3 hours.
20-30 minutes.

Conventional Oven

Temperature °C & 

(Shelf Position)

160   (C)

200  (C)
160  (C)
200  (C)
160  (C)
200  (C)

160  (C)
200  (C)
160  (C)
200  (C)
160  (C)
200  (C)

140-150  (C)

220  (C)

190  (C/B)
190  (C/B)
190  (C/B)

140  (C/B)

150  (C/B)
150  (C/B)
160  (C/B)
190  (C/B)
220  (C/B)

180  (C/B)
180  (C/B)

200  (C/B)
200  (C/B)
200  (C/B)
230  (C/B)
100  (C/B)
160  (C/B)
190  (C/B)

140-150  (C/B)

220  (C)

Fan Oven 

Temperature

 °C

150
190
150
190
150
190

150
190
150
190
150
190

130-140

210

180
180
180

130

140
140
150
180
210

170
170

190
190
190
220

90

150
180

130-140

210

Thoroughly thaw frozen joints before 

cooking. Meat may be roasted at 

220°C (210°C for fan oven) and the 

cooking time adjusted accordingly. 

For stuffed and rolled meats, add 

approximately 10 minutes per 500g, 

or cook at 200°C (190°C) for 20 

minutes then 160°C (150°C) for the 

remainder.

For stuffed poultry, you could cook 

at 200°C (190°C) for 20 minutes 

then 160°C (150°C) for remainder. 

Do not forget to include the weight 

of the stuffing.

For fresh or frozen prepacked 

poultry, follow instructions on the 

pack. Thoroughly thaw frozen 

poultry before cooking.

Using the conventional oven: when 

two tier cooking leave at least one 

runner space between shelves.

Position the baking tray with the 

front edge along the front of the 

oven shelf. 

ArtNo.050-0001 Gas cooking table

Using the conventional oven: for 

even browning the maximum size of 

baking tray recommended is 340 mm 

x 340 mm. This ensures free heat 

circulation.

If cooking a two tier load, the trays 

should be interchanged 

approximately halfway though the 

cooking time.

Up to three tiers can be cooked in a 

fan oven at the same time but make 

sure to leave at least one runner 

space between each shelf being 

cooked on.

DocNo.031-0004 - Cooking table - electric & fan single cavity

Содержание Toledo 90 Dual Fuel

Страница 1: ...90 Dual Fuel User Guide Installation Instructions U108610 07 Australia ArtNo 000 0021 Toledo logo ArtNo 000 0005 Classic logo...

Страница 2: ...ol Panel and Doors 13 Ovens 13 The Tall Oven 14 Cleaning Table 14 6 Troubleshooting 15 7 Installation 17 Service and Spares 17 Dear Installer 18 Provision of Ventilation 18 Location of Cooker 18 Conve...

Страница 3: ...DO keep people away from the area affected Call your gas supplier Ventilation n n CAUTION The use of a gas cooking appliance results in the production of heat and moisture in the room in which it is i...

Страница 4: ...hould be only one third full of fat Filling the pan too full of fat can cause spill over when food is added If you use a combination of oils or fats in frying stir them together before heating or as t...

Страница 5: ...r button is pressed in sparks will be made at every burner this is normal Do not attempt to disassemble or clean around any burner while another burner is on otherwise an electric shock could result T...

Страница 6: ...also avoid using unstable and misshapen pans that may tilt easily and pans with a very small base diameter e g milk pans single egg poachers Fig 2 7 The minimum recommended pan diameter is 120mm The m...

Страница 7: ...g spatulas will damage the surface Use heat resistant plastic or wooden utensils n n DO NOT put it crossways it will not fit properly and will be unstable n n DO NOT put it on any other burner it is n...

Страница 8: ...in place with the food on it slide the pan back into the grill chamber Make sure that it is pushed right in The grill pan trivet can be turned over to give two grilling positions Fig 2 17 Do not leav...

Страница 9: ...ally Before you set the clock you must have two numbers clearly in mind the cook period and the stop time Note You cannot set a start time directly this is set automatically by setting the cook period...

Страница 10: ...he clock is in manual mode and cancel any active programs Hold the Minute Minder and Cook period buttons When On appears on the display Fig 2 30 press the button once The key symbol and OF will now sh...

Страница 11: ...eight that can be held by the Handyrack is 5 5kg 12lb It should only be used with the supplied roasting tin which is designed to fit the Handyrack Any other vessel could be unstable It can be fitted a...

Страница 12: ...ing trays with food cooking on them should be placed level with the front edge of the oven s wire shelves Other containers should be placed centrally Keep all trays and containers away from the back o...

Страница 13: ...utes 20 30 minutes on a preheated tray 35 45 minutes 10 20 minutes according to size 20 40 minutes according to size 2 3 hours 45 60 minutes 40 45 minutes 2 to 3 hours 20 30 minutes Conventional Oven...

Страница 14: ...efitting the burner head make sure that the notch lines up with the electrode or hole in the base Check that the burner head is level and that the cap is fitted centrally on the burner head Fig 5 1 Th...

Страница 15: ...lift off the outer door panel The inside face of the glass panels can now be cleaned take care not to disturb or wet the door insulation Note If the door is triple glazed then the inner two panels are...

Страница 16: ...of Cooker Part Finish Recommended Cleaning Method Door door surround and Storage drawer exterior Enamel or paint Hot soapy water soft cloth Any stubborn stains remove gently with a liquid detergent St...

Страница 17: ...nstaller 6 Troubleshooting Power failure In the event of a failure in the electrical supply remember to reset the clock to make sure that the timed oven continues to operate Food is cooking too slowly...

Страница 18: ...o protect your fingers with a glove in case the bulb should shatter Screw in the new bulb screw back the bulb cover Turn on the circuit breaker and check that the bulb now lights The oven door is misa...

Страница 19: ...your appliance is outside the 12 month warranty period our service provider may charge for this visit If you request an engineer to visit and the fault is not the responsibility of the manufacture ou...

Страница 20: ...nt statutory regulations n n WARNING Where this appliance is installed in a marine craft caravan or mobile home it shall NOT be used as a space heater Provision of Ventilation This appliance is not co...

Страница 21: ...ing the cooker on a stone or concrete floor 4 Steel tape measure 5 Cross head screwdriver 6 Flat head screwdriver 7 4mm 3mm Allen keys 8 Spirit level 9 Pencil 10 Adjustable spanner 11 13mm spanner or...

Страница 22: ...th the surface protected the dimension B should not be less than 135mm above hotplate level The fixing of 5mm thick ceramic tiles to the surface or attaching fire resistant material to the surface and...

Страница 23: ...polystyrene base Fig 7 3 Repeat from the back and remove the rear half of the polystyrene base Lowering the Two Rear Rollers To adjust the height of the rear of the cooker first fit a 13mm spanner or...

Страница 24: ...before the stability bracket is installed Fitting a Stability Bracket When fitting a stability bracket please refer to the instructions supplied with the bracket for further details on fitting When fi...

Страница 25: ...cooker If it is necessary to use another hose it must be to AS1869 Class B and be suitable for your gas type If in doubt contact your supplier Screw connect the threaded end of the hose into the gas...

Страница 26: ...measure required by law and must be performed with particular care by a qualified technician who must also check that the electricity supply characteristics are correct The total electrical load of t...

Страница 27: ...heck Turn on the oven and check that it starts to heat up Check that the oven lights are working Note The oven light bulb is not included in the guarantee Turn off the oven Final Fitting Fitting the H...

Страница 28: ...or unauthorised gas controls n n Disconnect from the electricity and gas supply before servicing n n Before electrical reconnection check that the appliance is electrically safe Injectors Remove the...

Страница 29: ...t Fig 8 5 Make sure the device is secure in the top cap and refit the cap to the governor Pressure Testing The pressure test point is accessible on the inlet pipe at the rear Remove the test nipple sc...

Страница 30: ...any electrical components or covers n n Before electrical reconnection check that the appliance is electrically safe 1 Panels 1 1 To Remove the Control Panel DISCONNECT FROM THE ELECTRICITY SUPPLY Cl...

Страница 31: ...lace the Hotplate Control Taps DISCONNECT FROM THE ELECTRICITY SUPPLY n n BEFORE SERVICING ANY GAS CARRYING COMPONENTS TURN OFF THE GAS SUPPLY Remove the control panel and hotplate see 1 1 2 1 Unplug...

Страница 32: ...e Grill Controller DISCONNECT FROM THE ELECTRICITY SUPPLY Remove the control panel and hotplate see 1 1 2 1 Disconnect the wiring from controller Remove the 2 screws holding the controller to the moun...

Страница 33: ...sconnect the cut out wiring Undo the fixings that secure the cut out to the earth plate and remove Fit the replacement control and re assemble in reverse order 5 5 To Replace an Oven Thermostat DISCON...

Страница 34: ...main oven door can be adjusted to alter the angle of the door Fig 9 8 Loosen the bottom hinge fixing screws and use the notch and a flat bladed screwdriver to move the position of the hinge to set the...

Страница 35: ...he door panel Fit the door handle bracket and the door handle to the new panel Fit the panel to the door and reassemble in reverse order 6 9 To Replace the Tall Oven Door Magnetic Latch Remove the con...

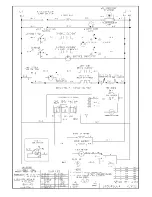
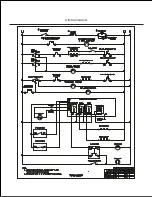
Страница 36: ...30V 50Hz 10 Circuit Diagram Code Description A1 Grill control A2 Grill element left hand side A3 Grill element right hand side B1 Left hand oven thermostat B2 Left hand oven control B3 Left hand oven...

Страница 37: ...1 0kPa LP Gas 2 54kPa Input Injector Bypass Input Injector Bypass Wok burner 15 2MJh 1 internal 112 90 15 0MJh 1 internal 66 54 external 164 external 91 Large burner 12 3MJh 1 165 80 12 0MJh 1 89 41...

Страница 38: ...36 Notes...

Страница 39: ...37 Notes...

Страница 40: ...Clarence Street Royal Leamington Spa Warwickshire CV31 2AD England Tel 44 0 1926 457400 Fax 44 0 1926 450526 E mail consumers falconappliances co uk...

Отзывы: