background image

19

Control Panel and Doors

Avoid using any abrasive cleaners including cream cleaners. 

For best results, use a liquid detergent.
The same cleaner can be used on the doors, or alternatively, 

using a soft cloth wrung out in clean hot soapy water – but 

take care that no surplus water seeps into the appliance.
After cleaning, polish with a dry cloth.

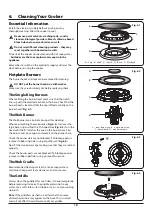
Removing the Left-hand Main Oven 

Linings

Some of the lining panels can be removed for cleaning. You 

will need to remove the shelves before removing the panels. 

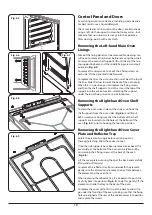
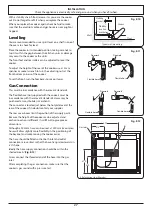
To remove the oven shelf supports lift until clear of the two 

top supporting holes, and the middle fixing screw and pull 

outwards (

Fig. 6.5

).

To remove the side panels, take out the 5 fixing screws on 

each side, lift the panel and slide forwards.
To replace the liner, the cut-out section must be at the top of 

the liner. Slide the liner towards the back of the oven cavity. 

When this is in position you can replace the fixing screws 

and then the shelf supports. To do this, insert the top of the 

support into the cut-out section, relocating the support 

under the lower fixing screw to secure into place.

Removing the Right-hand Oven Shelf 

Supports

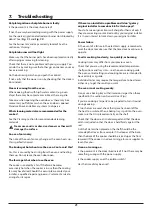
To clean the oven sides, slide out the shelves, unhook the 

shelf supports from the oven sides (

Fig. 6.6

), and lift out.

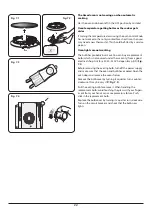
Refit in reverse, making sure that the bottom of the shelf 

supports are inserted into the holes at the bottom of the 

oven (

Fig. 6.7

), prior to hooking the top into position.

Removing the Right-hand Oven Cover 

Plate and Reflector Tray 

Isolate the electricity supply before carrying out any 

thorough cleaning. Allow the cooker to cool.
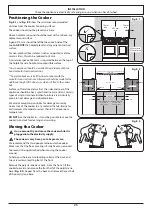
Once the side supports have been removed (see above) the 

cover plate at the bottom of the oven can be taken out by 

unscrewing the 2 fixing screws at the back of the oven  

(

Fig. 6.8

).

Lift the cover plate out using the lip at the back, and carefully 

lift up and pull forward. 
To remove the reflector tray from underneath the element, 

gently raise the element and remove the tray from between 

the element and the oven front. 
When replacing the reflector tray, it is important to push the 

tray fully back into position (

Fig. 6.9

). To do this, gently lift the 

element and slide the tray to the back of the oven. 
To replace the cover plate, tilt it up at the back to allow it to 

go under the front lip of the oven, making sure that the fixing 

holes are aligned at the rear of the cooker. Lower into position 

and replace the screws.

Fig. 6.5


Fig. 6.6


Fig. 6.7


Fig. 6.8


Fig. 6.9


Содержание Professional+ FX 100 Dual Fuel

Страница 1: ...USER GUIDE INSTALLATION INSTRUCTIONS Professional FX 100 Dual Fuel U111268 03a...

Страница 2: ......

Страница 3: ...er 16 General Oven Tips 16 5 Cooking Table 17 6 Cleaning Your Cooker 18 Essential Information 18 Hotplate Burners 18 Control Panel and Doors 19 Cleaning Table 20 7 Troubleshooting 21 8 Installation 23...

Страница 4: ...ii...

Страница 5: ...warranty or liability claim Before operating the oven s please refer to the oven shelf installation in the Accessories section WARNING The appliance and its accessible parts become hot during use and...

Страница 6: ...your gas type and supply voltage See the data badge DO NOT use reconditioned or unauthorised gas controls Disconnect from the electricity and gas supply before servicing When servicing or replacing g...

Страница 7: ...is recommended that this appliance is serviced annually WARNING Before removing the existing bulb turn off the power supply and make sure that the oven and bulb have cooled DO NOT use cooking vessels...

Страница 8: ...at overheating beyond the smoking point n WARNING Unattended cooking on a hob with fat or oil can be dangerous and may result in fire NEVER try to extinguish a fire with water but switch off the appli...

Страница 9: ...help to prevent soiling and discolouration of the oven exterior by cooking vapours Cleaning WARNING Using the self cleaning function results in higher temperatures than those for normal cooking Under...

Страница 10: ...eaning products they may react together with hazardous results All parts of the cooker can be cleaned with hot soapy water Take care that no water seeps into the appliance Before you remove any of the...

Страница 11: ...w of gas if the flame goes out When the hotplate control knob is pressed in sparks will be made at every burner this is normal Do not attempt to disassemble or clean around any burner while another bu...

Страница 12: ...eter is 120mm The maximum allowable pan base diameter is 260mm DO NOT use cooking vessels on the hotplate that overlap the edges Wok Burner The wok burner is designed to provide even heat over a large...

Страница 13: ...ing on the pan support Check that it is securely located The griddle plate can be lightly brushed with cooking oil before use or alternatively brush oil onto the food to be cooked Fig 2 13 Light the h...

Страница 14: ...with the oven door closed Defrosting should not be carried out in a warm oven Large items such as whole chickens and meat roasts should not be defrosted in this way We recommend this be carried out i...

Страница 15: ...helf It is also a gentle heat good for slow cooking of casseroles in the middle of the oven or for plate warming The Browning and Base Heat functions are useful additions to your oven giving you flexi...

Страница 16: ...ous cooker Operating the Ovens Multifunction ovens have two controls a function selector and a temperature setting knob Fig 2 15 1 Turn the function selector control to a cooking function Turn the ove...

Страница 17: ...shelf will pass between the supports and then pull the shelf forward Fig 2 21 Oven Lights Press the button to turn the lights on Fig 2 22 If the oven lights fail turn off the power supply before chan...

Страница 18: ...e The cook symbol remains visible during normal operation OR The clock must be set to the time of day before the oven will work Alarm will sound when cooking has finished to cancel follow this step ma...

Страница 19: ...set the time of day you want the oven to stop cooking Current time will be displayed along with the word AUTO Set the oven to the required cooking temperature and function Set the cook time Alarm will...

Страница 20: ...ral Oven Tips The wire shelves should always be pushed firmly to the back of the oven Baking trays with food cooking on them should be placed level with the front edge of the oven s wire shelves Other...

Страница 21: ...0 C 150 C for remainder Do not forget to include the weight of the stuffing For fresh or frozen pre packed poultry follow instructions on the pack Thoroughly thaw frozen poultry before cooking Cassero...

Страница 22: ...that the burner head is level and that the cap is fitted centrally on the burner head Fig 6 1 The Wok Burner The Wok burner can also be taken apart for cleaning When reassembling the wok burner Fig 6...

Страница 23: ...and Oven Shelf Supports To clean the oven sides slide out the shelves unhook the shelf supports from the oven sides Fig 6 6 and lift out Refit in reverse making sure that the bottom of the shelf suppo...

Страница 24: ...purpose cloth supermarket Sides plinth Painted surface Hot soapy water soft cloth Rear grille Enamel or stainless steel Hot soapy water soft cloth Cream cleaner with care if necessary Control panel P...

Страница 25: ...d repair engineer or Customer Service to arrange for its repair If there is an installation problem and I don t get my original installer to come back to fix it who pays You do Service organisations w...

Страница 26: ...anty from a good electrical shop Ask for a 40W 230V halogen lamp G9 Fig 7 3 Before removing the existing bulb turn off the power supply and make sure that the oven and bulb have cooled Open the oven d...

Страница 27: ...r liability claims and lead to prosecution n This appliance can be converted for use on another gas Provision of ventilation This appliance is not connected to a combustion products evacuation device...

Страница 28: ...llowing tools 1 Electric drill 2 Masonry drill bit only required if fitting the cooker on a stone or concrete floor 3 Wall plugs only required if fitting the cooker on a stone or concrete floor 4 Stee...

Страница 29: ...ed in accordance with the manufacturers instructions Allowance should be made for the additional height of the flue trim which is fitted to the cooker hob Surfaces of furniture and walls at the sides...

Страница 30: ...not use the door handles or control knobs to manoeuvre the cooker Fitting the Stability Bracket or Chain Unless otherwise stated a cooker using a flexible gas connector must be secured with a suitabl...

Страница 31: ...ner or socket wrench to turn the adjusting nuts at the front bottom corners of the cooker To set the front turn the feet bases to raise or lower Gas Connection This must be in accordance with the rele...

Страница 32: ...to the correct terminals for your electrical supply type Fig 8 13 and Fig 8 14 Check that the links are correctly fitted and that the terminal screws are tight Secure the mains cable using the cable...

Страница 33: ...INSTALLATION Check the appliance is electrically safe and gas sound when you have finished 29 Removing the drawer Fitting the drawer...

Страница 34: ...b b w or y r r b bk r br br b v y bk w r or w gr y br or y Code Description X05 Left Hand Oven Thermostat X06 Left Hand Oven Multifunction Switch X08 Left Hand Oven Base Element X09 Left Hand Oven Fa...

Страница 35: ...ctor Wok burner 62 4 0 kW 148 4 0 kW 291 g h 103 Rapide Large Burner 40 3 0 kW 134 3 0 kW 218 g h 87 Semi Rapide Medium Burner 32 1 7 kW 109 1 7 kW 124 g h 68 Auxiliary Small Burner 28 1 0 kW 75 1 0 k...

Страница 36: ...tplate energy saving tips Oven energy saving tips Use cookware with a flat base Cook meals together if possible Use the correct size cookware Keep the pre heating time short Use cookware with a lid Do...

Страница 37: ...33 994 604 DEPTH EXCLUDING HANDLES 641 DEPTH INCLUDING HANDLES 604 DEPTH EXCLUDING HANDLES 641 DEPTH INCLUDING HANDLES...

Страница 38: ...s burners 5 Auxiliary Small Burner EE gas burner Semi Rapide Medium Burner EE gas burner 58 Semi Rapide Medium Burner EE gas burner 58 Rapide Large Burner EE gas burner 56 Rapide Large Burner EE gas b...

Страница 39: ...wn Door Multifunction DDD Power conventional Power forced air convection Volume Litres 55 Energy consumption electricity conventional kWh cycle Energy consumption electricity forced air convection kWh...

Страница 40: ...Clarence Street Royal Leamington Spa Warwickshire CV31 2AD England www falconworld com...

Отзывы: